
Модераторы: avalon, Konstantin_stv
-

Алексей KZ
-
- Ответить с цитатой

![]() kwyjibo » Пн ноя 04, 2013 12:58 pm
kwyjibo » Пн ноя 04, 2013 12:58 pm


Алексей KZ писал(а):Здравствуйте, аппарат Xerox 5020, выскакивает ошибка С1 071-100, бумага доходит до регистрации и стопорится. Датчик вроде нормальный, ничего не мешает. Ролики все протирал. С лотка ручной подачи печатает нормально. Кто сталкивался подскажите.
ну по описанию сбоит датчик нижнего лотка… достать, посмотреть контакты, чем и как он на форматер идет…
вообще бы желательно знать, отчего вдруг начала появляться ошибка? что то делалось может с аппаратом? может было замятие и т.п.?
…everything is possible…
-

kwyjibo
- Заправил картридж
-

- Персональный альбом

![]()
- Ответить с цитатой
![]() kwyjibo » Пн ноя 04, 2013 1:20 pm
kwyjibo » Пн ноя 04, 2013 1:20 pm
Алексей KZ писал(а):Может и было что-то, но клиент говорит сам по себе начал так себя вести. Контакты проверил, вроде нормально, нигде обрывов вроде нет
данную модель не ковырял, но посмотрел бы все таки датчик который срабатывает в ошибке… он не оптический случаем там? не запылен? и если есть в другом месте аппарата похожий, то перекинь, посмотри измениться ли ошибка в аппарате?
…everything is possible…
-
kwyjibo
- Заправил картридж
-
- Персональный альбом
![]()
- Ответить с цитатой
![]() kwyjibo » Пн ноя 04, 2013 1:32 pm
kwyjibo » Пн ноя 04, 2013 1:32 pm
Алексей KZ писал(а):К сожалению донора нет, так что неоткуда перекидывать. А так вроде не запылен
Вы меня не поняли… на самом аппарате поищите похожий.. зачастую датчики регистрации в аппаратах одинаковые как на ручной подаче так и на нижнем лотке… поменяйте местами и про наблюдайте ошибку… если ошибка та же — то не в датчике дело и стоит копать в сторону форматера… если же изменилась, то оптопару (или чем он там реализован) под замену…
Последний раз редактировалось kwyjibo Пн ноя 04, 2013 1:43 pm, всего редактировалось 1 раз.
…everything is possible…
-
kwyjibo
- Заправил картридж
-
- Персональный альбом
![]()
![]() Алексей KZ » Ср ноя 06, 2013 2:38 pm
Алексей KZ » Ср ноя 06, 2013 2:38 pm
-
Алексей KZ
-
Вернуться в Гостевой форум
Кто сейчас на форуме
Сейчас этот форум просматривают: нет зарегистрированных пользователей и гости: 11
Современные копировальные аппараты Xerox отличаются качество, надежностью и «быстрым» стартом. Также у них существует множество особенностей, которые отличают их от принтеров других производителей. Например, используется тефлоновый вал, а не термопленка.
Однако избегать различных поломок и ошибок пока не удается ни одному устройству. К самым частым неисправностям у принтеров Xerox относятся: залипание или повреждение датчика бумаги, повреждение роликов подачи, часто требуется перепрошивка программного обеспечения.
Если у вас возникнут вопросы насчет того, как исправить код ошибки копировального аппарата Xerox, то вы можете обратиться к специалистам нашего сервисного центра.

Основные коды ошибок копировальных аппаратов Xerox и способы их устранения:
- Коды ошибок Xerox 1012, 1012(RE)
- Коды ошибок Xerox 1020
- Коды ошибок Xerox 1025
- Коды ошибок Xerox 1035
- Коды ошибок Xerox 1038
- Коды ошибок Xerox 2830
- Коды ошибок Xerox 5011, 5012, 5014
- Коды ошибок Xerox 5016, 5017, 5316, 5317
- Коды ошибок Xerox 5018, 5028
- Коды ошибок Xerox 5312, 5313, 5314
- Коды ошибок Xerox 5318, 5320, 5322
- Коды ошибок Xerox 5328
- Коды ошибок Xerox 5330
- Коды ошибок Xerox 5340, 5343
- Коды ошибок Xerox 5345
- Коды ошибок Xerox 5350, 5352
- Коды ошибок Xerox 5355
- Коды ошибок Xerox 5622
- Коды ошибок Xerox XC520, 540, 560, 580
Xerox 1012, 1012(RE)
| Код ошибки | Описание |
|---|---|
| E1 | Jam between paper feed and fuser |
| E3 | Jam in fuser |
| E5 | Clam shell open |
| E6 | Paper feed section cover is open |
| J1 | Toner cartridge near empty |
| J3 | Drum cartridge not seated properly |
| J7 | Waste toner full (replace drum cartridge) |
| L6 | Key counter out |
| L8 | Exposure area overheat |
| U1 | No clock pulse (drive problem) |
| U2 | Scan problem |
| U3 | Lens/mirror problem (RE model only) |
| U4 | Heat problem |
| U8 | Exposure lamp control circuit problem |
Xerox 1020
| Код ошибки | Описание |
|---|---|
| LL | Probable bad heater lamp |
Xerox 1025
| Код ошибки | Описание |
|---|---|
| A1 | DF jam |
| C1 | PF jam cass. 1 |
| C2 | PF jam cass. 2 |
| C3 | PF jam cass. 3 |
| C9 | Bypass jam |
| E1-1 | Paper jam before exit switch |
| E1-2 | Paper jam |
| E1-5 | Paper jam |
| E1-6 | Paper jam |
| E3-3 | Paper jam at exit switch |
| E3-4 | Paper jam at exit switch |
| E5 | Front door open |
| F1 | Collator jam |
| F5 | Collator interlock |
| F8 | No power to collator |
| F9 | Collator bin home switch |
| J7 | 250 copies since toner waste was full |
| L5 | Original cass. not present after clearing interrupt |
| L6 | Key counter |
| L8 | Platen glass too hot |
| U1 | Main motor clock pulse |
| U2 | Scan problem |
| U3-1 | Lens problem |
| U4-1 | Open thermistor |
| U4-2 | Low temperature |
| U4-4 | Temperature |
| U4-5 | Main PWB |
| U6-1 | Main PWB |
| U6-2 | Main PWB |
| U6-3 | Main board battery |
| U6-4 | Initialization |
| U8 | Exposure lamp |
Xerox 1035
| Код ошибки | Описание |
|---|---|
| A9 | Scanner location |
| C1 | Paper feed — upper cassette |
| C2 | Paper feed — lower cassette |
| C9 | Bypass jam |
| E5 | Clam shell is open |
| L6 | Key counter |
| U1 | Off/On |
| U2 | Optics |
| U4 | Low fuser temperature |
Xerox 1038
| Код ошибки | Описание |
|---|---|
| A1 | DF jam |
| C1 | PF jam cass. 1 |
| C2 | PF jam cass. 2 |
| C3 | PF jam cass. 3 |
| C9 | Bypass jam |
| E1-1 | Paper jam before exit switch |
| E1-2 | Paper jam |
| E1-5 | Paper jam |
| E1-6 | Paper jam |
| E3-3 | Paper jam at exit switch |
| E3-4 | Paper jam at exit switch |
| E5 | Front door open |
| F1 | Collator jam |
| F5 | Collator interlock |
| F8 | No power to collator |
| F9 | Collator bin home switch |
| J7 | 250 copies since toner waste was full |
| L5 | Original cass. not present after clearing interrupt |
| L6 | Key counter |
| L8 | Platen glass too hot |
| U1 | Main motor clock pulse |
| U2 | Scan problem |
| U3-1 | Lens problem |
| U4-1 | Open thermistor |
| U4-2 | Low temperature |
| U4-4 | Temperature |
| U4-5 | Main PWB |
| U6-1 | Main PWB |
| U6-2 | Main PWB |
| U6-3 | Main board battery |
| U6-4 | Initialization |
| U8 | Exposure lamp |
Xerox 2830
| Код ошибки | Описание |
|---|---|
| A9 | Scanner location |
| C1 | Paper feed — upper cassette |
| C2 | Paper feed — lower cassette |
| C9 | Bypass jam |
| E5 | Clam shell is open |
| E5 | Clam shell open |
| L6 | Key counter |
| U1 | Off/On |
| U2 | Optics |
| U4 | Low fuser temperature |
Xerox 5011, 5012, 5014
| Код ошибки | Описание |
|---|---|
| C8 | Bypass jam/no paper |
| C9 | Bypass jam |
| E1 | Jam |
| E3 | Fuser jam |
| E5 | Clamshell open |
| E6 | PF section cover open |
| J1 | Toner cartridge amost empty |
| J3 | Copy cart (drum unit) missing/not seated right |
| J7 | Copy cartridge has run 18,000 copies |
| J8 | Copy cartridge. Improperly seated or possible only one of two fuses in the cartridge blew |
| L6 | Key counter |
| L8 | Exposure glass too hot |
| U1 | Drive problem |
| U2 | Scan problem |
| U3 | Lens or mirror drive problem |
| U4 | Fuser problem. Heat lamp, thermoswitch, SSR, thermistor |
| U6 | Battery on main board |
| U8 | Exposure lamp or exposure lamp circuit |
Xerox 5016, 5017, 5316, 5317
| Code | Description |
|---|---|
| A1-1 | Document feeder feed jam |
| A1-2 | Document feeder belt jam |
| A2-1 | Document feeder exit jam |
| A2-2 | Duplex jam |
| A3 | DAD interlock |
| A5 | Duplex and DAD right side interlock |
| A6 | Copier jams after |
| A9 | Document feed belt drive motor |
| C1-3 | Top cassette misfeed |
| C2-3 | Middle cassette misfeed |
| C3-3 | Bottom cassette misfeed |
| C9-3 | Bypass misfeed |
| E1-11 to E1-14 | Paper jam in machine. Did not reach exit switch soon enough |
| E1-6 | Paper path jam |
| E3-31 to E3-34 | Exit switch jam |
| E3-6 | Fuser jam |
| E5 | Front door interlock |
| E6 | Right side interlock or TTM interlock |
| F1 | Sorter jam |
| F5 | Sorter interlock |
| F8 | Sorter board to copier main board communication problem |
| F9 | Sorter bins |
Xerox 5018, 5028
| Code | Description |
|---|---|
| A1 | Document is ADF |
| A1-8 | Main board received reset signal |
| A2 | ADF jams |
| A6, A7 | ADF jams |
| A9 | ADF jams |
| C1 — C4 | Feed jam |
| C5-1 to C5-4 | Jams in various areas |
| C5-2 | Jams in various areas |
| C5-3 | Jams in various areas |
| C5-4 | Duplex jam |
| E0 | Machine has reset |
| E1 | Jam |
| E1-E0 | Registration jam |
| E1-E5 | Clamshell interlock |
| E1-E6 | Right side interlock |
| E1-E7 | Two tray interlock |
| E1-E8 | Sorter interlock |
| E1-E9 | Copy cartridge interlock |
| E2 | Reset signal happened |
| E3 | Jam |
| E4 | Exit jam |
| E4-10 | Exit jam |
| E4-5 | Clamshell interlock |
| E4-6 | Right side interlock |
| E4-7 | Two tray interlock. Duplex interlock |
| E4-8 | Sorter interlock |
| E4-9 | Copy cartridge interlock |
| E5 | Clamshell interlock |
| E6 | Right side interlock |
| E7 | Duplex interlock |
| E9 | Copy cartridge interlock |
| F3-1 | Sorter bin home switch |
| F3-2 | Sorter cam switch |
| F3-3 | Sorter cam switch |
| J1-1 | Add toner |
| J1-2 | Temporary low toner signal |
| J2-0 | Replace copy cartridge |
| L2 | 2000 copies left on copy cartridge |
| L3 | ADF to machine communication problem |
| L4 (flashing) | 1000 copies left on fuser web |
| rr | Bad EPROM on main board |
| U0 | Main board |
| U2 | Scan problem |
| U2-1 | Scan home |
| U3-00 | Cam drive problem |
| U3-01 | Cam movement slow |
| U3-04 | Main board to duplex communication |
| U3-09 | Cam problem |
| U3-12 | Jogger problem |
| U3-19 | Cam problem |
| U3-21 | Cam problem |
| U3-23 | Cam problem |
| U3-29 | Cam problem |
| U3-32 | Cam problem |
| U3-34 | Cam problem |
| U3-39 | Cam problem |
| U3-43 | Cam problem |
| U3-45 | Cam problem |
| U3-49 | Cam problem |
| U3-54 | Cam problem |
| U3-56 | Cam problem |
| U3-59 | Cam problem |
| U4-1 | Fuser problem. Long warm up |
| U4-2 | Low fuser temperature after warm up |
| U4-3 | High fuser temperature |
| U4-4 | Open fuser thermistor |
| U4-6 | Replace fuser web |
| U4-7 | Thermistor signal problem |
| U7-1 | Copy cartridge belt drive problem |
| U9-3 | Exposure lamp problem |
| U9-4 | Toner motor |
| U9-5 | Problem in warm up |
Xerox 5312, 5313, 5314
| Код ошибки | Описание |
|---|---|
| C1 | Upper paper feed problem. Did not reach feed sensor |
| C2 | Lower paper feed problem. Did not reach feed sensor |
| E1 | Exit jam. Paper did not reach exit sensor |
| E3 | Exit jam. Paper still on exit sensor |
| J1 | Add toner |
| J3 | Copy cartridge (drum unit) not installed |
| J7 | Copy cartridge (drum unit) must be replaced |
| J8 | Copy cartridge (drum unit) problem |
| L6 | Problem with an accessory. Installed but not initialized |
| U1 | Drive problem. Main motor, gear etc. |
| U2 | Scan problem |
| U3 | Main board dip switches wrong. Lens drive problem |
| U4 | Fuser problem. Heat lamp, thermal switch, overheat, thermistor. |
| U6 | EPROM error |
| U8 | Auto exposure sensor. No exposure lamp or weak lamp |
Xerox 5318, 5320, 5322
| Code | Description |
|---|---|
| A1-11 | Original ready switch |
| A1-12 | Feed sensor |
| A1-1 to A1-32 | All indicate a paper path problem, etc. in the ADF |
| A1-21 | Original ready switch and document registration sensor or both the document feed sensor and document registration sensor |
| A1-22 | ADF registration sensor |
| A1-23 | Original did not reach ADF registration sensor quickly enough |
| A1-24 | ADF sensor stuck down too long |
| A1-25 | ADF sensor actuated at the wrong time during single sheet feed |
| A1-26 | ADF sensor not actuated quickly enough in sheet feed mode |
| A1-31 | In reverse, ADF sensor is not actuated soon enough |
| A1-32 | In reverse, ADF sensor is actuated too long |
| A2 | ADF exit problems |
| A2-1 | Original ready sensor and ADF exit switch are actuated or ADF feed in sensor and ADF exit switch are both actuated |
| A2-2 | ADF exit switch |
| A2-3 | ADF exit switch is not actuated on time |
| A3 | Irregular size documents |
| A3-1 | Wrong size original sensed in 1:1 mode |
| A3-2 | Wrong size original sensed in the 2:1 mode |
| A5 | ADF interlock |
| A5 | ADF interlock |
| A6 | ADF single sheet document reset. |
| A6-1 | Reset original |
| A6-2 | Reset sheet feeder |
| A7 | Document cover interlock |
| A8 | ADF exit interlock |
| C1 | Tray 1 jam |
| C1-2 | Paper feed problem in tray 1 |
| C1-3 | Paper does not reach registration |
| C2 | Tray 2 jam |
| C3 | Tray 3 jam |
| C3-1 | Paper feed problem from tray 3 |
| C3-2 | Paper feed problem from tray 3 |
| C3-3 | Paper feed problem from tray 1 |
| C6-1 | Duplex paper feed problem |
| C6-2 | Duplex and/or tray 1 paper feed problem |
| C6-3 | Paper feed problem from tray 1 |
| C7-1 | Paper feed problem from HCF |
| C7-2 | Paper feed problem from HCF on tray 1 |
| C7-3 | Paper feed problem from tray 1 |
| C8 | Paper stays in tray or duplex or HCF |
| C8-1 | Paper on tray 1 feed sensor |
| C8-2 | Paper on tray 2 feed sensor |
| C8-3 | Paper on tray 3 feed sensor |
| C8-4 | Paper on HCF feed sensor |
| C8-5 | Paper in duplex section |
| C9 | Bypass feed problem |
| C9-3 | Paper from bypass did not reach registration sensor quickly enough |
| E1-10 to E1-25 | Internal jam |
| E1-6 | Paper on registration sensor |
| E2 | Reset signal happened. Might read E-2 something else. |
| E3-30 to E4-14 | Exit jam |
| E3-30 to E3-35 | Exit switch actuated too long |
| E3-6 | Exit jam |
| E3-6 | Paper on exit switch |
| E4-10 to E4-14 | Inverter sensor not actuated. |
| E4-10 to E4-45 | Paper did not reach inverter switch soon enough |
| E4-15 | Inverter sensor |
| E4-40 to E4-45 | Duplex entry sensor |
| E4-6 | Paper on inverter switch |
| E4-6 | Inverter sensor |
| E5 | Front door interlock |
| E6-1 | Tray 1 interlock |
| E6-2 | 2 tray or duplex interlock |
| E6-3 | HCF interlock |
| E7-2 | Duplex inverter interlock |
| E7-3 | Duplex interlock |
| E8-10 to E8-15 | Paper on duplex feed sensor is not actuated soon enough |
| E8-6 | Paper in duplex |
| E8-6 to E8-15 | Duplex entry sensor |
| F1-1 | Paper did not reach sorter |
| F1-2 | Paper stayed on sorter feed sensor |
| F1-6 | Sorter exit sensor |
| F3 | Paper size not available for sort/stack |
| F5 | Sorter interlock |
| H2-1 | Communication problem between main board and duplex board |
| H2-2 | Side guard sensor problem |
| H3-1 | Communication problem between main board and HCF |
| H3-2 | Upper limit sensor problem on HCF |
| H6-1 | ADF size sensor |
| H6-2 | ADF nudgeer sensor |
| H6-3 | Belt drive motor does not have 24 volts. Black toner is empty, but 100 copies have been run without changing toner |
| J1 | Black toner is empty, but 100 copies have been run without changing toner |
| J3 | Replace copy cartridge |
| J3 | No copy cartridge (drum unit) |
| J7 | Copy cartrige must be replaced |
| J8-1 | Wrong copy cartridge installed |
| J8-2 | Copy cartridge EEPROM must be changed |
| L6 | Auditron or other counter problem |
| L6 | Key counter not installed |
| L8 | Platen glass temperature is too high |
| L9 | Communication problem between interimage erase/edge lamps and main board |
| U1-1 | Main motor drive problem |
| U2-1 | Scan home problem |
| U2-1 to U2-4 | Scan home sensor |
| U2-2 | Scan home problem or optics problem |
| U2-3, U2-4 | Scan home problem |
| U3-1 | Lens sensor problem |
| U4-1 | Fuser thermistor open |
| U4-2 | Fuser did not warm up properly |
| U4-3 | Fuser temperature too high |
| U4-4 | Fuser problem. Staying on too long |
| U4-6 | High fuser temperature |
| U5-1 | Sorter bin home switch not activated |
| U5-2 | Sorter bin home switch stayed actuated |
| U5-3 | Sorter bin home switch |
| U5-4 | Sorter bin home switch |
| U6-1 | ROM problem |
| U6-2 | RAM problem |
| U6-3 | Low battery |
| U6-4 | Incorrect value in NVM. Reinitialize main board with code 20-96 |
| U8-1 | Exposure lamp problem |
| U8-2 | Communication problem main board and exposure board |
| U8-3 | Exposure lamp or exposure lamp board problem |
| U8-4 to U8-6 | Problem with exposure lamp, lamp sensor, lamp board |
Xerox 5328
| Code | Description |
|---|---|
| A1 | Document in ADF |
| A1-8 | Main board received reset signal |
| A2 | ADF jams |
| A6 | ADF registration jam |
| A7 | ADF interlock |
| A9 | Tray 1 jam |
| C1 | Tray 2 jam |
| C2 | Tray 3 jam |
| C3 | Bypass feed jams |
| C4 | Machine has reset |
| E1 | Jam |
| E1-5 | Clamshell interlock |
| E1-6 | Right side interlock |
| E1-7 | Two tray interlock, or duplex interlock |
| E1-8 | Sorter interlock |
| E1-9 | Copy cartridge interlock |
| E1 or E1-0 | Registration jam |
| E2 | Reset signal happened |
| E3 | Jam in transfer area |
| E4 | Exit jam |
| E4-0 | Exit jam |
| E4-5 | Clamshell interlock |
| E4-6 | Right side interlock |
| E4-7 | Two tray interlock |
| E4-8 | Sorter interlock |
| E4-9 | Copy cartridge interlock |
| E5 | Clamshell interlock |
| E6 | Right side interlock |
| E9 | Copy cartridge interlock |
| F3-1 | Sorter bin home switch |
| F3-2 | Sorter cam switch |
| F3-3 | Sorter cam switch |
| F5 | Sorter interlock |
| J1-1 | Add toner |
| J1-2 | Temporary low toner signal |
| J2-1, J2-2 | Replace copy cartridge |
| J5, J6 | ADF to machine communications problem |
| L2 | 2000 copies left on cartridge |
| L3 | ADF to machine communications problem |
| L4 | (flashing) 1000 copier left on fuser web |
| L6 | Auditron or other counter problem |
| LL | Main board. Try simulation 1.1 to initialize |
| rc | Wrong operation panel installed |
| rr | Bad EPROM on main board. Try 1.1 |
| U0 | Main board |
| U2 | Scan problem |
| U2-1 | Scan home |
| U2-2 | Scan home or scan encoder |
| U2-4 | Scan home or scan dual page sensor |
| U2-7 | Scan home |
| U4-1 | Fuser problem. Long warm up |
| U4-2 | Low fuser temperature after warm up |
| U4-3 | High fuser temperature |
| U4-4 | Open fuser thermistor |
| U4-6 | Replace fuser web. |
| U4-7 | Thermistor signal problem |
| U7-1 | Copy cartridge belt drive problem |
| U9-3 | Exposure lamp problem |
| U9-4 | Toner motor |
| U9-5 | Problem in warm-up |
Xerox 5330
| Code | Description |
|---|---|
| A1-1 to A1-32 | All indicate a paper path problem, etc. in the ADF. |
| A2 | ADF exit problems |
| A3 | Irregular size documents |
| A5 | ADF interlock |
| A6 | ADF single sheet document reset. |
| A7 | Platen interlock |
| A8 | ADF exit interlock |
| C1 | Tray 1 jam |
| C2 | Tray 2 jam |
| C3 | Tray 3 jam |
| C6-1, C6-2 | Jams related to duplex |
| C6-3 | Registration sensor, re tray 1 |
| C7-1, C7-2 | HCF feed problems |
| C7-3 | Tray 1 feed problem |
| C8 | Paper stays in tray or duplex or HCF |
| C9 | Bypass feed problem |
| E1-10 to E1-25 | Internal jam |
| E1-6 | Paper on registration sensor |
| E2 | Reset signal happened. Might read E-2 something else. |
| E3-30 to E4-14 | Exit jam |
| E3-6 | Exit jam |
| E4-10 to E4-14 | Inverter sensor not actuated. |
| E4-15 | Inverter sensor |
| E4-40 to E4-45 | Duplex entry sensor |
| E4-6 | Inverter sensor |
| E5 | Front door interlock |
| E6-1 | Tray 1 interlock |
| E6-2 | 2 tray or duplex interlock |
| E6-3 | HCF interlock |
| E7-2, E7-3 | Duplex interlock |
| E8-6 to E8-15 | Duplex entry sensor |
| F1-1 | Sorter entry sensor |
| F1-6 | Sorter exit sensor |
| F3 | Paper size not available for sort/stack |
| F5 | Sorter interlock |
| J1 | Add toner |
| J3 | Replace copy cartridge |
| J7 | Replace copy cartridge |
| J8-1 | Wrong copy cartridge installed |
| J8-2 | Copy cartridge EEPROM |
| L6 | Auditron or other counter problem |
| L8 | Platen glass temperature is too high |
| L9 | Communication problem between interimage erase/edge lamps and main board |
| U1-1 | Main motor drive problem |
| U2-1 to U2-4 | Scan home sensor |
| U3-1 | Lens sensor |
| U4-1 | Open fuser thermistor |
| U4-2 | Fuser did not warm up properly |
| U4-3 | Fuser temperature too high |
| U4-4 | Fuser problem. Staying on too long |
| U4-6 | High fuser temperature |
| U5-1 | Sorter bin home switch not activated |
| U5-2 | Sorter bin home switch stayed actuated |
| U5-3 | Sorter bin home switch |
| U5-4 | Sorter bin home switch |
| U6-1 | ROM problem |
| U6-2 | RAM problem |
| U6-3 | Low battery |
| U6-4 | Incorrect value in NVM. Reinitialize main board with code 20-96 |
| U8-1 to U8-6 | Problem with exposure lamp, lamp sensor, lamp board |
Xerox 5340, 5343
| Code | Description |
|---|---|
| 00-009; 030 to 033 | A door was opened while paper was being fed |
| 00-047 | Paper in duplex |
| 00-1 | Auditron |
| 00-2 | Diagnostic error |
| 00-3 | Faults error |
| 00-4 | Ric error |
| 00-5 | Job manager system error |
| 00-6 | LLM interface |
| 00-7 | Standby error |
| 00-8 | Communications error |
| 00-9 | Xerographic error |
| 01-300 | Front interlock |
| 01-310 | Right upper interlock |
| 01-315 | Left upper interlock |
| 01-320 | Left lower interlock |
| 01-325 | Fuser interlock |
| 02-910 | Key counter missing |
| 02-920 | Wrong combination of accessories |
| 03-321, 322, 326, 327 | LLM to ISIL communications problems |
| 03-328 | IOT communications problem with duplex or tray 4 |
| 03-330 | IOT communications problems with HCF |
| 03-335, 03-336 | LLM communications problems with edit |
| 03-340 | NVM memory |
| 03-341, 03-347 | Communications problems between IOT and sorter |
| 03-350, 03-354 | Communications problem with LLM and user interface |
| 03-363, 03-364 | Communications problem between LLM & optics |
| 03-370, 03-373 | Communications problem between LLM & DADF |
| 03-380, 384 | |
| 03-416, 03-422 | RAM memory problem |
| 03-424, 426 | NVM memory problem |
| 03-430, 432 | Billing problem |
| 03-439 | GRAIB communications problem |
| 03-440 | RIC communications problem |
| 03-441 | RIC NVM problem |
| 03-442 | Modem |
| 03-443, 03-458 | RIC problems |
| 03-460 | Serial communications processor problem |
| 04-300 | Main motor or drive problem |
| 05-100, 05-108 | DADF registration sensor |
| 05-110 | DADF exit sensor |
| 05-115, 120 | DADF jams |
| 05-305 | DADF document drive |
| 05-310, 312 | DADF document sensor |
| 05-316 | DADF registration sensor jam |
| 05-325 | DADF exit sensor |
| 05-335, 341, 345 | DADF interlock switches |
| 06-300, 06-310 | Scan problems |
| 06-315 | Scan drive |
| 06-320A, 320B, 320C, 325 | Scan problem |
| 06-330 | Lens drive |
| 06-340 | Exposure control problem |
| 06-342 | LLM CPU problem |
| 06-344, 06-350 | Exposure cvontrol problem |
| 06-352 | IOT CPU problem |
| 07-300, 315, 330, 345 | Tray faults |
| 07-360, 07-370 | HCF problems |
| 07-375, 380A, 380B | Duplex problems |
| 08-100, 08-110 | Feed problems. Lead edge of copy paper is late getting to feed sensor of tray 1 |
| 08-115, 08-162 | Feed problem. Lead edge of copy paper is late getting to registration sensor |
| 08-165 | Paper jam at registration sensor |
| 08-310, 08-370 | Paper at a sensor when power is turned on |
| 08-330 | DADF nudger sensor |
| 08-380 | Registration side to side problem with home position |
| 08-390 | Nip |
| 09-300 | Copy cartridge finished (drum unit) |
| 09-310 | Add black toner Add color toner |
| 09-320 | Add color toner |
| 09-330 | Wrong copy cartridge (wrong drum unit) |
| 09-340 | Drum cartridge not installed properly |
| 09-350 | Waste toner full |
| 100 | A fault has occurred |
| 10-100 | Exit jam |
| 10-105 | Exit jam |
| 10-110 | Vertical sensor jam |
| 10-120, 122, 125 | Duplex jam |
| 10-150, 155 | Too much or not enough paper in duplex tray |
| 10-300 | Fuser thermistor |
| 10-302 | Low fuser temperature |
| 10-304 | Bad fuser temp |
| 10-308 | High fuser temperature or open thermistor |
| 10-310 | High fuser temperature |
| 10-312 | Fuser not up to temperature after energy save |
| 10-314 | Fuser problem |
| 10-320 | Fuser web finished |
| 10-330, 335, 340 | Exit switch, vertical sensor switch actuated when power is turned on |
| 11-100, 11-116 | Sorter jam |
| 11-150, 11-176 | Sorter auto stapler jam |
| 11-310, 314, 316 | Sorter interlock |
| 11-325A, B, C, D, E, F, G | Sorter index |
| 11-352, 354, 356 | Sorter auto stapler interlocks |
| 11-365A, B, C, D, E | Sorter auto stapler bin |
| 11-370, 371, 372A, 373A, 373B, 374 | Sorter auto stapler staple failure, staple home problem or tamper home problem |
| 11-385A, 385B, 390A,B,C,D,E, 396A | Sorter auto stapler staple failure, staple home problem or tamper home problem |
| 301 | Fuser web must be replaced |
| 302 | Copy cartridge (drum unit) must be replaced |
| 501 | Tray 1 must be rebuilt |
| 502 | Tray 2 must be rebuilt |
| 503 | Tray 3 must be rebuilt |
| 504 | Tray 4 must be rebuilt |
| 505 | HCF must be rebuilt |
| 506 | Bypass must be rebuilt |
| 507 | Duplex unit must be rebuilt |
| 508 | Replace black developer |
| 509 | Replace red developer |
| 510 | Replace green developer |
| 512 | Replace brown developer |
| 513 | Copy cartridge (drum unit) will need replacing soon |
| 514 | Fuser web will need replacing soon |
| 515 | DADF belt should be replaced |
| 516 | DADF feed rollers should be replaced |
| 517 | Replace exposure lamp |
| 518 | Replace suction filter |
| 519 | Replace ozone filter |
| 520 | Replace optics filter |
| 521 | Replace particle filter |
| 522 | Replace upper fuser roller |
| 523 | Replace fuser pawls |
| 524 | Replace pressure roller |
| 525 | Replace pressure roller pawls |
| 900-905 | Key operator calls |
Xerox 5345
| Код ошибки | Описание |
|---|---|
| 01-01 | Frequency monitoring and zero cross problem |
| 01-02 | Interlock |
| 01-03 | AC power problem |
| 01-04 | Finisher interlock |
| 01-05 | 24v problem |
| 03-01 | Optics to main board communication problem |
| 03-02 | Software reset problem |
| 03-03 | Could be punched holes in the lead edge of the original |
| 03-04 | Software problem |
| 03-06 | Low battery |
| 03-07 | NVM not initialized or is missing or defective |
| 03-17 | Communication problem between main board and finisher board |
| 03-18 | Initializes one NVM counter to agree to others |
| 03-19 | All three NVM counter to agree with others |
| 03-20 | Main board/interface board problems |
| 03-21 | Problem with RIC NVM |
| 03-22 | RIC modem problem |
| 03-23 | RIC real time clock failure. |
| 03-25 | RIC NVM problem or not initialized |
| 03-27 | NVM problem |
| 03-28 | Watchdog software problem |
| 03-29 | Microprocessor crystal not at correct frequency |
| 03-30 | No software response from finisher after 20 seconds have elapsed |
| 06-01 | Lens did not reach 1.1 position |
| 06-02 | 1/2 rate scanner problem |
| 06-03 | Scan home problem |
| 06-04 | Scan home problem |
| 06-05 | Scan home problem |
| 06-06 | Scan encoder |
| 06-07 | Scan encoder |
| 06-08 | Scan drive boost |
| 06-09 | Scan encoder |
| 06-11 | Scan encoder pulse phases |
| 06-12 | Insufficient scan damping |
| 07-01 | Duplex tray not home during duplexing |
| 07-02 | Tray 2 not home when selected |
| 07-13 | Tray 2 height sensor problem |
| 07-15 | Tray 2 empty |
| 07-16 | Tray 1 door open |
| 07-18 | Tray 1 stack sensor |
| 07-22 | Tray 1 empty |
| 07-26 | Tray 1 bypass switch actuated too long |
| 07-27 | Tray 1 bypass switch deactuated too early |
| 07-30 | Paper in duplex |
| 07-31 | Paper in duplex |
| 07-32 | Duplex tray empty, when paper should be there |
| 08-10 | Paper did not reach tray 2 input tray sensor |
| 08-11 | Paper did not reach duplex input sensor |
| 08-12 | Paper did not reach tray 1 |
| 08-14 | Paper did not leave tray 2 input sensor quickly enough |
| 08-18 | Trail edge did not reach tray 2 input sensor quickly enough |
| 08-19 | Trail edge did not reach tray 1 input sensor quickly enough |
| 08-20 | Paper in duplex |
| 08-21 | Paper in tray 2 input |
| 08-22 | Paper in tray 2 or duplex at wrong time |
| 08-23 | Paper at tray 1 input at wrong time |
| 08-24 | Paper in tray 1 at wrong time |
| 08-28 | Upper and lower nips problem |
| 09-08 | Low toner condition |
| 09-12 | Drum signals are out of range |
| 09-13 | Unstable drum patch readings |
| 09-15 | Patch is too dark |
| 09-16 | Patch is too light |
| 09-17 | Open toner container access cover |
| 09-18 | Low toner level |
| 09-21 | Low toner sensor disconnected |
| 09-22 | Low toner condition, even after machine has been theoretically, adding toner |
| 10-02 | Low fuser temperature |
| 10-03 | High fuser temperature |
| 10-06 | Paper did not reach out put switch |
| 10-07 | Paper stayed on output switch |
| 10-10 | Paper did not reach decurler sensor |
| 10-11 | Paper did not reach decurler sensor |
| 10-12 | Paper on decurler sensor |
| 10-13 | Paper did not reach duplex entry sensor in time |
| 10-14 | Paper did not reach duplex entry sensor in time |
| 10-15 | Paper on entry sensor at wrong time |
| 10-17 | Fuser temperature is too high and fuser relay has deactuated |
| 12-01 | Paper at finisher input sensor |
| 12-02 | Paper did not reach finisher |
| 12-03 | Paper reached finisher too soon |
| 12-05 | Paper at stapler |
| 12-06 | Paper at stapler |
| 12-07 | Paper did not reach stapler |
| 12-08 | Paper did not reach stapler |
| 12-10 | Complied motor not working properly |
| 12-15 | Eject motor problem and/or eject encoder |
| 12-20 | Stacker motor problem |
| 12-21 | Stacker interlock |
| 12-22 | Stacker bottom sensor |
| 12-23 | Stacker bottom sensor |
| 12-24 | Stacker bottom sensor senses full |
| 12-25 | Stack height sensor |
| 12-26 | Stack height sensor |
| 12-27 | Stack height sensor |
| 12-30 | Offset home sensor |
| 12-31 | Offset home sensor |
| 12-32 | OCT switch |
| 12-35 | Eject nip carriage |
| 12-36 | Eject cam interlock |
| 12-37 | Eject nip carriage open timing |
| 12-38 | Eject cam interlock |
| 12-40 | Tamper motor |
| 12-41 | Tamper home problem |
| 12-42 | Tamper home sensor |
| 12-43 | Staple load sensor |
| 12-44 | Tamper home sensor |
| 12-45 | Tamper home sensor |
| 12-50 | Low on staples |
| 12-51 | Stapler home sensor |
| 12-52 | Stapler home sensor |
| 12-53 | Eject cam interlock |
| 33-37 | Too few documents |
| 55-01 | RDH interlock switch open during use |
| 55-04 | Paper on bypass sensor |
| 55-05 | Paper at vacuum timing sensor |
| 55-06 | Paper on output sensor |
| 55-10 | No paper reached S31 |
| 55-20 | Paper did not leave S31 at correct time |
| 55-24 | Set counter arm problem |
| 55-25 | Documents in input tray not detected |
| 55-27 | Lead edge did not reach S35 at correct time |
| 55-2955-30 | Trail edge did not reach S35 at correct time |
| 55-31 | S32, ADF registration sensor did not see paper at correct time |
| 55-32 | S32 did not see trail edge at correct time |
| 55-33 | S36 One too many documents |
| 55-36 | One too many documents |
| 55-39 | Hole count problem on document feeder belt |
| 55-40 | Document belt travel problem |
| 55-41 | Document belt mistracking or skewing |
| 55-45 | Paper at inverter sensor |
| 55-47 | Inverter sensor did not see paper lead edge at correct time |
| 55-49 | More than 50 sheets in input tray |
| 55-50 | Right side interlock |
| 55-51 | Left side interlock |
| 55-55 | Document on glass |
| 93-93 | NVM has to be initialized after new software installed |
Xerox 5350, 5352
| Code | Description |
|---|---|
| 00-009, 030, 031, 032, 033 | A door was opened while paper was being fed |
| 00-047 | Paper in duplex |
| 00-1 | Auditron |
| 00-2 | Diagnostic error |
| 00-3 | Faults error |
| 00-4 | Ric error |
| 00-5 | Job manager system error |
| 00-6 | LLM interface |
| 00-7 | Standby error |
| 00-8 | Communications error |
| 00-9 | Xerographic error |
| 01-300 | Front interlock |
| 01-310 | Right upper interlock |
| 01-315 | Left upper interlock |
| 01-320 | Left lower interlock |
| 01-325 | Fuser interlock |
| 02-910 | Key counter missing |
| 02-920 | Wrong combination of accessories |
| 03-321, 322, 326, 327 | LLM to ISIL communications problems |
| 03-328 | IOT communications problem with duplex or tray 4 |
| 03-330 | IOT communications problems with HCF |
| 03-335, 336 | LLM communications problems with edit |
| 03-340 | NVM memory |
| 03-341-347 | Communications problems between IOT and sorter |
| 03-350-354 | Communications problem with LLM and user interface |
| 03-363, 364 | Communications problem between LLM & optics |
| 03-370-03-373 | Communications problem between LLM & DADF |
| 03-380, 384 | |
| 03-416-422 | RAM memory problem |
| 03-424, 426 | NVM memory problem |
| 03-430, 432 | Billing problem |
| 03-439 | GRAIB communications problem |
| 03-440 | RIC communications problem |
| 03-441 | RIC NVM problem |
| 03-442 | Modem |
| 03-443-458 | RIC problems |
| 03-460 | Serial communications processor problem |
| 04-300 | Main motor or drive problem |
| 05-100-108 | DADF registration sensor |
| 05-110 | DADF exit sensor |
| 05-115, 120 | DADF jams |
| 05-305 | DADF document drive |
| 05-310, 312 | DADF document sensor |
| 05-316 | DADF registration sensor jam |
| 05-325 | DADF exit sensor |
| 05-335, 341, 345 | DADF interlock switches |
| 06-300-310 | Scan problems |
| 06-315 | Scan drive |
| 06-320A, 320B, 320C, 325 | Scan problem |
| 06-330 | Lens drive |
| 06-340 | Exposure control problem |
| 06-342 | LLM CPU problem |
| 06-344-350 | Exposure cvontrol problem |
| 06-352 | IOT CPU problem |
| 07-300, 315, 330, 345 | Tray faults |
| 07-360-370 | HCF problems |
| 07-375, 380A, 380B | Duplex problems |
| 08-100-110 | Feed problems. Lead edge of copy paper is late getting to feed sensor of tray 1 |
| 08-115-162 | Feed problem. Lead edge of copy paper is late getting to registration sensor |
| 08-165 | Paper jam at registration sensor |
| 08-310-370 | Paper at a sensor when power is turned on |
| 08-330 | DADF nudger sensor |
| 08-380 | Registration side to side problem with home position |
| 08-390 | Nip |
| 09-300 | Copy cartridge finished (drum unit) |
| 09-310 | Add black toner Add color toner |
| 09-320 | Add color toner |
| 09-330 | Wrong copy cartridge (wrong drum unit) |
| 09-340 | Drum cartridge not installed properly |
| 09-350 | Waste toner full |
| 100 | A fault has occurred |
| 10-100 | Exit jam |
| 10-105 | Exit jam |
| 10-110 | Vertical sensor jam |
| 10-120, 122, 125 | Duplex jam |
| 10-150, 155 | Too much or not enough paper in duplex tray |
| 10-300 | Fuser thermistor |
| 10-302 | Low fuser temperature |
| 10-304 | Bad fuser temp |
| 10-308 | High fuser temperature or open thermistor |
| 10-310 | High fuser temperature |
| 10-312 | Fuser not up to temperature after energy save |
| 10-314 | Fuser problem |
| 10-320 | Fuser web finished |
| 10-330, 335, 340 | Exit switch, vertical sensor switch actuated when power is turned on |
| 11-100-116 | Sorter jam |
| 11-150-176 | Sorter auto stapler jam |
| 11-310, 314, 316 | Sorter interlock |
| 11-325A,B,C,D,E,F,G | Sorter index |
| 11-352, 354, 356 | Sorter auto stapler interlocks |
| 11-365A,B,C,D,E | Sorter auto stapler bin |
| 11-370,371,372A,373A,373B,374 | Sorter auto stapler staple failure, staple home problem or tamper home problem |
| 11-385A,385B,390A,B,C,D,E,396A | Sorter auto stapler staple failure, staple home problem or tamper home problem |
| 301 | Fuser web must be replaced |
| 302 | Copy cartridge (drum unit) must be replaced |
| 501 | Tray 1 must be rebuilt |
| 502 | Tray 2 must be rebuilt |
| 503 | Tray 3 must be rebuilt |
| 504 | Tray 4 must be rebuilt |
| 505 | HCF must be rebuilt |
| 506 | Bypass must be rebuilt |
| 507 | Duplex unit must be rebuilt |
| 508 | Replace black developer |
| 509 | Replace red developer |
| 510 | Replace green developer |
| 512 | Replace brown developer |
| 513 | Copy cartridge (drum unit) will need replacing soon |
| 514 | Fuser web will need replacing soon |
| 515 | DADF belt should be replaced |
| 516 | DADF feed rollers should be replaced |
| 517 | Replace exposure lamp |
| 518 | Replace suction filter |
| 519 | Replace ozone filter |
| 520 | Replace optics filter |
| 521 | Replace particle filter |
| 522 | Replace upper fuser roller |
| 523 | Replace fuser pawls |
| 524 | Replace pressure roller |
| 525 | Replace pressure roller pawls |
| 900-905 | Key operator calls |
Xerox 5355
| Код ошибки | Описание |
|---|---|
| 01-01 | Frequency monitoring and zero cross problem |
| 01-02 | Interlock |
| 01-03 | AC power problem |
| 01-04 | Finisher interlock |
| 01-05 | 24v problem |
| 03-01 | Optics to main board communication problem |
| 03-02 | Software reset problem |
| 03-03 | Could be punched holes in the lead edge of the original |
| 03-04 | Software problem |
| 03-06 | Low battery |
| 03-07 | NVM not initialized or is missing or defective |
| 03-17 | Communication problem between main board and finisher board |
| 03-18 | Initializes one NVM counter to agree to others |
| 03-19 | All three NVM counter to agree with others |
| 03-20 | Main board/interface board problems |
| 03-21 | Problem with RIC NVM |
| 03-22 | RIC modem problem |
| 03-23 | RIC real time clock failure. |
| 03-25 | RIC NVM problem or not initialized |
| 03-27 | NVM problem |
| 03-28 | Watchdog software problem |
| 03-29 | Microprocessor crystal not at correct frequency |
| 03-30 | No software response from finisher after 20 seconds have elapsed |
| 06-01 | Lens did not reach 1.1 position |
| 06-02 | 1/2 rate scanner problem |
| 06-03 | Scan home problem |
| 06-04 | Scan home problem |
| 06-05 | Scan home problem |
| 06-06 | Scan encoder |
| 06-07 | Scan encoder |
| 06-08 | Scan drive boost |
| 06-09 | Scan encoder |
| 06-11 | Scan encoder pulse phases |
| 06-12 | Insufficient scan damping |
| 07-01 | Duplex tray not home during duplexing |
| 07-02 | Tray 2 not home when selected |
| 07-13 | Tray 2 height sensor problem |
| 07-15 | Tray 2 empty |
| 07-16 | Tray 1 door open |
| 07-18 | Tray 1 stack sensor |
| 07-22 | Tray 1 empty |
| 07-26 | Tray 1 bypass switch actuated too long |
| 07-27 | Tray 1 bypass switch deactuated too early |
| 07-30 | Paper in duplex |
| 07-31 | Paper in duplex |
| 07-32 | Duplex tray empty, when paper should be there |
| 08-10 | Paper did not reach tray 2 input tray sensor |
| 08-11 | Paper did not reach duplex input sensor |
| 08-12 | Paper did not reach tray 1 |
| 08-14 | Paper did not leave tray 2 input sensor quickly enough |
| 08-18 | Trail edge did not reach tray 2 input sensor quickly enough |
| 08-19 | Trail edge did not reach tray 1 input sensor quickly enough |
| 08-20 | Paper in duplex |
| 08-21 | Paper in tray 2 input |
| 08-22 | Paper in tray 2 or duplex at wrong time |
| 08-23 | Paper at tray 1 input at wrong time |
| 08-24 | Paper in tray 1 at wrong time |
| 08-28 | Upper and lower nips problem |
| 09-08 | Low toner condition |
| 09-12 | Drum signals are out of range |
| 09-13 | Unstable drum patch readings |
| 09-15 | Patch is too dark |
| 09-16 | Patch is too light |
| 09-17 | Open toner container access cover |
| 09-18 | Low toner level |
| 09-21 | Low toner sensor disconnected |
| 09-22 | Low toner condition, even after machine has been theoretically, adding toner |
| 10-02 | Low fuser temperature |
| 10-03 | High fuser temperature |
| 10-06 | Paper did not reach out put switch |
| 10-07 | Paper stayed on output switch |
| 10-10 | Paper did not reach decurler sensor |
| 10-11 | Paper did not reach decurler sensor |
| 10-12 | Paper on decurler sensor |
| 10-13 | Paper did not reach duplex entry sensor in time |
| 10-14 | Paper did not reach duplex entry sensor in time |
| 10-15 | Paper on entry sensor at wrong time |
| 10-17 | Fuser temperature is too high and fuser relay has deactuated |
| 12-01 | Paper at finisher input sensor |
| 12-02 | Paper did not reach finisher |
| 12-03 | Paper reached finisher too soon |
| 12-05 | Paper at stapler |
| 12-06 | Paper at stapler |
| 12-07 | Paper did not reach stapler |
| 12-08 | Paper did not reach stapler |
| 12-10 | Complied motor not working properly |
| 12-15 | Eject motor problem and/or eject encoder |
| 12-20 | Stacker motor problem |
| 12-21 | Stacker interlock |
| 12-22 | Stacker bottom sensor |
| 12-23 | Stacker bottom sensor |
| 12-24 | Stacker bottom sensor senses full |
| 12-25 | Stack height sensor |
| 12-26 | Stack height sensor |
| 12-27 | Stack height sensor |
| 12-30 | Offset home sensor |
| 12-31 | Offset home sensor |
| 12-32 | OCT switch |
| 12-35 | Eject nip carriage |
| 12-36 | Eject cam interlock |
| 12-37 | Eject nip carriage open timing |
| 12-38 | Eject cam interlock |
| 12-40 | Tamper motor |
| 12-41 | Tamper home problem |
| 12-42 | Tamper home sensor |
| 12-43 | Staple load sensor |
| 12-44 | Tamper home sensor |
| 12-45 | Tamper home sensor |
| 12-50 | Low on staples |
| 12-51 | Stapler home sensor |
| 12-52 | Stapler home sensor |
| 12-53 | Eject cam interlock |
| 33-37 | Too few documents |
| 55-01 | rdh interlock switch open during use |
| 55-04 | Paper on bypass sensor |
| 55-05 | Paper at vacuum timing sensor |
| 55-06 | Paper on output sensor |
| 55-10 | No paper reached S31 |
| 55-20 | Paper did not leave S31 at correct time |
| 55-24 | Set counter arm problem |
| 55-25 | Documents in input tray not detected |
| 55-27 | Lead edge did not reach S35 at correct time |
| 55-2955-30 | Trail edge did not reach S35 at correct time |
| 55-31 | S32, ADF registration sensor did not see paper at correct time |
| 55-32 | S32 did not see trail edge at correct time |
| 55-33 | S36 One too many documents |
| 55-36 | One too many documents |
| 55-39 | Hole count problem on document feeder belt |
| 55-40 | Document belt travel problem |
| 55-41 | Document belt mistracking or skewing |
| 55-45 | Paper at inverter sensor |
| 55-47 | Inverter sensor did not see paper lead edge at correct time |
| 55-49 | More than 50 sheets in input tray |
| 55-50 | Right side interlock |
| 55-51 | Left side interlock |
| 55-55 | Document on glass |
| 93-93 | NVM has to be initialized after new software installed |
Xerox XC520, 540, 560, 580
| Код ошибки | Описание |
|---|---|
| H2 | Fuser thermistor |
| H3 | Fuser temperature too high. Must be reset in diagnostics |
| H4 | Fuser temperature too low. Must be reset in diagnostics |
| L3 | Scan problem |
| L4 | Min motor drive problem |
| L8 | Exposure lamp not lightning or not enough light reaching auto exposure sensor |
| P | Paper did not feed |
Xerox 5622
| Code | Description |
|---|---|
| A1-1 to A1-32 | All indicate a paper path problem, etc. in the ADF |
| A2 | ADF exit problems |
| A3 | Irregular size documents |
| A5 | ADF interlock |
| A6 | ADF single sheet document reset |
| A7 | Platen interlock |
| A8 | ADF exit interlock |
| C1 | Tray 1 jam |
| C2 | Tray 2 jam |
| C3 | Tray 3 jam |
| C6-1, C6-2 | Jams related to duplex |
| C6-3 | Registration sensor, re tray 1 |
| C7-1, C7-2 | HCF feed problems |
| C7-3 | Tray 1 feed problem |
| C8 | Paper stays in tray or duplex or HCF |
| C9 | Bypass feed problem |
| E1-10 to E1-25 | Internal jam |
| E1-6 | Paper on registration sensor |
| E2 | Reset signal happened. Might read E-2 something else |
| E3-30 to E4-14 | Exit jam |
| E3-6 | Exit jam |
| E4-10 to E4-14 | Inverter sensor not actuated |
| E4-15 | Inverter sensor |
| E4-40 to E4-45 | Duplex entry sensor |
| E4-6 | Inverter sensor |
| E5 | Front door interlock |
| E6-1 | Tray 1 interlock |
| E6-2 | 2 tray or duplex interlock |
| E6-3 | HCF interlock |
| E7-2, E7-3 | Duplex interlock |
| E8-6 to E8-15 | Duplex entry sensor |
| F1-1 | Sorter entry sensor |
| F1-6 | Sorter exit sensor |
| F3 | Paper size not available for sort/stack |
| F5 | Sorter interlock |
| J1 | Add toner |
| J3 | Replace copy cartridge |
| J7 | Replace copy cartridge |
| J8-1 | Wrong copy cartridge installed |
| J8-2 | Copy cartridge EEPROM |
| L6 | Auditron or other counter problem |
| L8 | Platen glass temperature is too high |
| L9 | Communication problem between interimage erase/edge lamps and main board |
| U1-1 | Main motor drive problem |
| U2-1 to U2-4 | Scan home sensor |
| U3-1 | Lens sensor |
| U4-1 | Open fuser thermistor |
| U4-2 | Fuser did not warm up properly |
| U4-3 | Fuser temperature too high |
| U4-4 | Fuser problem. Staying on too long |
| U4-6 | High fuser temperature |
| U5-1 | Sorter bin home switch not activated |
| U5-2 | Sorter bin home switch stayed actuated |
| U5-3, U5-4 | Sorter bin home switch |
| U6-1 | ROM problem |
| U6-2 | RAM problem |
| U6-3 | Low battery |
| U6-4 | Incorrect value in NVM. Reinitialize main board with code 20-96 |
| U8-1 to U8-6 | Problem with exposure lamp, lamp sensor, lamp board |

Устранение неисправностей
Многофункциональный принтер серии WorkCentre 5300
Руководство пользователя
188
Сообщения на панели управления
На сенсорный экран панели управления выводится информация и подсказки по поиску и
устранению неисправностей. При возникновении условия ошибки или предупреждения на
сенсорном экране отображается сообщение. На сенсорном экране также может
отображаться анимированное изображение, указывающее на местоположение проблемы,
например, застрявшей бумаги.
Проблемы, при которых работа принтера полностью прекращается, обладают связанными
кодами неисправности. Эти коды помогают точно определить, в какой подсистеме
возникла проблема. В любое время можно извлечь данные о текущих неисправностях, а
также историю неисправностей.
Просмотреть перечень сообщений о неисправности, которые отображались на принтере,
можно следующим образом.
1.
Нажмите кнопку Статус аппарата.
2.
На сенсорном экране выберите вкладку Сбои.
3.
Нажмите кнопку Текущие неисправности, Текущие сообщения или
История неисправностей.
4.
Нажмите кнопку Закрыть.
Устранение неисправностей
Многофункциональный принтер серии WorkCentre 5300
Руководство пользователя
189
Устранение общих неисправностей
В данном разделе приведены процедуры поиска и устранения неисправностей. Некоторые
неисправности можно устранить перезагрузкой принтера.
Сведения о перезагрузке принтера см. в разделе
Если неисправность не устраняется перезагрузкой принтера, найдите в этой главе
таблицу, наиболее подходящую для данной неисправности.
•
•
•
•
•
•
Принтер не включается
ВНИМАНИЕ:
Подключите трехжильный шнур питания (с контактом заземления)
напрямую к заземленной розетке сети переменного тока. Не используйте сетевой
разветвитель. При необходимости обратитесь к квалифицированному специалисту,
чтобы установить розетку, заземленную надлежащим образом.
Возможные причины
Решения
Выключатель питания находится в
неправильном положении.
Выключите принтер с помощью выключателя питания
на нижнем центральном лотке. Подождите две
минуты и снова включите принтер.
Убедитесь в том, что основной выключатель питания,
расположенный под передней крышкой принтера,
находится во включенном положении.
Шнур питания неправильно вставлен
в розетку.
Выключите принтер и надежно вставьте вилку шнура
питания в розетку.
Неисправна розетка, к которой
подключен принтер.
Включите в розетку другой электрический прибор и
посмотрите, будет ли он работать.
Попробуйте другую розетку.
Принтер подключен к розетке,
напряжение или частота тока в
которой не соответствуют его
техническим характеристикам.
Используйте источник питания с техническими
характеристиками, указанными в разделе
Модераторы: avalon, Konstantin_stv
-
Алексей KZ
-
- Ответить с цитатой
![]() kwyjibo » Пн ноя 04, 2013 12:58 pm
kwyjibo » Пн ноя 04, 2013 12:58 pm
Алексей KZ писал(а):Здравствуйте, аппарат Xerox 5020, выскакивает ошибка С1 071-100, бумага доходит до регистрации и стопорится. Датчик вроде нормальный, ничего не мешает. Ролики все протирал. С лотка ручной подачи печатает нормально. Кто сталкивался подскажите.
ну по описанию сбоит датчик нижнего лотка… достать, посмотреть контакты, чем и как он на форматер идет…
вообще бы желательно знать, отчего вдруг начала появляться ошибка? что то делалось может с аппаратом? может было замятие и т.п.?
…everything is possible…
-
kwyjibo
- Заправил картридж
-
- Персональный альбом
![]()
- Ответить с цитатой
![]() kwyjibo » Пн ноя 04, 2013 1:20 pm
kwyjibo » Пн ноя 04, 2013 1:20 pm
Алексей KZ писал(а):Может и было что-то, но клиент говорит сам по себе начал так себя вести. Контакты проверил, вроде нормально, нигде обрывов вроде нет
данную модель не ковырял, но посмотрел бы все таки датчик который срабатывает в ошибке… он не оптический случаем там? не запылен? и если есть в другом месте аппарата похожий, то перекинь, посмотри измениться ли ошибка в аппарате?
…everything is possible…
-
kwyjibo
- Заправил картридж
-
- Персональный альбом
![]()
- Ответить с цитатой
![]() kwyjibo » Пн ноя 04, 2013 1:32 pm
kwyjibo » Пн ноя 04, 2013 1:32 pm
Алексей KZ писал(а):К сожалению донора нет, так что неоткуда перекидывать. А так вроде не запылен
Вы меня не поняли… на самом аппарате поищите похожий.. зачастую датчики регистрации в аппаратах одинаковые как на ручной подаче так и на нижнем лотке… поменяйте местами и про наблюдайте ошибку… если ошибка та же — то не в датчике дело и стоит копать в сторону форматера… если же изменилась, то оптопару (или чем он там реализован) под замену…
Последний раз редактировалось kwyjibo Пн ноя 04, 2013 1:43 pm, всего редактировалось 1 раз.
…everything is possible…
-
kwyjibo
- Заправил картридж
-
- Персональный альбом
![]()
![]() Алексей KZ » Ср ноя 06, 2013 2:38 pm
Алексей KZ » Ср ноя 06, 2013 2:38 pm
-
Алексей KZ
-
Вернуться в Гостевой форум
Кто сейчас на форуме
Сейчас этот форум просматривают: нет зарегистрированных пользователей и гости: 5
For troubleshooting and service purposes, confirm the fault code in the bottom, left corner of the Touch Screen.
Note: This article assumes that you are using paper within specifications for the printer, and that all trays are loaded correctly.
Step 1: Remove Jammed Paper From Tray 1
Step 2: Power the Printer Off then On
Step 3: Replace the Paper Feed Roller
NOTE: The images in this procedure are for demonstration purposes only and may not specifically match your printer model; colors, icons, and other minor differences may exist.
Step 1: Remove Jammed Paper From Tray 1
- Remove any paper from the Bypass Tray.
- Grasp both sides of the Bypass Tray, then pull it straight out of the printer.

- Pull out Tray 1 until it stops.
- To remove the tray, lift the front of it slightly, then pull it out of the printer.

- Remove the jammed paper.

- Remove any crumpled paper from the tray and any remaining paper jammed in the printer.
- Tray 2 (optional)
- Fuser
- Single-Pass Duplex Automatic Document Feeder (DADF)
CAUTION: To avoid possible injury, do not touch any sharp edges inside the device.
NOTE: Single-Pass DADF is only available on the MFP, not available on the SFP (printer-only) model.
- Insert Tray 1 into the printer, then push it in all the way. If the tray is extended for legal-size paper, the tray protrudes when it is inserted into the printer.
- Insert the Bypass Tray completely into the printer.
- When paper trays are set to Fully Adjustable, you are prompted to verify or change the paper settings.
- To confirm the same paper size, type, or color, touch OK.
- To select a new paper size, type or color, touch the current setting, then select a new setting. When finished, touch OK.
- To return to the Home screen, press the Home button.
- Try your job again. If the problem persists, continue with the next step.


Return to Top
Step 2: Power the Printer Off then On
CAUTION: Do not plug or unplug the power cord while the printer is powered on.
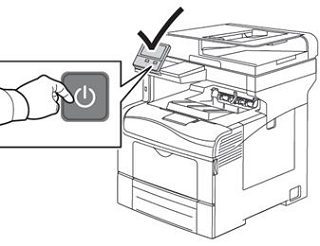
- At the printer control panel, press the Power/Wake button.
- To power off the printer, touch Power Off.
- If the printer does not respond to a single press of the Power/Wake button, then press and hold the button for 5 seconds. A Please Wait message appears as the printer powers down. After 10 seconds, the touch screen goes dark and the Power/Wake button flashes until the printer powers down.
- To power on the printer, press the Power/Wake button.

- Try your job again. If the problem persists, contact Support for additional assistance.
Return to Top
- 29 сентября 2016 12:02:23
- Просмотров: 224434
-


Xerox WC-5335 модуль узла термофиксатора.
Трудно поверить в его восемь лет с тех пор, как мы впервые принял хороший вид на C123 стиле термоэлемент модули. А также Xerox любит этой машины для основания и не были еще два волны новых моделей с тех пор в котором термоэлемент проекты были почти идентичны. Старый термоэлемент восстановления статьи по-прежнему хороший, но в более поздних моделей на протяжении ряда лет делает эти ценности пересмотра. Сначала мы обратимся в номера по каталогу для термоэлементы найти в новые модели этой серии. Затем мы рассмотрим важность обновления встроенного ПО и как перейти по этому поводу. И наконец мы будем перейти на термоэлемент связанных кодов неисправностей и настройки температуры для вас доступны в NVM.
Каждое новое семейство моделей имеет свои собственные номера по каталогу для термоэлемента. Хорошая новость заключается в том, что детали в этих термоэлементы, в том числе теплового стабилизатора поперечной устойчивости и давление вальцов, все из одной версии термоэлемента к следующему. Процедура для восстановления каждого является таким же образом. Здесь находятся номера деталей для термоэлементы для каждой семьи в модели:
-C123 семейство CC-C123/C128/C133, WC-M123/M128/M133, Pro123/Pro128/Pro133: 126K16480, 126K16481, 604K20342, 604K20343, 604K20344, 622S00191
-WC-5230 семейство (WorkCentre) WC-5222/5225/5230: 126K24980, 126K24981
-WC-5335 семейство WC-5325/5330/5335: 126K29391, 126K29392, 126K29393, 126K29394, 126K29395
Эти модели все очень привередливы насчет температуры термоэлемента и время цикла нагревания при запуске. Клиенты должны быть осведомлены о том, что если машина стоит в холодном помещении и при попытке запустить его, он, скорее всего, не готов; это время и называют “неспособность согреться во время” типа код неисправности. Некоторые из этих кодов требуется сбросить ошибку из диагностического режима (который мы рассмотрим позже в этой статье).
Также мы выяснили, что на WC-5335 семьи в частности, очень важно обновить прошивку на машине, потому что они уже исправлены несколько проблем, связанных с термоблоком. Один известный поисковой проблема в термопленки работает слишком жарко. Тонер осыпается на странице, если вы мажете на площадь тяжелую почву. Затем тонер начнет смещение на страницах и на термисторы, что дает вам еще жарче, пока черные рукава-как покрытие прижимного ролика палочки для жары крена и отслаивается лоскутами. В книге сказано, что WC 5325/5330/5335 машины все должны быть обновлены до версии 53.30.11 или выше.
Вы можете перейти и загрузить прошивку от www.support.xerox.com (которая является большим ресурсом для любых потребностей клиента, как изменение настроек системного администратора или перезагрузкой микропрограммы и т.д.). На сайте поддержки вы введите модель машины и выберите либо «поддержки» или «Драйверы и загружаемые материалы» для правильного модель из списка. В этом случае выберите «Драйверы и загружаемые материалы» и прокрутите вниз до нижней части где прошивки выбор не найдено.
Обновления программного обеспечения на 5335 семьи с флэш-накопителя USB:
Создать папку на флэш-накопитель USB и имя его «DWLD». Скопируйте файл с расширением .bin файл получен от support.xerox.com сайт. Он поставляется в формате ZIP, распакуйте архив и скопируйте и вставьте его в новую папку. Убедитесь в печати через USB-порт включен, а затем полностью выключить машину. Вам необходимо отключить оба выключателя питания (один находится внутри передней крышки). Пробку в флэш-накопитель USB в разъем USB на панели управления (если доступно).
Чтобы очистить термоэлемент коды неисправности и также для сброса HFSI (Высокая частота элемент обслуживания) Счетчики вам нужно перейти в режим диагностики. Начало в диагностика немного отличается на старых моделей (C123 семьи), но это все еще довольно близко:
Ввод пользовательский интерфейс (пользовательский интерфейс) режим диагностики:
Из включенном состоянии, нажмите и удерживайте кнопку “0” в течение шести секунд, а затем нажать кнопку “Старт”, продолжая удерживать кнопку “0”. Машина будет запрашивать пароль. Введите доступа по умолчанию количество “6789” и нажмите кнопку “подтвердить”. На дисплее будет признать, что теперь вы находитесь в режиме диагностики (на семью C123, цвета на дисплее будут обратными). Далее нажимаем “состояние машины” кнопку (или “вход/выход” для C123Family). Выберите вкладку “инструменты”, затем “системные настройки”, “Общие настройки”, “техническое обслуживание/диагностика.” Это приведет вас в Главное меню, где вы найдете настройки памяти (НВМ) и много других важных вещей. Счетчики HFSI для сброса термоблока граф и другие высокочастотные элементы обслуживания находится в “Настройки/Прочие”.
Теперь давайте взглянуть на список кодов неисправностей, которые нужно сделать с термоблоком.
Термоблок коды состояния и как восстановить их.
C123 и WC-5230 семьи: (C123/128/133, М123/128/133, Pro123/128/133, WC-5222/5225/5235)

WC-5335 семьи: (WC-5325/5330/5335)

* Сброс Фьюзера Коды (010-320, 010-327, 059-315, & 059-317)
Достигнуто путем сброса NVM 744-220 код “0”, или 744-005 для WC-5335 семьи.
Сначала введите пользовательский интерфейс (пользовательский интерфейс) диагностический режим (см. выше для деталей).
Когда вы находитесь в меню обслуживание/диагностика, вы увидите среди прочего выбор называется “NVM чтение/запись” (nvm в энергонезависимой памяти). Теперь вы можете ввести ваш звена цепи код (в данном случае 744-220, или 744-005 к WC-5335 семьи, и нажмите “подтвердить/изменить”. Текущее значение будет отображаться (если машина находится в термоблок неисправность, то значение будет установлено в “1, 2, 3 или 4, в зависимости от конкретной неисправности). Выберите “новое значение” столбца и введите новое значение (“0”). Выберите “Сохранить” и новый номер должен появиться в колонке “текущие значения”. Выберите “Распродажа” для перезагрузки. Аппарат будет пытаться снова прогрев термоэлемента. Если условие, которое вызвало виноват в первую очередь все-таки происходит, код состояния вернется через несколько минут, пытаясь согреться.
Если у вас есть упрямые машина, которая держит время, когда он включен по утрам, некоторые люди сообщили, что изменения NVM памяти настройки 744-043 на “1” продлевает допустимое время прогрева. Это помогает сделать машину, чтобы быть более снисходительными. Все-таки это важно, что владелец машины держать его в помещении, которое не слишком холодно ночью. Если в комнате слишком холодно, когда они включить машину, он, скорее всего, перейдет в коду неисправности, необходимо прийти техник превратить код из диагностики. Вы хотите, чтобы внимательно проверить фьюзинг после изменения каких-либо термоблок настройки, чтобы убедиться, что там все предохранители при различных обстоятельствах, потому что вариаций на прошивку может сделать одна машина вести себя немного отличается от другого.
Есть еще одна вещь, которая окажется полезной при проверке термоблока вы собираетесь восстановить. Вы хотите знать, какие контакты для чего схемы внутри термоблока. Есть две инфракрасные лампы, которые фактически объединены в одном фонаре, чтобы проверить. Эти оба разделяют общую обратный кабель, который проходит через термостат (термопредохранитель). Если в термопленки достаточно сильно перегрет, термостат будет взорван и должны быть заменены. Есть также два термисторы, задний перегрев термистора и центр управления термистор.
Здесь представлены пин-аутов для каждого термоэлемента комплектующих для C123 и WC-5230 семьи и WC-5335 семьи.

Обратите внимание, что C123 и WC-5230 семьи являются взаимозаменяемыми, но на WC-5325 пин-код-это совершенно разные и они ушли так далеко, чтобы перевернуть разъем над. Проверьте две фотографии справа.

C123 или WC-5230 семьи

WC-5335 семьи
Любой из двух тепла лампы схемы должна измерить 100 Ом или меньше, и термисторы должны прочитать за 3К ом, если они хорошие.
Каждый светильник жары цепи проходит один и тот же термостат (термопредохранитель) и обратно через один и тот же свинец.
Это должно привести всех в курс дела на новой смертные, слившиеся в этом стиле ксерокс копиры. Вы можете получить термоблока восстановить инструкции, . Это довольно просто, хотя как обычно полезно иметь учебные, чтобы помочь сократить кривую обучения немного.
Заказать восстановление эти смертные, слившиеся всех!
Если во фьюзер машины Xerox WorkCentre 5225, 5230 установить нагревательный вал с заметно отличающимися от оригинального вала характеристиками (например, вал от Xerox WorkCentre C118 или некачественный совместимый вал), то довольно часто можно получить ошибку 10-327, которая означает, что машина не сумела нагреть фьюзер до нужной температуры за заданное время.
Устранения причины проблемы заменой вала на «правильный» в данной машине недостаточно для того, чтобы машина вновь заработала — ошибку нужно сбросить из сервисного режима.
Внимание! Перед сбросом ошибки нужно обязательно устранить причину появления этой ошибки! Помимо неподходящего нагревательного вала, ошибки фьюзера могут быть вызваны загрязнением или неисправностью термисторов, неисправностью ламп нагрева, срабатывание термопредохранителя (в этом случае нужно обязательно выяснить, почему он сработал), обрывом или коротким замыканием в цепях лампы или термисторов и в редких случаях неисправностью платы управления.
Процедура сброса
Войти в сервисный режим:
- Нажать и удерживать более 6 секунд кнопку [0] на панели управления. Не отпуская кнопку [0], нажать кнопку [Старт].

- На появившемся экране ввести пароль — 6789 (значение по умолчанию) и нажмите кнопку [Confirm]

- Нажать кнопку информации о машине

Записать значение 0 в ячейку NVM 744-220:
- Выбрать вкладку [Инструменты]

- В разделе [Режимы] выбрать [Обслуживание/диагностика]

- Выбрать раздел [NVM Read / Write…]

- Введите адрес ячейки 744-220 и нажмите [Confirm / Change]

- Введите [0] в поле [New Value] и нажмите [Save]

- Нажмите [Close], затем [Exit (Keep Log)], затем [Yes]. Машина перезагрузится и выйдет на готовность, если причина проблемы была ранее устранена. Вы можете выбрать пункт [Exit (Clear Log)], если хотите очистить историю неисправностей машины.