
Ошибка Kernel-Power код: 41 в Windows – причины возникновения и все способы устранения
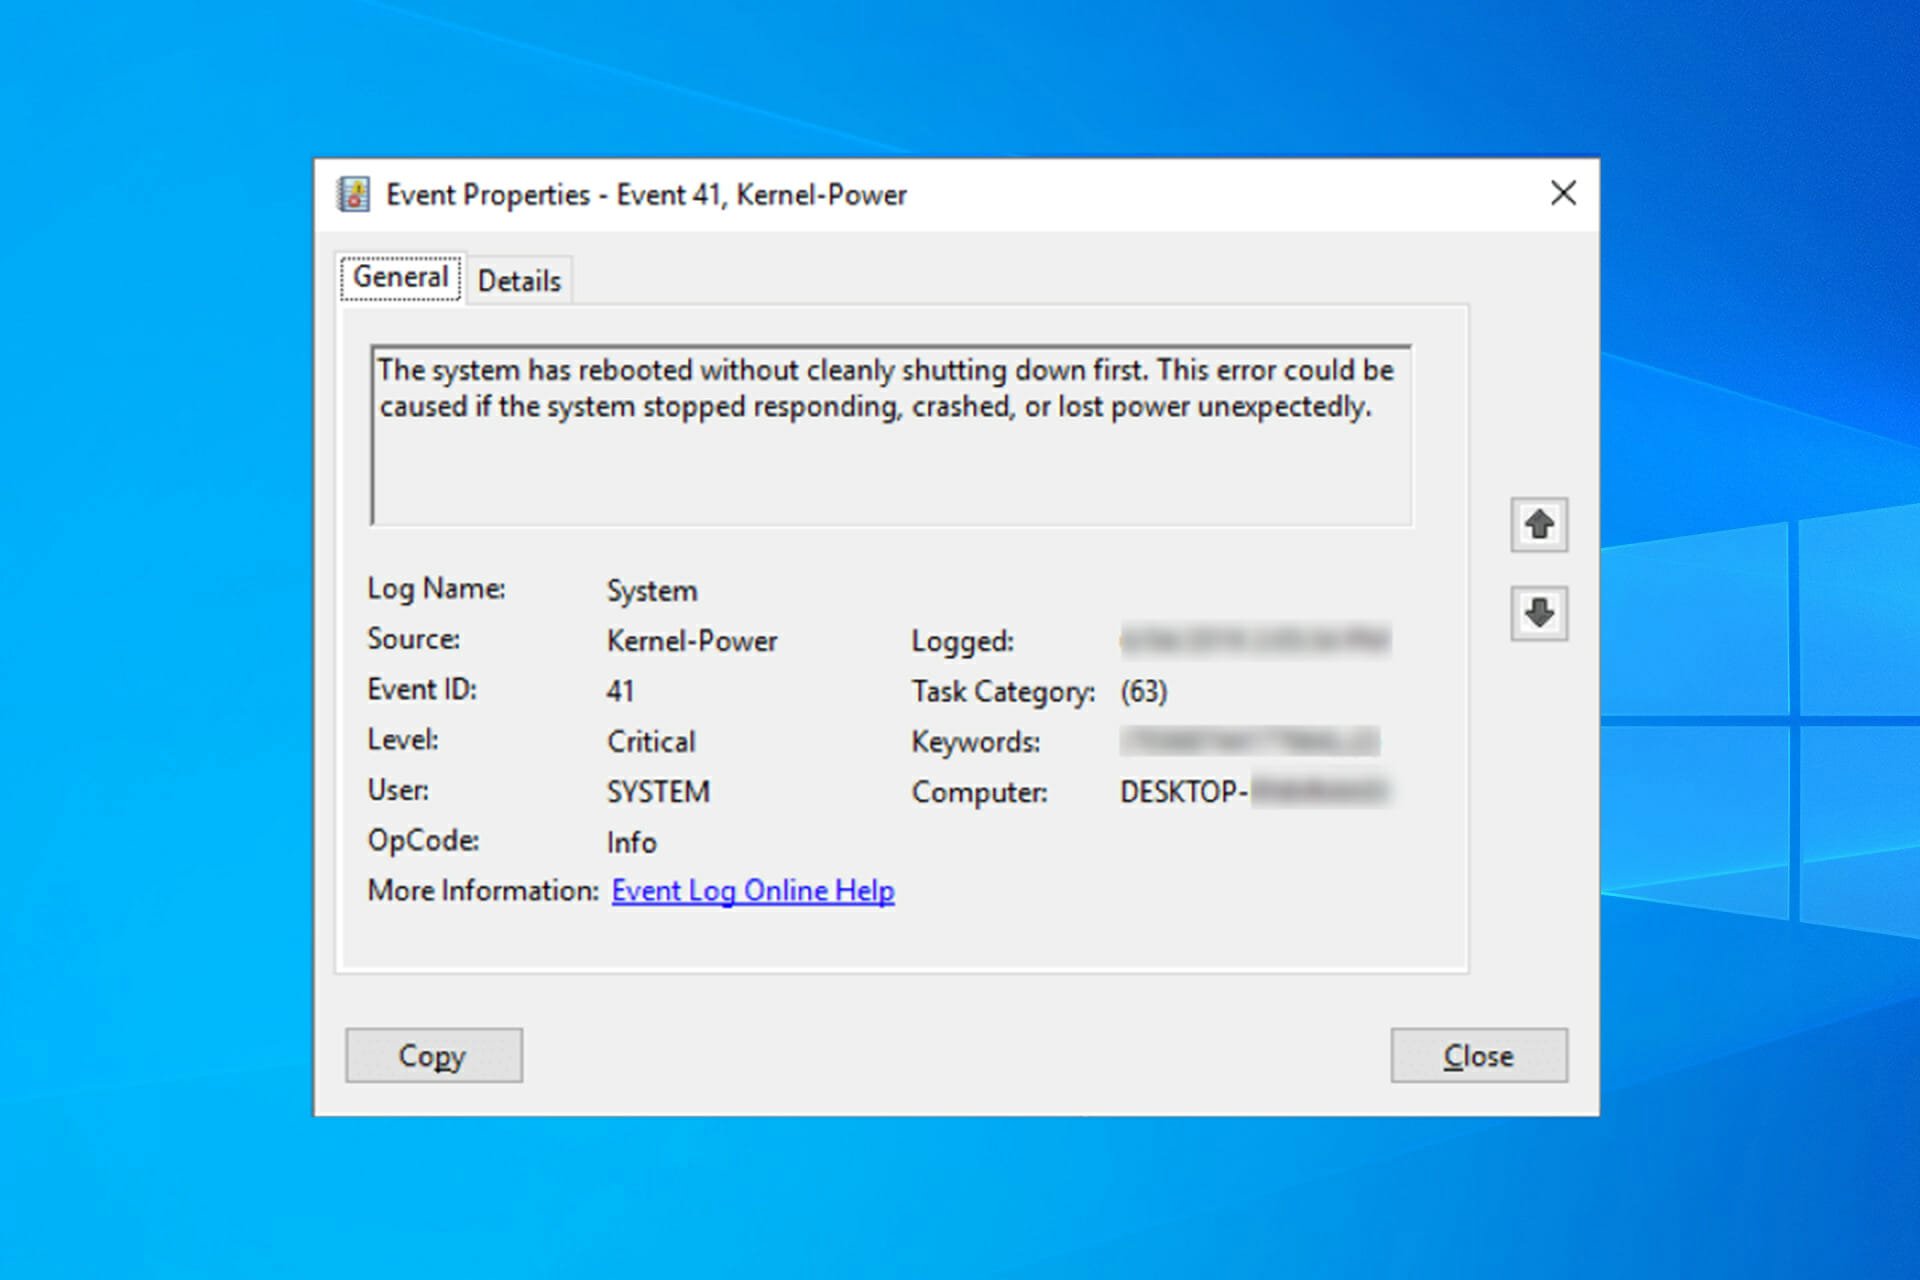
Если ваш компьютер часто перезагружается без какой-либо причины, вы можете столкнуться с критической ошибкой Kernel Power 41. Ядро является центральной частью операционной системы, и его сбой вызывает перезагрузку ПК. Вы можете проверить наличие ошибки в журнале событий вашего ПК. Она чаще всего возникает при запуске игр и других требовательных процессов. Иногда эта ошибка также вызывает BSOD (синий экран смерти) с ошибкой 0x8000400000000002. Также многие пользователи получают сообщение «Система перезагрузилась без предварительной полной остановки. Эта ошибка может быть вызвана тем, что система перестала отвечать, произошёл сбой или неожиданное отключение питания». Такая проблема затрагивает не только Windows 10, но и предыдущие версии ОС.

Как устранить ошибку «Kernel-Power код: 41».
В сообщении об ошибке Kernel-Power (ID 41) говорится, что система была перезагружена без предварительного полного выключения. Это может быть вызвано тем, что ОС перестаёт отвечать на запросы, происходит сбой или неожиданное отключение питания. Точнее, ошибка возникает, когда компьютер неожиданно выключается или перезагружается. Критическая ошибка Kernel-Power Event ID 41 генерируется, когда компьютер под управлением Windows запускается после его последнего выключения, и ОС обнаруживает, что предыдущее выключение было выполнено неправильно. Событие с кодом 41 сообщает, что произошло нечто неожиданное, что не позволяет корректно завершить работу Windows.

Причины неисправности и способы устранения
Само сообщение об ошибке предоставляет много информации, и поэтому важно знать, что компьютер делал непосредственно перед событием, и определить потенциальное решение. Недостаточное или неисправное электропитание может быть одной из основных причин. Например, если вы недавно добавили оперативную память (RAM), дополнительные устройства или жёсткие диски, после чего столкнулись с ошибкой, причиной может быть источник питания. Среди других популярных причин появления ошибки Kernel-Power 41 в Windows 10 и других:
- Некорректные, повреждённые или устаревшие драйвера.
- Неправильные настройки BIOS.
- Антивирусное ПО.
- Настройки электропитания.
Вот ещё несколько примеров этой проблемы:
- Ошибка питания ядра при игре – Ошибка питания ядра 41 обычно возникает при запуске игр.
- Событие питания ядра 41, задание 63 Windows 10 – ещё один вариант ошибки питания ядра 41.
- Ошибка BSOD 0x8000400000000002 – Kernel Power 41 обычно вызывает BSOD, за которым следует код ошибки 0x8000400000000002.
В приведённом ниже руководстве есть несколько возможных решений для исправления ошибок Kernel-Power. Они касаются операционной системы Windows и параметров, которые могут вызывать проблемы.
Обновление драйверов
Microsoft постоянно выпускает различные обновления для улучшения общего впечатления пользователей Windows. Но такое событие может принести много боли, поскольку некоторые из них делают систему полностью непригодной для использования. Итак, проверьте, не возникает ли после установки последнего обновления проблема Kernel-Power 41, и стоит ли его удалять. Следуйте инструкциям, чтобы сделать это:
- Нажмите Windows+I, откройте приложение «Настройки».
- Выберите «Обновление и безопасность», нажмите «Просмотр истории установленных обновлений».
- Выберите «Удалить обновления».
Теперь проверьте, исправлена ли ошибка или нет.

Проверка оперативки
Ещё одной распространённой причиной неисправности ядра в Windows является оперативная память (RAM), когда она не подключена должным образом или слот (или сама планка) запылён. Чтобы отсоединить оперативную память, достаточно отогнуть специальные зажимы по бокам слота. Извлеките чип, удалите пыль и грязь и верните его на место. Не делайте этого, когда ваш компьютер включён или подключён к источнику питания. По окончании снова подключите компьютер к источнику питания и включите его. Проверьте систему на работоспособность. Следующим шагом будет использование встроенного в Windows инструмента диагностики памяти. Чтобы добраться до него, откройте панель управления и нажмите «Администрирование». Вы также можете открыть пуск и ввести «память» в поле поиска. Вы увидите ссылку для диагностики проблем с памятью вашего компьютера.
Затем вас спросят, хотите ли вы перезагрузить компьютер немедленно или запустить тест при следующей перезагрузке. Компьютер загрузится в диагностический инструмент и начнёт выполнение теста, который разбит на два отдельных этапа. Внизу вы увидите поле «Состояние», в котором будут отображаться обнаруженные проблемы. Вы также можете нажать клавишу F1 и изменить несколько параметров, таких как тип теста (базовый, стандартный или расширенный), настройки кэша и счётчик проходов.

Диагностика с memtest86
memtest86 на сегодняшний день является самым популярным среди инструментов проверки оперативки, который существует с 1990-х годов. Чтобы использовать его, вы должны записать ISO-образ на компакт-диск, а затем настроить компьютер для приоритетной загрузки с диска. После загрузки с компакт-диска вы увидите меню с несколькими различными параметрами. По умолчанию будет автоматически выбран первый вариант. Начнётся тест памяти, и при наличии ошибок в правом нижнем углу появится сообщение. Memtest86 имеет несколько тестов памяти, поэтому процесс занимает немного больше времени, чем инструмент проверки памяти Windows. Это отличный помощник каждого администратора и в значительной степени промышленный стандарт для диагностики памяти. Существуют и другие инструменты, которые выполняют аналогичные проверки памяти, но memtest86 является наиболее исчерпывающим и точным из всех.
Критическая ошибка Kernel-Power обычно связана с питанием и указывает на то, что что-то не так с блоком питания компьютера. Причиной может быть окисление на задней панели переключателя устройства. В этом случае обратитесь к специалисту для проверки блока питания – замена может решить проблему. Другая возможная причина этой критической ошибки – перегрев. Компьютер обычно выключается, когда температура слишком высокая. Вы можете скачать программу SpeedFan, которая контролирует температуру и проверяет, не перегреваются ли компоненты ПК при включении компьютера. Убедитесь, что все провода подключены правильно (внутри и снаружи компьютерного блока), и проверьте, правильно ли подключены разъёмы питания для графического процессора и основной (материнской) платы. Кроме того, удалите процессор и переустановите его (если у вас есть практические навыки и опыт подобной процедуры).

Изменение настроек BIOS
BIOS (Basic Input Output System) – это программное обеспечение, хранящееся на небольшом чипе памяти на материнской плате. Чтобы обновить BIOS, перейдите на веб-сайт производителя материнской платы и загрузите последнюю версию BIOS для материнской платы. Там должно быть руководство, описывающее, как обновить BIOS — убедитесь, что вы внимательно прочитали это. Имейте в виду, что обновление BIOS — это процедура для опытных пользователей, и, если она не выполняется должным образом, может привести к необратимому повреждению оборудования. Если вы не знаете, как обновить BIOS, найдите эксперта, чтобы избежать повреждения вашего компьютера. Большинство IT-специалистов пришли к выводу, что изменение определённых фоновых режимов в BIOS и в ОС Windows 7 и других также может помочь при устранении проблемы. Для этого выполните следующие шаги:
- Выключите компьютер.
- Теперь включите ПК и войдите в BIOS, нажав клавишу BIOS во время загрузки системы. Ключ BIOS обычно отображается на экране загрузки с надписью «Нажмите ___, чтобы войти в программу установки». Обычными кнопками запуска BIOS являются F1, F2, Del, Esc и F10. Обратите внимание, что действовать нужно сразу после включения ПК, так как сообщение исчезает довольно быстро.
- Найдите раздел Power. Он находится на разных вкладках инструментов прошивки BIOS, в зависимости от производителя, и уникального способа найти его не существует. Обычно он находится в разделе «Параметры питания» или что-то похожее на это, и называется «Настройки ACPI».
- Найдите параметр «Включить спящий режим» или «Функции ACPI» и убедитесь, что они включены. Ниже вы должны увидеть варианты состояния сна ACPI или состояния ожидания ACPI, поэтому убедитесь, что вы изменили их с S1 на S3.
- Перейдите в раздел «Выход» и выберите «Сохранить изменения и выйти».
После перезагрузки проверьте, появляется ли ошибка.

Устранение конфликта двух звуковых карт
Некоторые пользователи получают критическую ошибку питания ядра kernel-41 из-за звукового драйвера, поэтому обязательно проверьте дубликаты драйверов и отключите драйверы. Следуйте шагам:
- Нажмите клавишу Windows+X, выберите Диспетчер устройств и откройте его.
- Теперь найдите аудио драйверы в контроллерах звука, видео и игр.
- Если есть какие-либо повторяющиеся записи, щёлкните правой кнопкой мыши одну из них и выберите «Отключить» в меню.
Если в вашей системе нет дублирующих аудио драйверов, попробуйте отключить аудио драйверы из списков. Некоторые пользователи сообщают, что отключение ATI High Definition Audio Device из диспетчера устройств решило проблему. Однако вы также можете попытаться отключить любой другой драйвер аудиоустройства, чтобы устранить проблему, и проверить, помогает ли это исправить ошибку.

Другие способы избавиться от ошибки
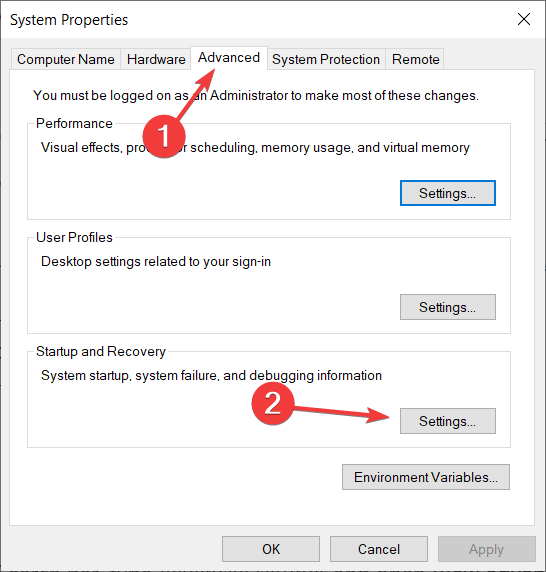
Возможно, вы столкнулись с критической ошибкой Kernel-Power, связанной с идентификатором события 41. Она обычно наблюдается в средстве просмотра событий Windows, в котором отображается журнал системных сообщений и сообщений приложения, включая предупреждения, информационные сообщения и ошибки. Часто в средстве просмотра событий отображается много ошибок, но, если ваш компьютер работает нормально, вы можете их игнорировать. Однако не следует игнорировать критическую ошибку Kernel-Power, так как она может повлиять на стабильность Windows. Щёлкните правой кнопкой мыши на ярлыке Мой компьютер и выберите Свойства-Дополнительные параметры системы-Параметры запуска и восстановления, и отключите параметр «Автоматически перезагружать» в разделе «Сбой системы». Откройте редактор реестра, набрав «regedit» в строке поиска или в диалоговом окне «Выполнить», и перейдите к следующему ключу:
HKEY_LOCAL_MACHINE/СИСТЕМА/ CurrentControlSetControlPower
Найдите REG_DWORD с именем «HibernateEnabled» в правой части окна, щёлкните его правой кнопкой мыши и выберите «Изменить». Измените его значение на 0.
Мы надеемся, что это руководство было полезным и помогло исправить критическую ошибку Kernel-Power (ID 41). Если ни один из методов, упомянутых выше, не решил проблему, это может быть связано с аппаратным обеспечением, и вам следует обратиться к специалисту по компьютерам для проверки системы. Если же вы уже сталкивались с подобной проблемой и смогли исправить ошибку, поделитесь с нашими читателями в комментариях под этой статьёй.
Вводная часть
0x8000400000000002 — ошибка очень разнообразна, ее второе имя Kernel-Power 41. В самом начале, нужно исключить возможность вмешательства в работу операционной системы антивирусной программы. На время работ отключить, а для наилучшего эффекта удалить антивирусную программу (для тех кто не умеет удалять программное обеспечение с компьютера, читайте по этой ссылке).
Список возможных симптомов ошибки 0x8000400000000002:
- Неправильная настройка биос
- Неправильная работа драйверов
- Перегрев оборудования
- Проблемы с электропитанием
Пути решения:
Ошибка 0x8000400000000002 (Kernel-Power 41) происходит из-за ошибок в оборудовании, его драйверов или их настроек. Они или что-то другое могут нарушить работу ядра Windows. В любом случае, прежде, чем начать исследовать данную проблему стоит выполнить проверку целостности системных файлов. Данный метод работает начиная с Windows 7 с патчем KB2966583 и выше. Повторюсь, данный метод в Windows 8, 8.1 и 10 работает прямо с «коробки», для Windows 7 нужен патч обновления KB2966583, иначе ничего не будет работать! Запускаем командную строчку от имени администратора и выполняем следующие команды:
Dism /Online /Cleanup-Image /ScanHealth
Если в ходе не обнаружились ошибки, то следующие команды можно мело пропускать и искать решение ниже. В случае, если команда выдала «Хранилище компонентов подлежит восстановлению». То выполните следующие команды. И потом тестируйте свою операционную систему на наличие данной ошибки.
Для тех кто не знает, как это нужно выполнить, здесь рассказывается более подробнее
Dism /Online /Cleanup-Image /RestoreHealth
sfc /scannow
Биос.
При настройке подачи электропитания на компоненты ПК в биосе, ошибка 0x8000400000000002 происходит часто. Простой способ избавиться от нее — сбросить все настройки по умолчанию (смотрите, как это сделать)
Драйвера.
Драйвера — часто приносят пользователям головную боль и ошибка 0x8000400000000002 не исключение. Чтобы выяснить это, нужно открыть «Просмотр событий». В Windows 10 делается путем: пуск — все программы — средства администрирования Windows — просмотр событий.
В Предыдущих версиях, а так же и в 10 версии можно сделать: Панель управления (из категорий выводим весь список: выбрать крупные или мелкие значки) (смотрите скриншот) — администрирование — просмотр событий

В просмотре событий ищем ошибки «перед», иногда «после» зависания системы. Система покажет какой драйвер дает сбой. Далее удаляем и устанавливаем заново. Как это делать по подробнее расписано здесь.

Оборудование и электропитание. Сейчас будет описано несколько сценариев.
Компьютер выключается или начинает во время требовательных к ресурсам задач, например игры. Большая вероятность того, что блок питания не справляется со своей задачей. Отсюда следует, что нужно обратить внимание на него. Если Ваш ПК находится на гарантии, оттесните его в сервисный центр с сообщением:
Нестабильно работает блок питания в играх
При отсутствии гарантии попробуйте поставить другой блок питания, желательно по мощности больше, чем тот, который стоит на проблемном ПК.

Небольшое ответвление от темы. Чтобы не волноваться по перепадам напряжения (именно по этому чаще всего выходят блоки питания), установите источник бесперебойного питания. Они смогут продлить жизнь Вашему ПК.
Возвращаемся к ошибке 0x8000400000000002. ПК стоит в простое или через некоторое время зависает, после чего выходит bsod. Причина кроется в жестком диске (ошибка 0x8000400000000002 появляется только в SSD) или видеокарте, возможно и в другом компоненте ПК, но это редкость. Пути решения два:
- Обновить проблемные драйвера (смотрите как это сделать)
- Компонент оборудования перегревается. На этот пукнт, есть множество разного рода действий (пункты идут о легкого к сложому):
- почистите свой ПК от пыли и прочего мусора, сделайте уборку
- Откройте боковую крышку настольного системного блока. Для ноутбука установите подставку с системой охлаждения.
- Для настольного системного блока можно установить дополнительную систему охлаждения.
- Разберте ПК, почистите, замените термопасту и соберите обратно.
Но прежде чем открывать крышку компьютера, установите программу SpeedFan. Эта простая в использовании программа позволяет следить за температурой компонентов ПК. С ее помощью Вы легко сможете найти перегревающийся компонент ПК и примите нужные меры для устранения данной ошибки.
Если у Вас еще остались вопросы по поводу ошибки 0x8000400000000002, пишите в комментариях. Обязательно разберемся!
The solutions in this article worked for other users
by Milan Stanojevic
Milan has been enthusiastic about technology ever since his childhood days, and this led him to take interest in all PC-related technologies. He’s a PC enthusiast and he… read more
Updated on March 8, 2023
Reviewed by
Vlad Turiceanu

Passionate about technology, Windows, and everything that has a power button, he spent most of his time developing new skills and learning more about the tech world. Coming… read more
- The Kernel Power error 41 in Windows 10 can appear after random restarts or file corruption.
- However, this Kernel-Power 41 (63) from Windows 10 can also occur because of a hardware problem or a driver.
- The problem may be also fixed by third-party software to deal with it automatically.
XINSTALL BY CLICKING THE DOWNLOAD FILE
Fortect is a tool that checks your Windows OS for bad or corrupted system files. Once found, it can replace these versions with a fresh one from its repository with original Windows System files. Thus, it will restore your system to a fully functional state.Here is how to do it in 3 easy steps:
- Download and Install Fortect on your PC
- Launch the tool and Start scanning to find broken files that are causing the problems
- Right-click on Start Repair to fix issues affecting your computer’s security and performance
- Fortect has been downloaded by 0 readers this month.
We all experience computer errors from time to time, and some Windows 10 users have reported the Kernel Power 41 error on their devices. You might also get the 0x8000400000000002 error code with it, and face random restart issues.
The error comes with the following message: The system has rebooted without cleanly shutting down first. This error could be caused if the system stopped responding, crashed, or lost power unexpectedly. Let’s find out how to fix things!
Why does the Kernel Power 41 black screen appear?
The reasons behind this problem are pretty vast, but we will highlight some of the main ones. We are firstly referring to improper shutdown – if this error appears right after a crash, clearly, the system failed to initialize some important components.
Sometimes, when your Windows PC freezes randomly, the system is left with corrupted files causing this problem. The Kernel Power 41 error may also be caused by problematic drivers. Many reported that the driver has stopped responding and has recovered.
Here are some more variations and causes of the Kernel Power 41 problem:
- Kernel Power 41 after sleep mode – If there are any errors with your power settings or a delayed Windows update that’s not properly installed, the error can happen after sleep or hibernation.
- Kernel Power error when playing games – Some games are pretty resource-demanding. That’s why you can bump into kernel-power 41 (63) on Windows 10 while gaming.
- Kernel Power 41 in Windows 7 – Although we’re talking about Windows 10 here, Kernel Power 41 is error is also common in Windows 7. Either way, you can use most solutions from this article.
- Kernel Power event 41 task 63 in Windows 10 – Another variation of the Kernel Power 41 error.
- Kernel Power 41 when using a Windows 10 laptop – This error is equally common on Windows PC and laptops.
- BSOD 0x8000400000000002 – Kernel Power 41 error usually causes a BSOD followed by the 0x8000400000000002 error code.
Now that we know the reasons behind this issue and its possible iterations, let’s start fixing it.
How can I fix the Kernel Power 41 error on Windows 10?
- Why does the Kernel Power 41 black screen appear?
- How can I fix the Kernel Power 41 error on Windows 10?
- 1. Update your drivers
- 2. Disable duplicate audio drivers
- 3. Disable or uninstall your antivirus
- 4. Increase the CPU core voltage
- 5. Change your power settings
- 6. Turn off Fast Startup
- 7. Update your BIOS
- 8. Uninstall any recent updates
- 9. Disable Auto-restart in the Advanced System settings
Before getting into the actual tweaks, let’s go through some simple checks that might fix the problem quickly:
- Check for any drivers that display a yellow exclamation mark in Device Manager. Just like with the Kernel Security Check Failure error, it’s recommended to make sure that your drivers are OK, and the exclamation mark to their right signals a possible problem.
- Make sure that your Windows OS is updated.
- Restart your PC. The system may recover without any intervention whatsoever.
- Check your hardware for any damage and look if the fans inside the PC are working properly. This error may be triggered by hardware failure or overheating. If this is the case, stop your machine and make the necessary repairs ASAP.
If you crosschecked the critical steps above, let’s fix this problem by using the solutions below.
1. Update your drivers
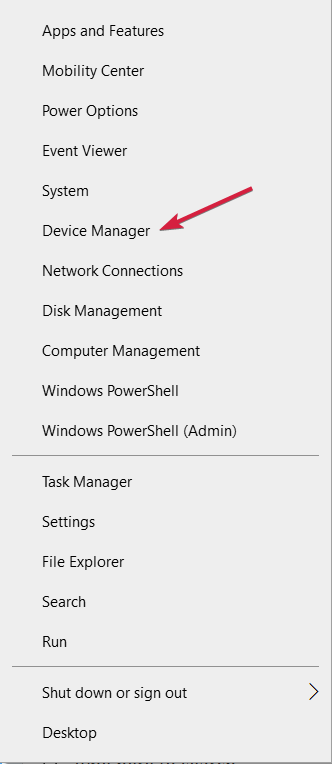
- Right-click the Start button and select Device Manager.

- Expand the sections one by one, and look if any of the drivers have an exclamation mark to their right.
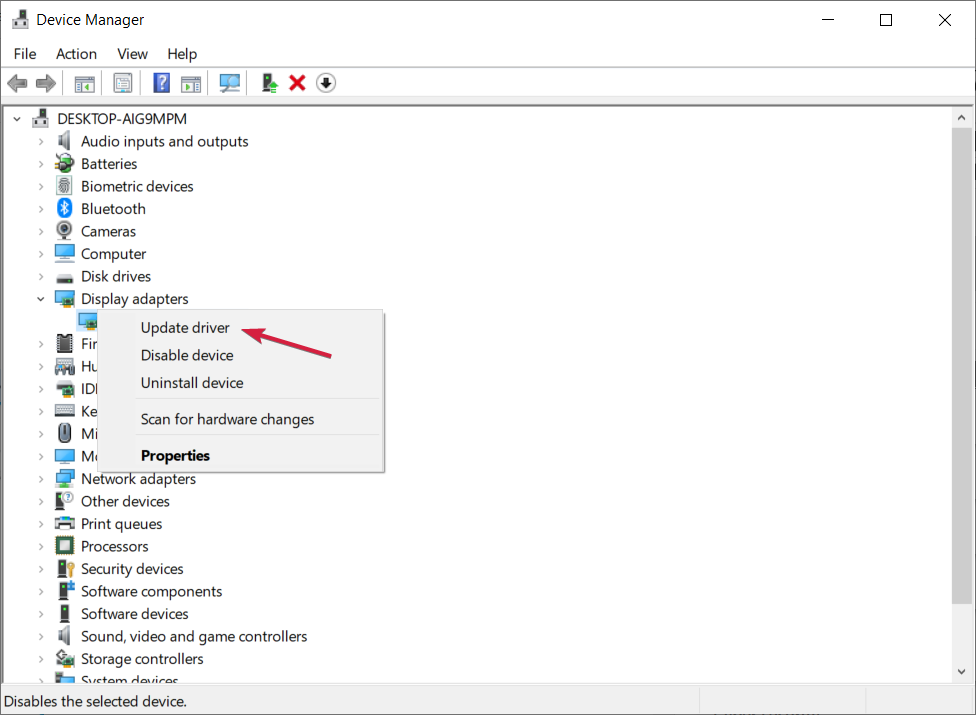
- Right-click the driver and select Update driver.

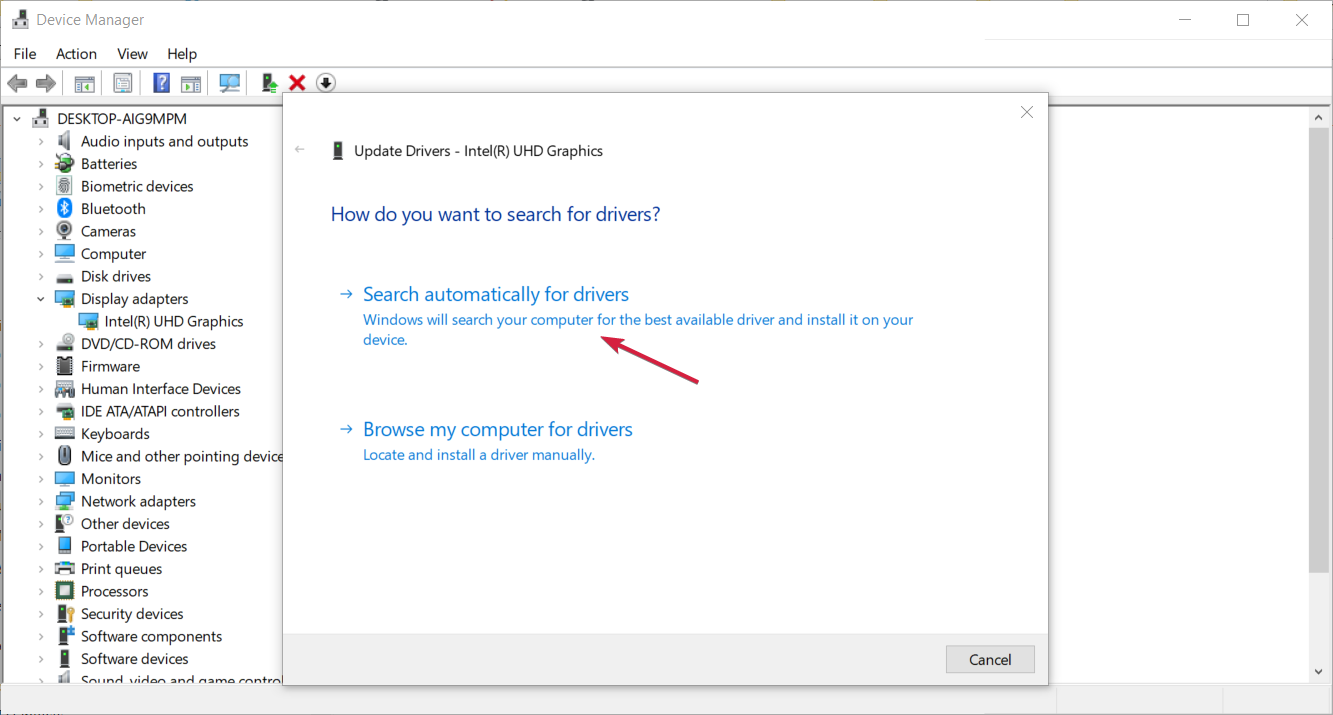
- In the next window choose the Search automatically for drivers option.

- The system will look for any updates and install it.
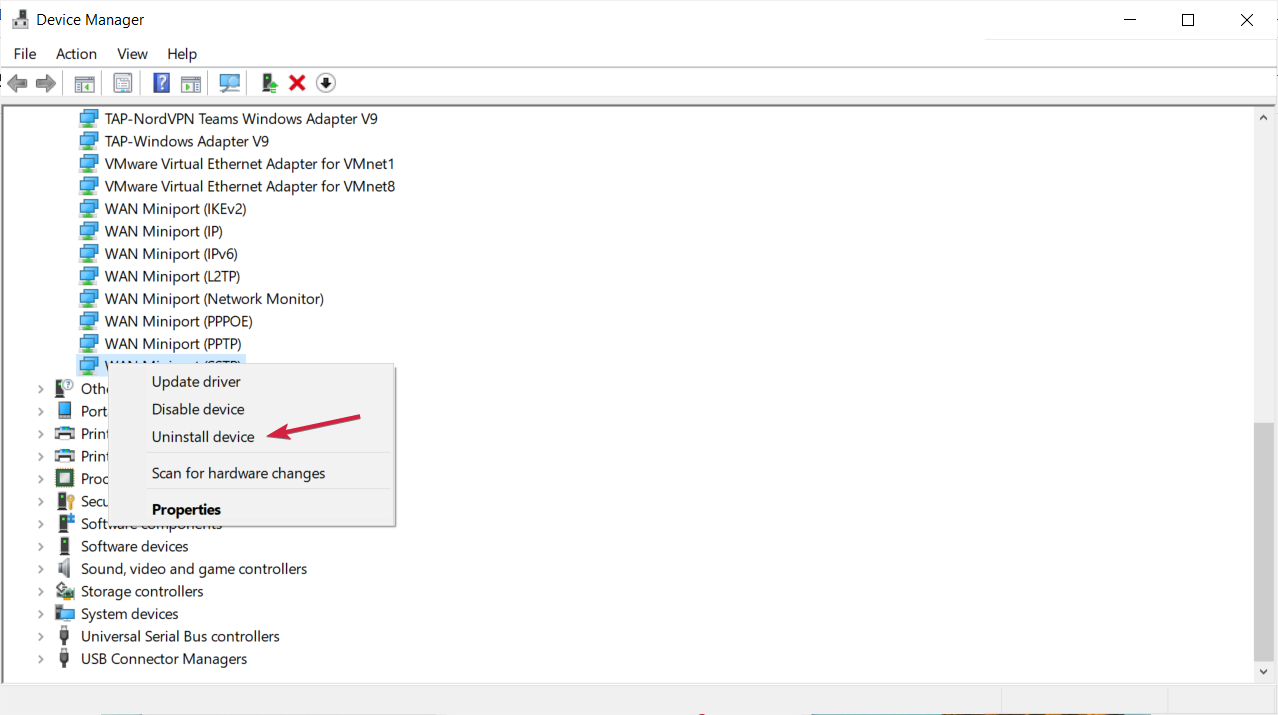
- If the problem still persists, instead of updating the driver in step 3, select Uninstall device.

- Reboot your PC and the system will detect the device and install a generic driver for it.
- If that doesn’t work either, go to the manufacturer’s website and download the driver for your OS.
- Perform this solution especially for the audio and graphics drivers as they are the most prone to producing this error.
The kernel-power 41 (63) Windows 10 error is sometimes caused by outdated drivers, and if you want to fix it, make sure that you have the latest drivers installed.
If you do not have the necessary computer skills to update/fix the drivers manually, we strongly suggest doing it automatically by using a third-party tool.
Various errors are the result of a malfunctioning driver. When this is the case, you may need to update or reinstall completely this specific component. As the process is not straight-forward to complete, we recommend using an automated tool for the job. Here’s how to do it:
- Download and install DriverFix.
- Launch the app.
- Wait for the software to detect all your faulty drivers.
- You will now be presented with a list of all the drivers that have issues, and you just need to select the ones you’d liked fixed.
- Wait for DriverFix to download and install the newest drivers.
- Restart your PC for the changes to take effect.

DriverFix
Keep your Windows safe from any type of errors caused by corrupted drivers, by installing and using DriverFix today!
Disclaimer: this program needs to be upgraded from the free version in order to perform some specific actions.
2. Disable duplicate audio drivers
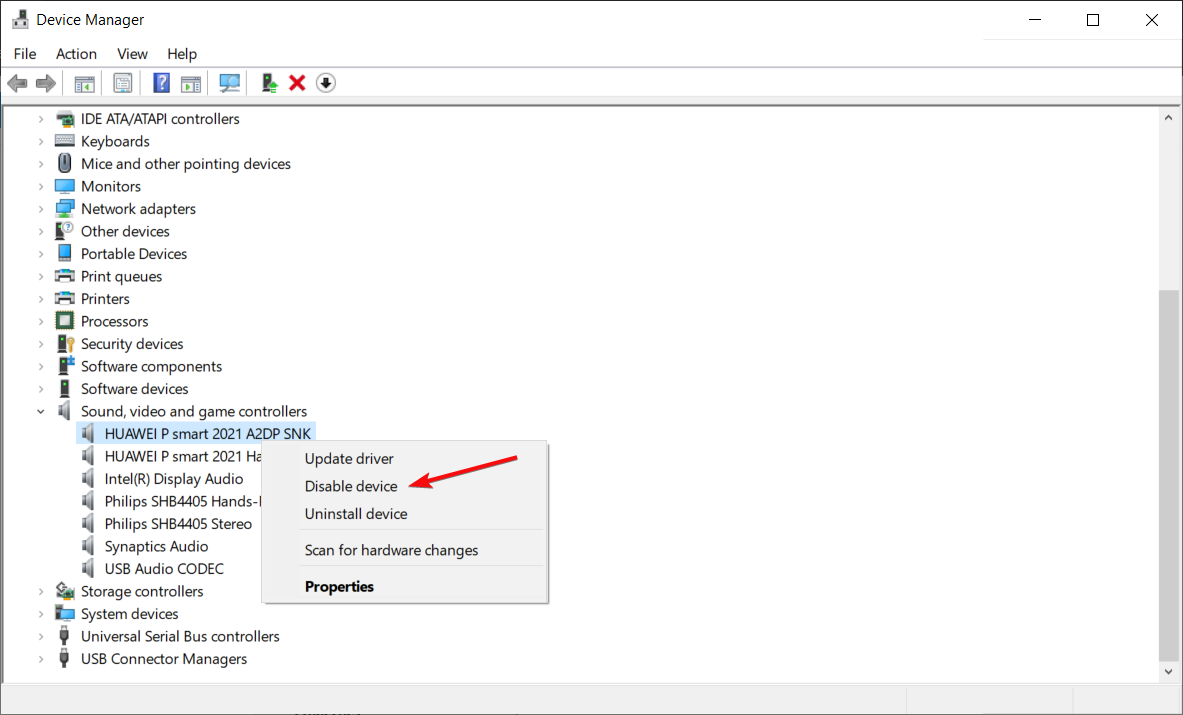
- Right-click the Start button and choose Device Manager from the menu.

- When Device Manager opens, locate your audio drivers in the Sound, video and game controllers section.
- If you see duplicate entries, right-click one of those duplicates and choose Disable device from the menu.

We already mentioned that Kernel Power 41 errors can be caused by your audio driver, so make sure that you check Device Manager for any duplicate driver entries.
Even if you don’t have duplicate audio drivers, you can try disabling one of the audio drivers that you have on the list.
Users have reported that the issue was resolved after disabling ATI High Definition Audio Device from Device Manager.
Even if you don’t have ATI High Definition Audio Device installed, you can try disabling any audio device that isn’t High Definition Audio Device.
3. Disable or uninstall your antivirus
Certain antivirus software, such as AVG, can cause Kernel Power 41 errors on your Windows 10 device. If you have AVG antivirus installed, try to temporarily disable or uninstall it and see if the issue is resolved. Sometimes, the event 41 kernel power fix is as simple as deleting/reinstalling your security software.
If the problem still persists, you might want to consider switching to different antivirus software that will offer efficient protection.
For that, you can confidently choose from the best antivirus software today and secure your PC.
If you want to completely uninstall your antivirus, we’ve got a dedicated guide for Norton users. Also, if you’re using McAfee, you can check out this helpful article to learn how to remove it for good.
4. Increase the CPU core voltage
One of the problems causing the Kernel Power Error 41 is that the CPU is not getting enough power from the system.
Hence, a viable solution is to increase the CPU core voltage. One way to do that is to look for CPU voltage settings in BIOS.
However, not all BIOS software have this option so a more simple solution is to use a CPU overclocking dedicated app.
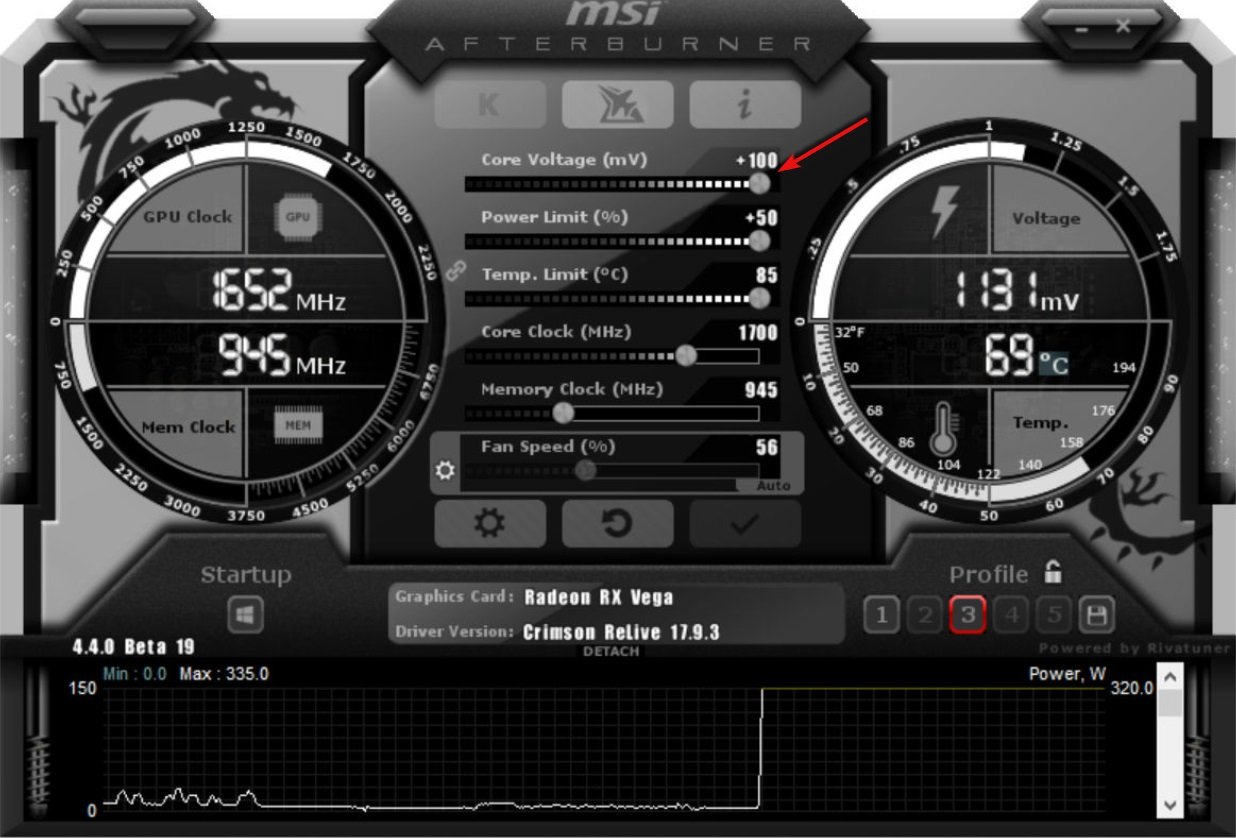
For example, in MSI Afterburner, you just need to access the Settings menu and adjust the voltage of the
Please note that although this solution worked for some of our readers, it’s a delicate procedure so if you don’t do it properly, there is a chance you can damage your components.
5. Change your power settings
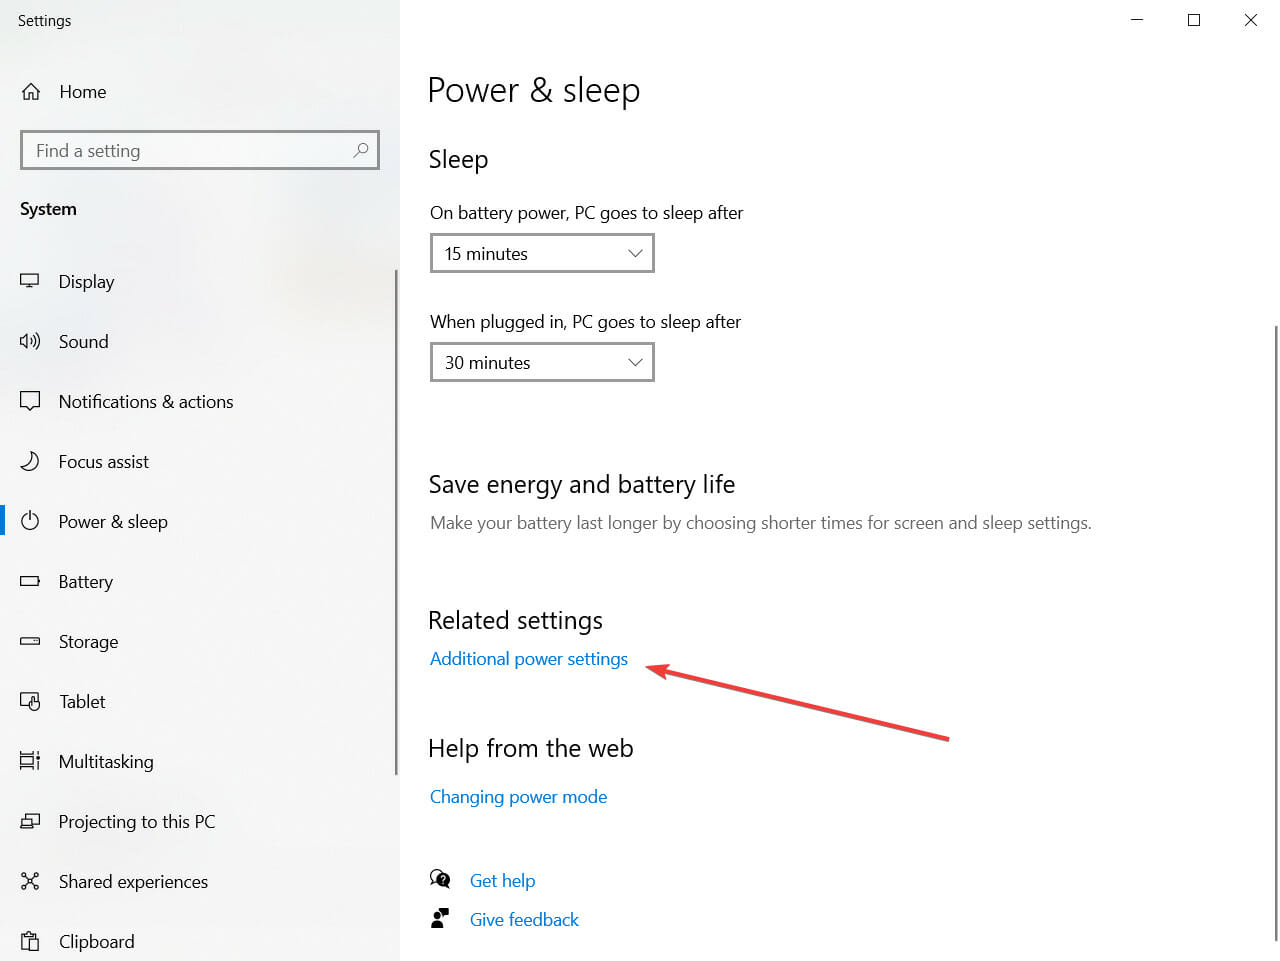
- Press Windows key + S, type power, and choose Power & Sleep settings from the menu.

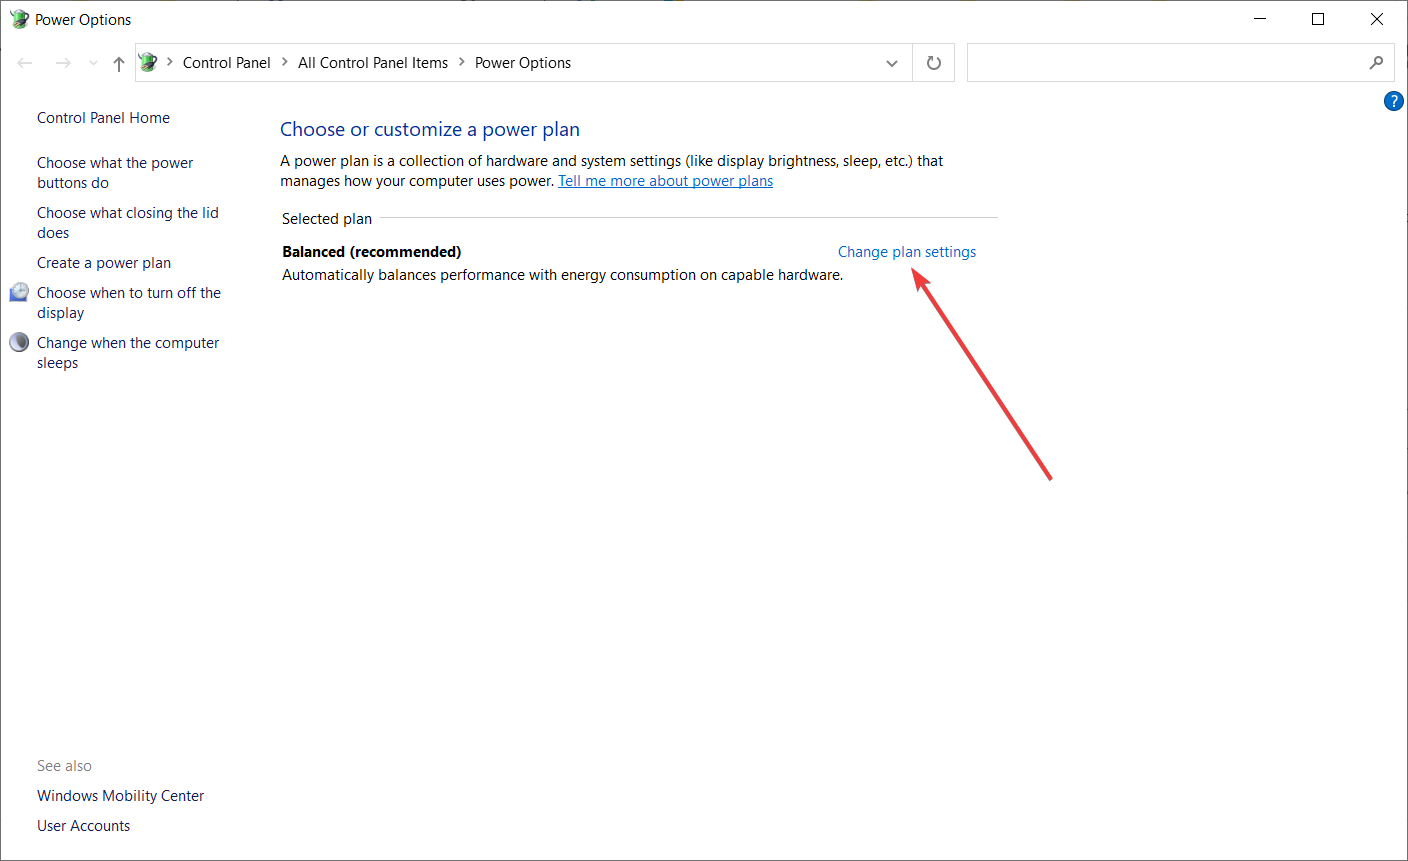
- When Power Options window opens, click on Additional power settings.

- Find your current plan and click on Change plan settings.

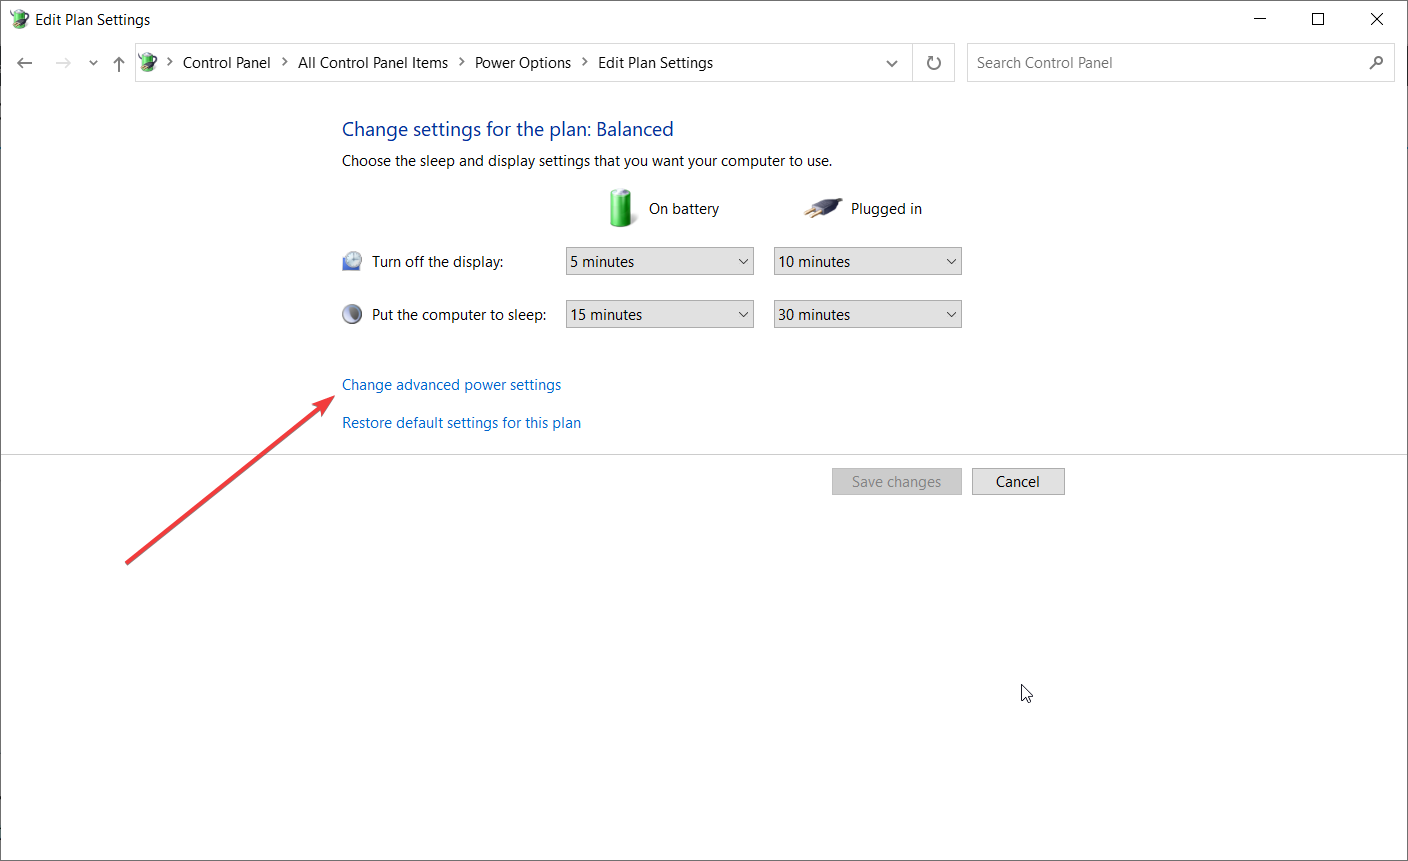
- Now click on Change advanced power settings.
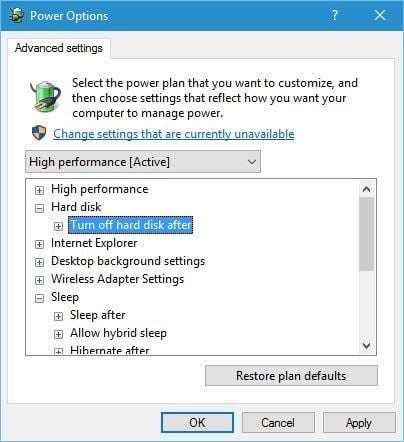
- Locate Hard disk section and expand it. Click on Turn off hard disk after and set it to Never (You can do that by entering 0 as a value).

- Find the Sleep section and set the sleep timer to 0 in order to turn it off.
- Click Apply and OK to save the changes.

Kernel Power 41 blue screen errors can be caused by your power settings, so it might be best that you change some of those settings.
If you can’t find your Power Plans, get them back by following the easy steps in this comprehensive article.
6. Turn off Fast Startup
- Press Windows key + S, type power, and select Power & Sleep settings from the menu.
- When Power Options window opens, click on Additional power settings.
- When Power Options window opens, click on Choose what the power buttons do.

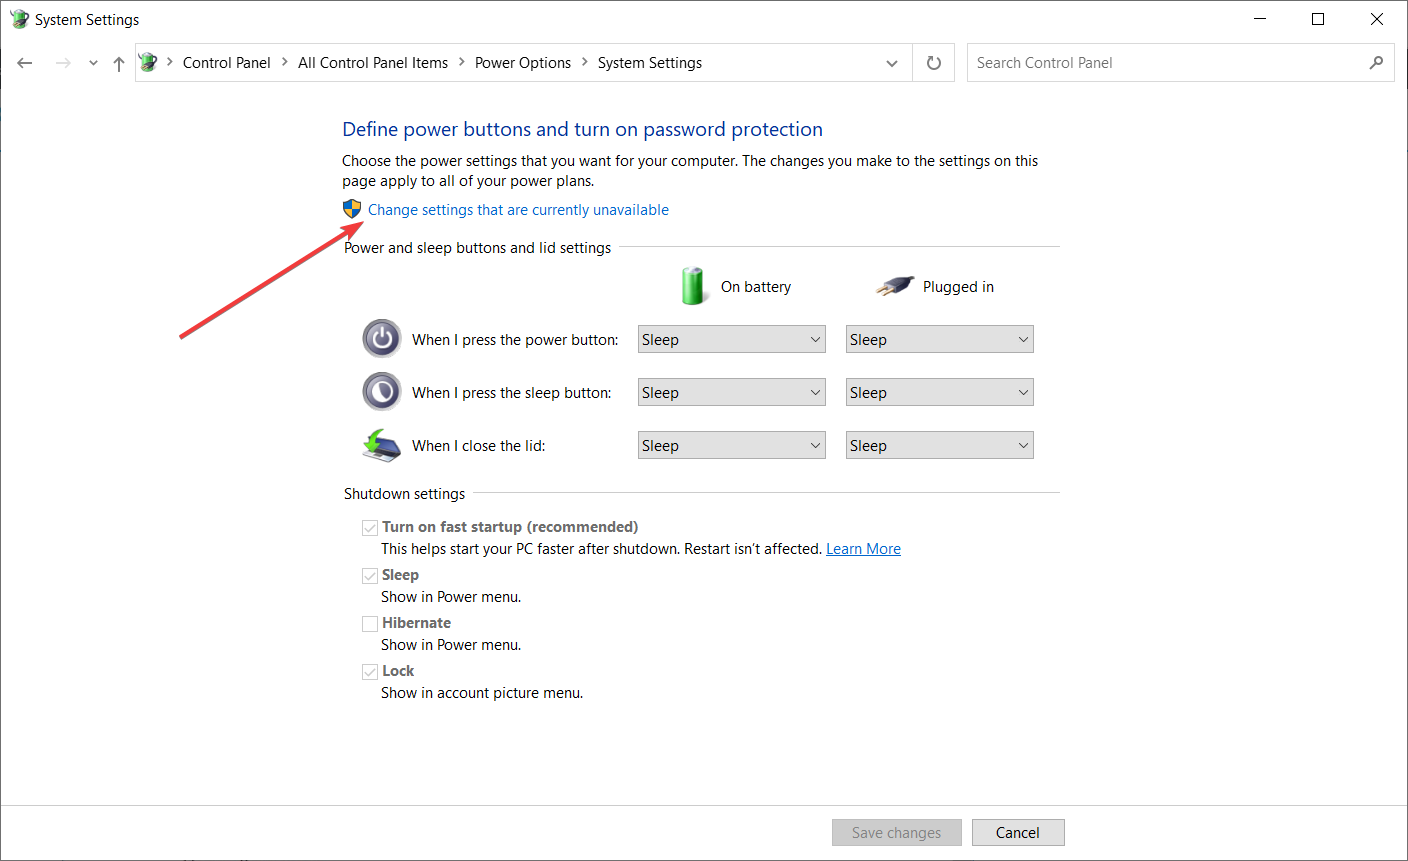
- Click on Change settings that are currently unavailable.
- Scroll down to the Shutdown settings section.
- Locate Turn on fast startup (recommended) and uncheck it.
- Click Save changes.

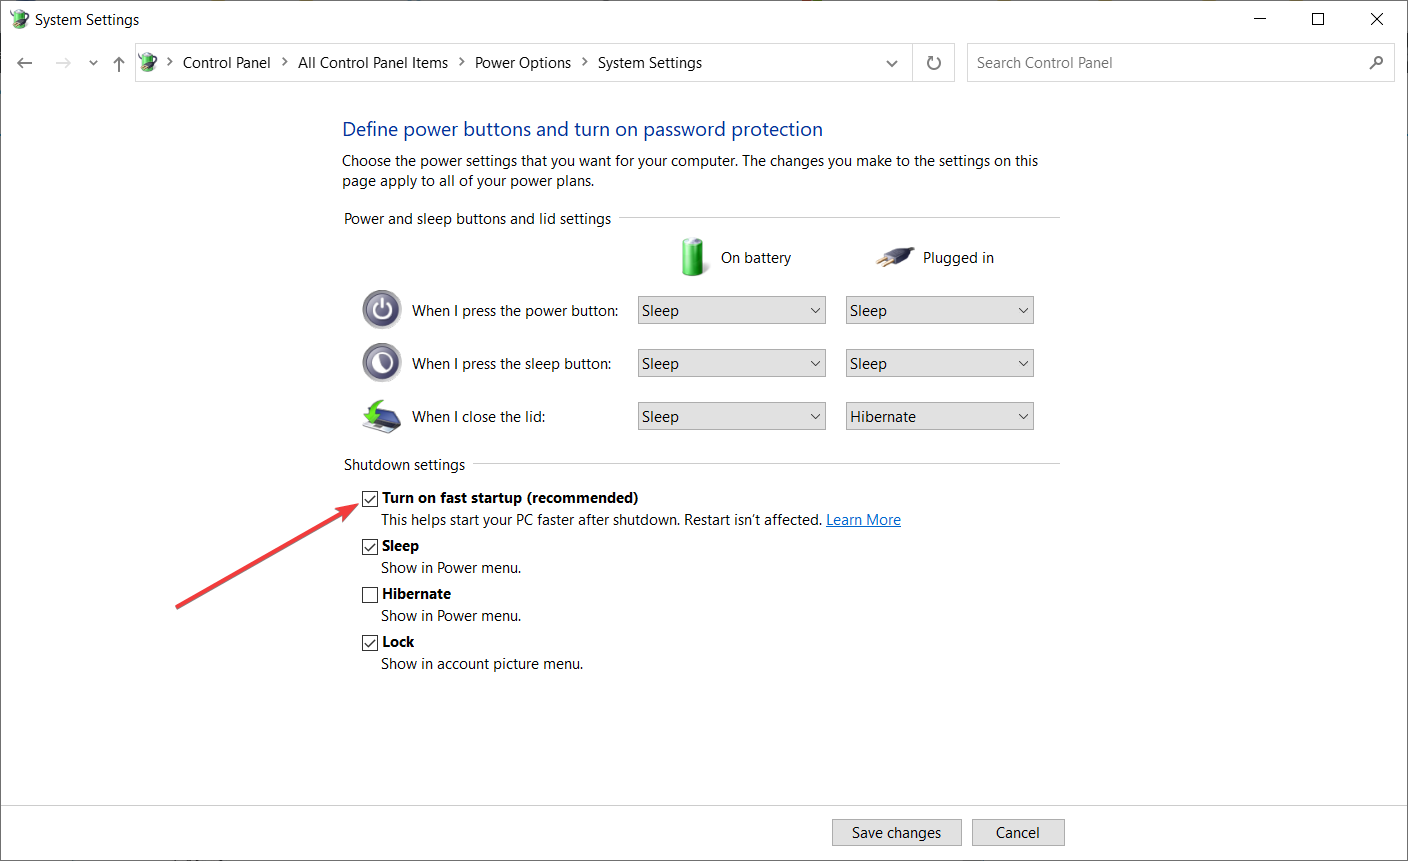
You should know that this issue can be caused by the Fast Startup option. In order to fix this problem, it’s advised that you turn off the Fast Startup feature, and you can do that by following the steps above.
After you’ve turned off Fast Startup, your computer might start a bit slower, but the Kernel Power 41 error should be resolved.
If you can’t turn off the Fast Startup, we’ve got the right guide that will help you fix this problem in no time.
7. Update your BIOS
In order to update BIOS, you need to visit your motherboard manufacturer’s website and download the latest version of BIOS.
Before you start the update, make sure that you read the instruction manual carefully in order to avoid causing permanent damage to your computer.
If you don’t know how to do that, we have an excellent guide on how to update BIOS on Windows 10.
- FIX: Kernel mode heap corruption BSoD in Windows 10/11
- Fix: Kernel Security Check Failure BSOD Windows 11
- How to fix the Kernel mode heap corruption in Windows 10/11
8. Uninstall any recent updates
1. Press the Windows key + I to open the Settings app.
2. Select Update & security and click on View update history.
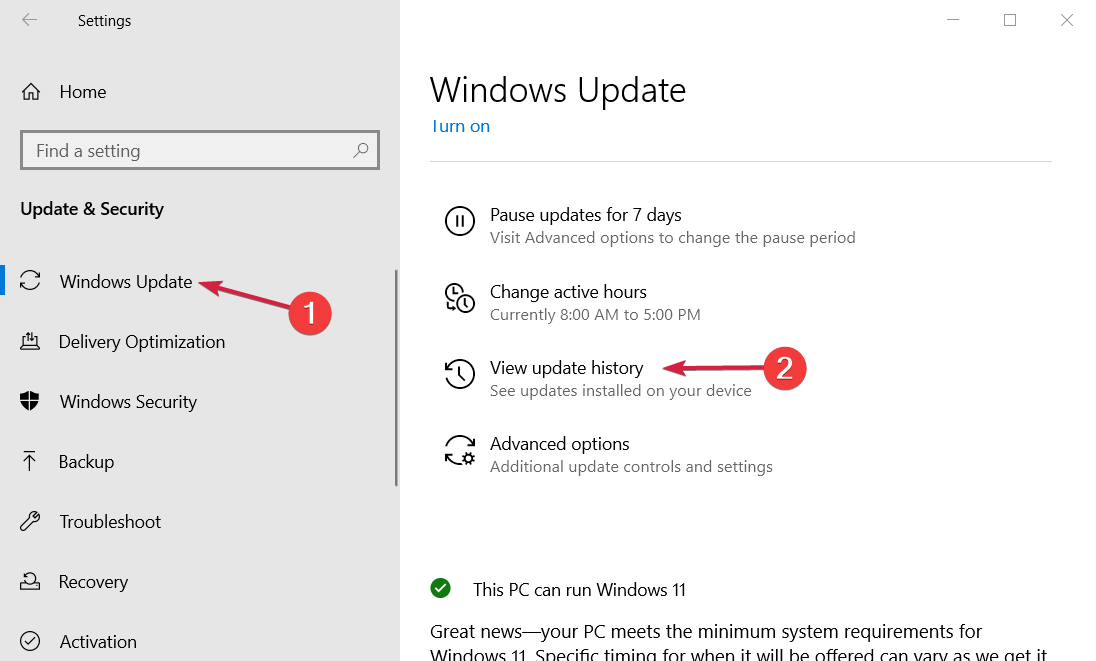
3. Choose to Uninstall updates.
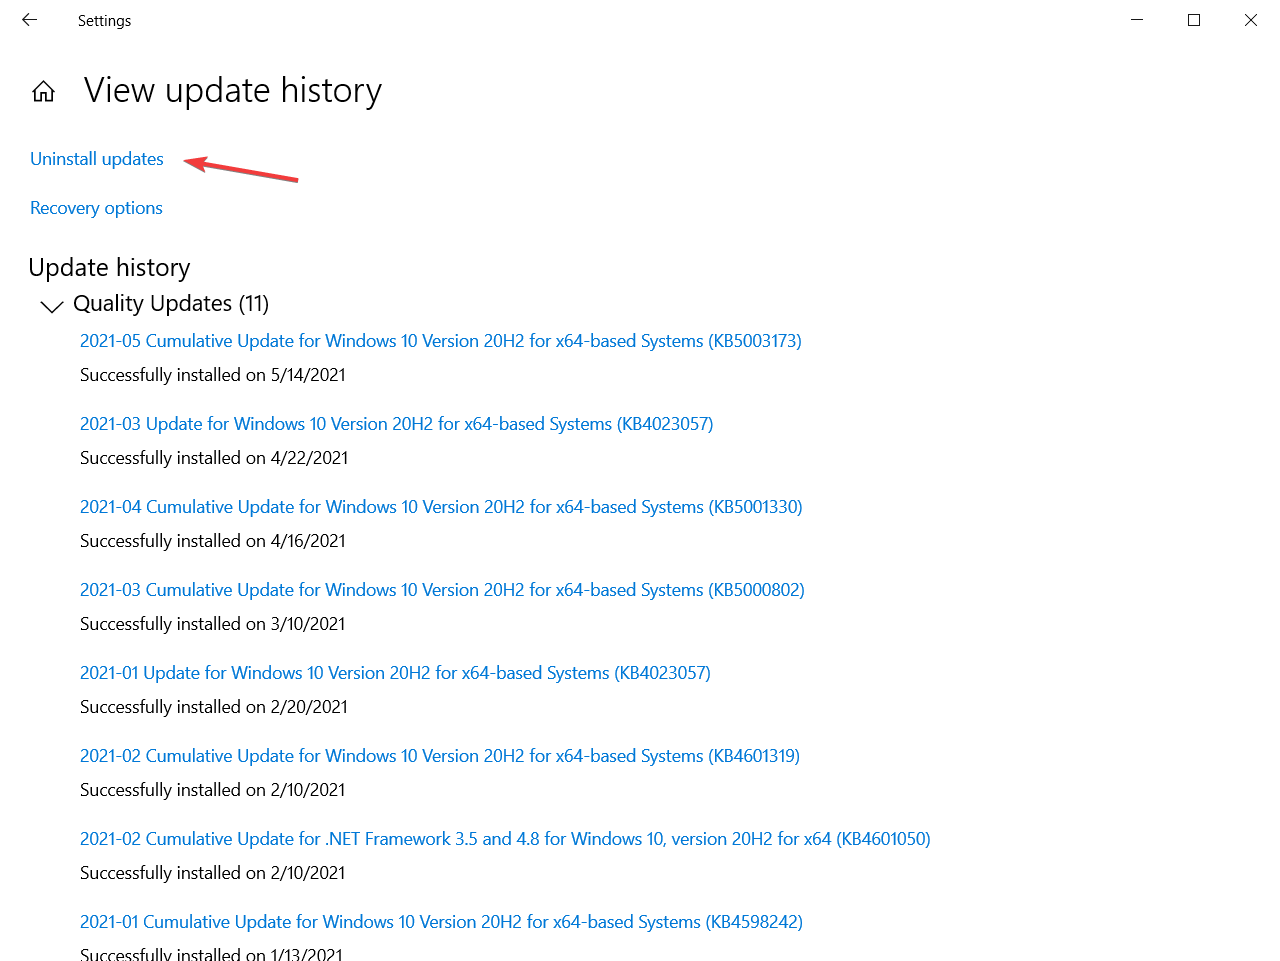
4. Look for the last update or any other recent update that might have caused the error.
5. Uninstall the latest update (and any other recent ones) and restart your PC.
We all know how Windows 10 mandatory updates can bring us a world of pain. Maybe the intentions were good, but the end results are preposterous for some users.
Some of them reported that the Kernel Power Error 41 started with the latest Windows Updates, which rendered the system completely unusable.
Now, since you can’t avoid updates completely, you can at least relieve yourself from the recent updates by uninstalling them from the system.
If you’re having trouble opening the Setting app, check out this complete guide to solve the issue.
9. Disable Auto-restart in the Advanced System settings
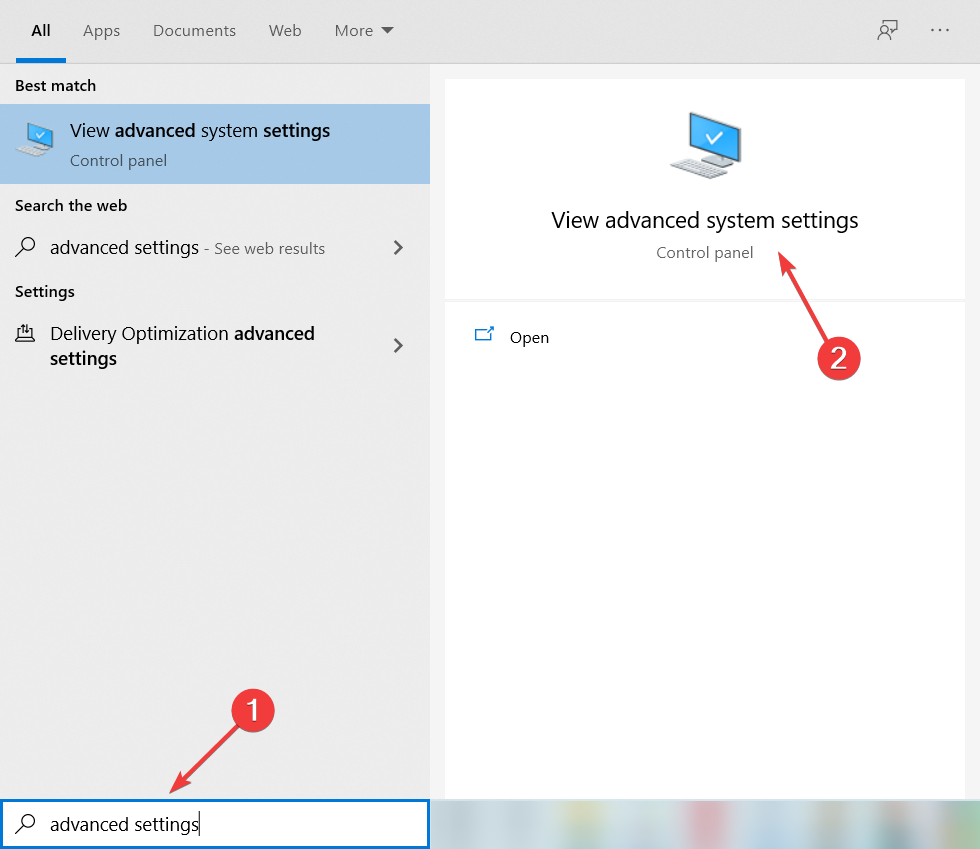
- In the Windows Search bar, type advanced settings and open View advanced system settings.

- Select the Advanced tab, then select Settings under the Startup and Recovery section.

- Uncheck the Automatically restart box and confirm the changes.
This workaround comes into play only and only if you’re 100% sure that your hardware is spot on.
The majority of affected users resolved the issue by replacing some of the key hardware components, with a special focus on the power supply and CPU.
You may increase the voltage towards your CPU in the BIOS. This way, the CPU will always have enough power and will not shut down.
Therefore, if you’re completely certain that everything is bread and butter concerning the hardware, but the sudden shutdowns with the same error reoccur frequently, you can try and disable the error-inflicted auto-restart.
In case it’s an electrical fault, and you are persistently getting the Kernel Power 41 error, the likelihood of damage to sensitive components is even higher. So, in all, the error is pretty bad, and you should get it fixed as soon as possible.
Because event 41 kernel power is pretty common and many users complained about it, even Microsoft made a detailed document explaining the error. You can check out their advanced troubleshooting guide for more info on what is it and what causes it.
Since this problem can be caused by problematic drivers, you should also take a look at our best driver updater software for Windows 10 and get the right tool.
If you have any more questions about the event 41 Kernel Power, feel free to post them in the comments section below.
Still experiencing issues?
SPONSORED
If the above suggestions have not solved your problem, your computer may experience more severe Windows troubles. We suggest choosing an all-in-one solution like Fortect to fix problems efficiently. After installation, just click the View&Fix button and then press Start Repair.
![]()
If you are facing a bluescreen while restarting your system well it is a BSOD (Blue Screen of Death) issue. These are critical errors and require correct measures otherwise you might end losing your OS. Our today’s guide talks about the 0x8000400000000002 error code issue also known as kernel power 41 critical error. According to the users, the issue appears suddenly while playing games or using any applications, the system automatically shows a blue with the error code. However, after restarting the system runs fine, but it can occur again if not fixed. The purpose of this guide is to give you various solutions that can be used to fix this issue.

Causes Of 0x8000400000000002 BSOD Error Code Issue
First of all let’s talk about the symptoms, usually, the issue prevents the user from using any application for a long as it crashes the OS instantly. The majority of the users who are getting this issue have confirmed that the issue commonly occurs while playing games. The issue is related to the Kernel. A kernel is an important part of the system it has all the hardware and software related important drivers, files, and other important things. You can consider Kernel as the medium of connection between the hardware and the software/OS.
Similar Types Of 0x8000400000000002 BSOD Error Code Issue
- 0x8000400000000002 reddit
- 0x8000400000000002 event viewer
- 0x8000400000000002 bsod
- 0x8000400000000002 hotfix
- Event id 41
- 0x8000400000000002 crash
- Kernel-power 41 (63) windows 10
- 0x80000000000000
In order to resolve the 0x8000400000000002 BSOD Error Code Issue, below we have demonstrated all the solutions that will help you in fixing this issue. Just follow the steps carefully and hopefully the issue will be solved.
1. Update Windows
Make sure that your windows is up to date. If there are any pending updates check for it. Follow the below steps to check and update your system.
- STEP 1. Go to the Start Menu, on the left you will see a gear icon, click on it
- STEP 2. Once you are in the Settings, head to Update and Security settings
- STEP 3. As soon as you click on Update and Security, on the left you can see a button for Check for updates
- STEP 4. Hit that button, also make sure that you system is connected to the internet
- STEP 5. Let the updates download and install
- STEP 6. Once the updates are installed, you will see that the issue is no longer exists
2. Update Drivers
Another thing to look for are drivers. Make sure that your system drivers are up to date. BSOD errors occurs when their is fault in any driver.
Follow the below steps to check and ensure that the driver are up to date.
- STEP 1. Hold Windows+R key on the keyboard, now type Devmgmt.msc
- STEP 2. You will be directed to the Device Manager Window
- STEP 3. Under Device manager check all the major driver and update them one by one
- STEP 4. To update, simply right click and then choose Update device
- STEP 5. Also make sure that you are connected to the internet
- STEP 6. Last but not least, after updating the driver; restart your system
3. Modify Power Settings
If both the above methods did not solve your issue, then chances are that your power settings are causing the issue. Various users have fixed the issue using this method. Follow the steps now.
- STEP 1. Open up the Start menu, type Control Panel
- STEP 2. Once you are in the Control Panel, change the view to small
- STEP 3. Now click on Power Options Settings
- STEP 4. On the left click on Change when Computer sleeps thenadvanced powersettings
- STEP 5. Now Expand Hard Disk > turn off Hard Disk after here choose Never
- STEP 6. Now go to the Sleep option here also Set Never
- STEP 7. Save the changes and restart your system, your issue will be gone
4. Disable Fast Startup
Another way that you can use to resolve 0x8000400000000002 error code issue, in case the above method fails is to disable the Fast startup.
- STEP 1. Open up the Start menu, type Control Panel
- STEP 2. Once you are in the Control Panel, change the view to small
- STEP 3. Now click on Power Options Settings
- STEP 4. On the top left click on Choose what Power button do link
- STEP 5. Click on Change settings that are currently available
- STEP 6. Under Shutdown settings section, untick Turn on fast startup
- STEP 7. Save the changes and restart the system
5. Update BIOS
The final way to fix the 0x8000400000000002 error code issue is by updating your system BIOS. Systme BIOS can be easily downloaded from the Maufacturer Site.
Just open up the browser, in the address bar type BIOS followed by your system and model number.
From the results open up the official site and download the installer file. Finally install it and your BIOS will be updated.
Conclusion:
The above guide gives you solutions to fix 0x8000400000000002 error code issue. The guide also talked about the possible causes and symptoms of the issue.
We hope by following this guide your issue is fixed. For more similar guides follow us. Thank you!