
Contents
- What Causes Update Error 0x8024200b in Windows 10?
- How to Fix the Windows 10 Error 0x8024200b
- Fix 1: Run a System Clean-Up Tool to Remove Temporary Files
- Fix 2: Run the Windows Update Troubleshooter
- Fix 3: Clear the Software Distribution Folder
- Fix 4: Reset the Windows Update Components
- Fix 5: Clear the BITS Queue
- Fix 6: Download the Windows Update Directly from the Microsoft Website
- Fix 7: Uninstall Unknown Printer Drivers
- Fix 8: Scan for Malicious Files
- Fix 9: Run Sfc /Scannow
- Fix 10: Run System Restore
- Fix 11: Clean Boot Your OS
- Fix 12: Contact a Microsoft Virtual Agent
![[FIXED] Windows 10 Update Download Error 0x8024200B](https://www.auslogics.com/en/articles/wp-content/uploads/2021/12/how-to-fix-windows-10-update-download-error-0x8024200b.jpg)
What is the Error 0x8024200b on Windows 10? You might encounter it when trying to upgrade to Windows 10 from a previous version of the operating system. It can also happen when downloading or installing one or several Windows 10 updates. If you are facing this issue, this post will be of use to you.
What Causes Update Error 0x8024200b in Windows 10?
The Error 0x8024200b could be due to:
- Poor network connectivity
- Corrupt or missing system files
- Problematic temporary files
- Windows Update corruption
- Outdated device drivers
- Corrupt Windows images
How to Fix the Windows 10 Error 0x8024200b
If you are currently dealing with the 0x8024200b error when downloading or installing Windows updates, you will find several troubleshooting procedures in this guide. These fixes have been proven effective by other users:
- Run a system clean-up tool to remove temporary files
- Run the Windows Update troubleshooter
- Clear the Software Distribution folder
- Reset the Windows update components
- Clear the BITS queue
- Download the Windows 10 Update directly from the Microsoft Website
- Uninstall unknown printer drivers
- Scan for malicious files
- Run Sfc /scannow
- Run a system restore
- Clean boot your OS
- Contact a Microsoft virtual agent
By the time you complete the following procedures, you will have been able to resolve the Windows Update error.
Fix 1: Run a System Clean-Up Tool to Remove Temporary Files
Try clearing the temporary files in your PC if you are finding it difficult to install Windows Updates. We suggest you use Auslogics BoostSpeed to carry out the system clean up. It is an industry-acclaimed tool that is backed by Microsoft.
Fix 2: Run the Windows Update Troubleshooter
Your OS might be able to resolve the update issue automatically. The Update troubleshooter analyzes the WU component to identify what has gone wrong. It then employs a viable repair strategy to fix the identified issue.
Here is how to run the utility:
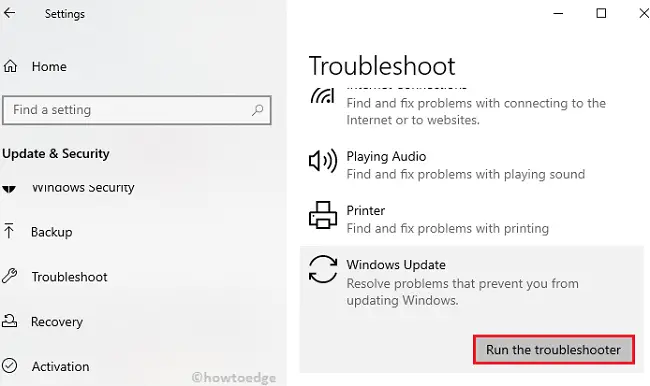
- Open the Settings app by pressing the Windows key + I keyboard combination.
- Click on Update & Security.
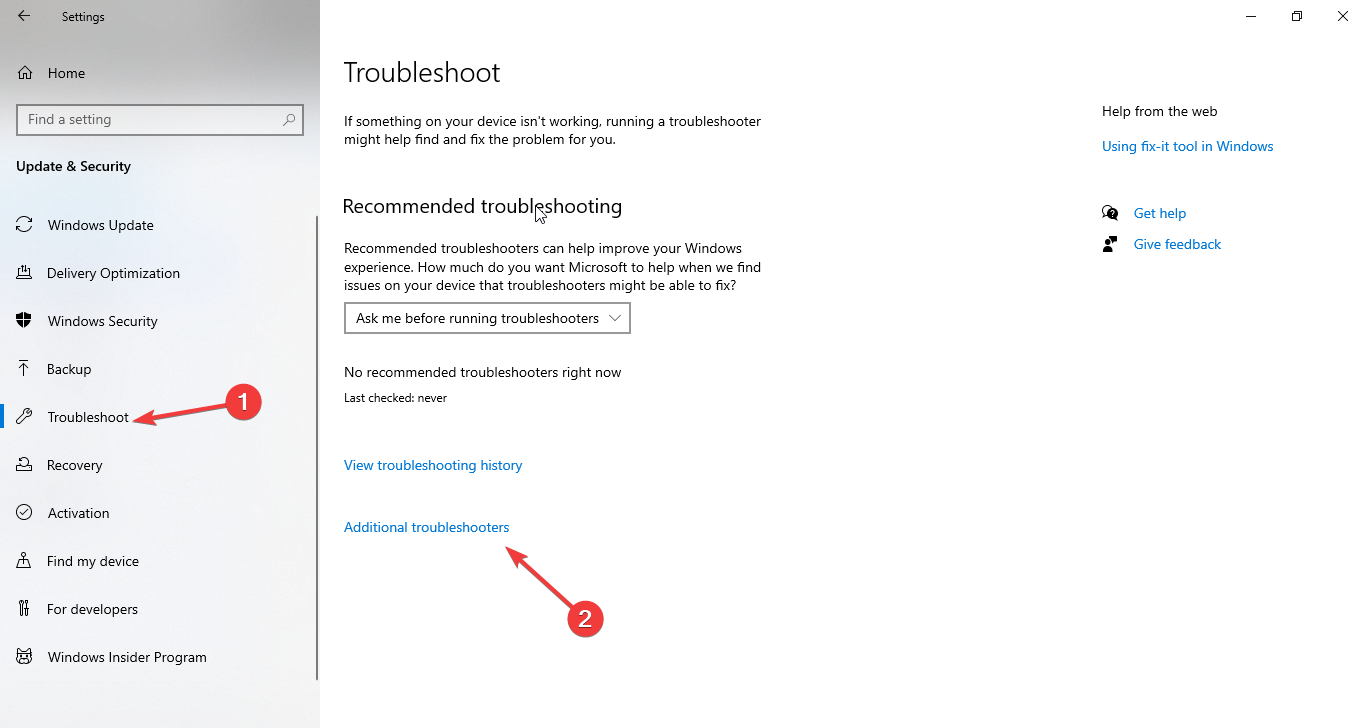
- In the left pane of the new page, locate Troubleshoot and click on the tab.
Tip:
You can quickly get to the Troubleshoot tab by typing “Ms-settings:troubleshoot” (no quotes) in the Run dialog.
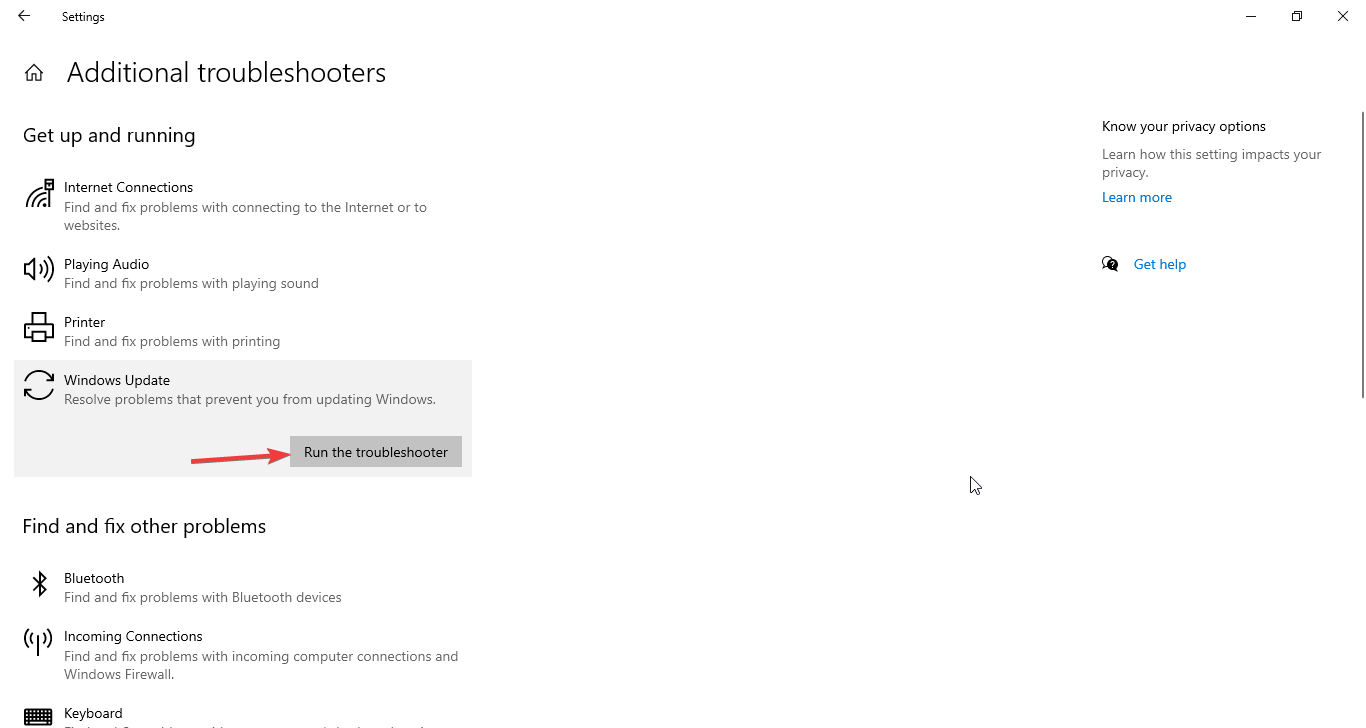
- Click on Windows Update in the right pane.
- Click on Run the troubleshooter and wait for the scan to complete.
- Click on Apply this Fix if the utility detects a problem that it can repair.
- Restart your computer when the process is complete. You can then test whether the WU error has been resolved.
Fix 3: Clear the Software Distribution Folder
In Windows 10, the Software Distribution folder is located in the Windows directory and is used to store temporary files required for the installation of Windows updates. Clearing the contents of this folder may be sufficient in resolving the WU Error 0x8024300B:
- Open the Run dialog and by pressing Win + R keys on your keyboard.
- Type “Services.msc” (no quotes) in the text box and click OK or press Enter.
- Scroll through the list of services in the Services window and locate Windows Update. Right-click on it and select Stop from the context menu to disable the service temporarily.
- Close the Services window. Then, open File Explorer (Press the Win + E keyboard combo) and navigate to: C:WindowsSoftwareDistributionDownload.
- Clear all the contents in the folder.
- Invoke Services.msc again, as shown in Step 2.
- Locate Windows Update. Right-click on it and select on Start from the context menu to start the service.
- Restart your computer and try installing WU again.
Fix 4: Reset the Windows Update Components
Corrupt WU components are likely the cause of the error code you are facing. In a situation like this, you have to reset all associated Windows components and delete the folders where the temporary files are stored.
There are two methods you can use to carry out this fix:
- Reset Windows Update using a command line
- Reset Windows Update using an agent script
We’ll look at how to perform both methods.
Reset Windows Update Using a Command Line
- Open an elevated Command Prompt window. You can do this by pressing the Windows + X combination and clicking on Command Prompt (Admin) from the menu.
- Click Yes when the User Account Control (UAC) prompt is displayed. The prompt requests to give Windows Command Processor administrator privileges.
- Once you are in the Administrator: Command Prompt window, the first action to take is stopping all services that are related to Windows Update, including Windows Update Services, Cryptographic services, BITS services, and MSI Installer. Simply run each of the following lines one after the other:
- net stop wuauserv
- net stop cryptSvc
- net stop bits
- net stop msiserver
Note:
Press Enter when you type or copy and paste each line before moving on to the next one.
- Once you’ve completed Step 3, rename the SoftwareDistribution and Catroot2 folders, which are used by WU, by running the following commands:
- ren C:WindowsSoftwareDistribution SoftwareDistribution.old
- ren C:WindowsSystem32catroot2 Catroot2.old
Renaming the folders forces the system to create fresh folders.
- Now, you have to re-enable the Windows services we stopped in Step 3. Run the following commands:
- net start wuauserv
- net start cryptSvc
- net start bits
- net start msiserver
- Close the elevated Command Prompt window and restart your computer.
Reset Windows Update Using an Agent Script
- Visit the Microsoft Technet page at https://gallery.technet.microsoft.com/scriptcenter/Reset-Windows-Update-Agent-d824badc.
- Download the Reset Windows Update Agent script.
- Extract the contents of the downloaded zip file and double-click on the ResetWUENG executable. Follow the on-screen instructions to run the script that resets your Windows Update components.
- After the process completes successfully, restart your computer and check whether you can now download and install WU.
Fix 5: Clear the BITS Queue
Clearing the BITS queue of current jobs can help:
- Open an elevated command prompt. You can do this by typing “CMD” (no quotes) in the Start menu’s search bar. Then, right-click on Command Prompt and click on the Run as Administrator option.
- Click the Yes button when UAC (User Account Control) requests to grant Windows Command Processor admin privileges.
- Type or copy and paste “bitsadmin.exe /reset /allusers” (Do not include the quotes) and hit Enter to run it.
- Check whether the WU issue has been resolved.
Fix 6: Download the Windows Update Directly from the Microsoft Website
You can download the cumulative update manually and apply it to your system. First, you will have to find the latest update number. You can then search for it in the Update Catalog.
Follow the easy steps below to get the KB number:
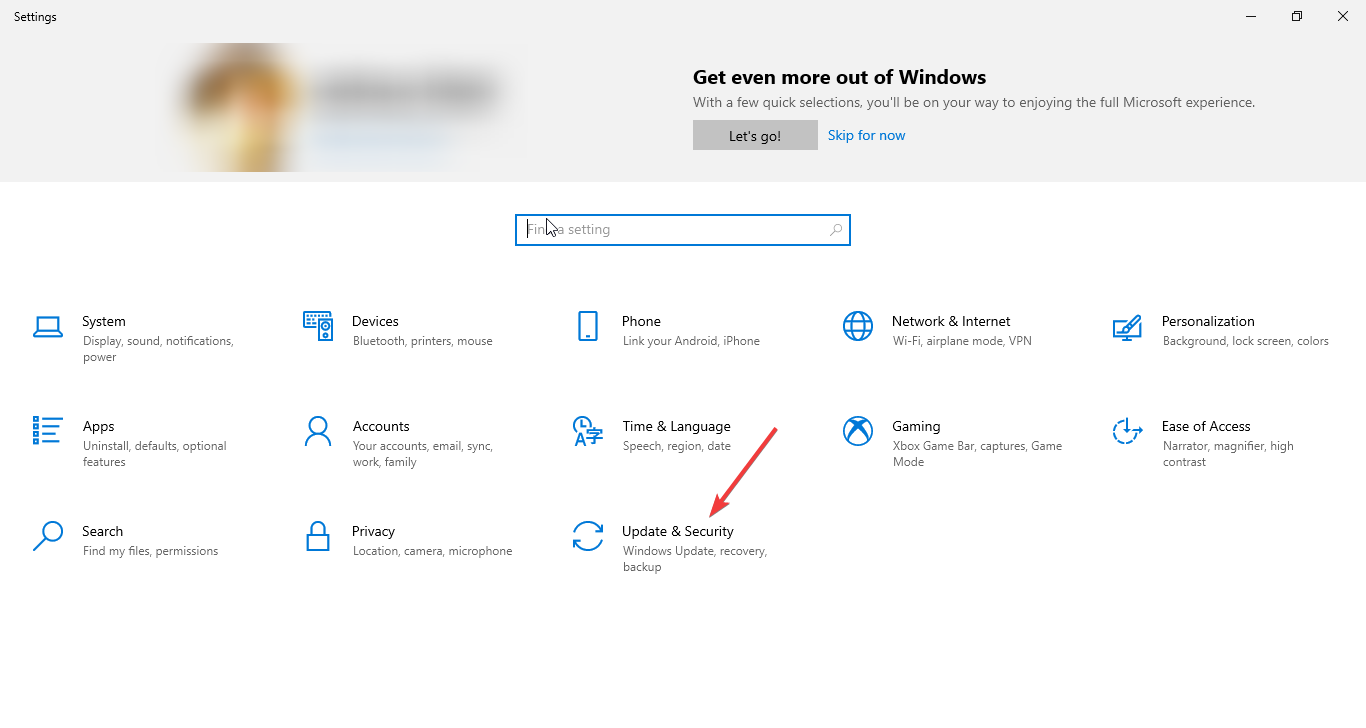
- Open the Settings app. You can do this by going to the Start menu (Press the Win key) and click on the gear icon that represents Settings. Alternatively, you can quickly open the Settings app using the keyboard combination (Win + I).
- Click on Update & Security. Then, click on View Update History.
Once you have obtained the KB number, the next step is to download and install the standalone package manually. Here’s how:
- Launch your browser and visit the Microsoft Update Catalog website at https://catalog.update.microsoft.com/
- Enter the KB number you got earlier in the search field.
- Identify the patch that matches your Windows build and architecture.
- Click the Download button once you have found the pending cumulative update for your OS.
- Click the top link.
- Go to the location in your computer where you saved the downloaded setup file.
- Run the setup file by double-clicking on it. Then, wait for the process to complete.
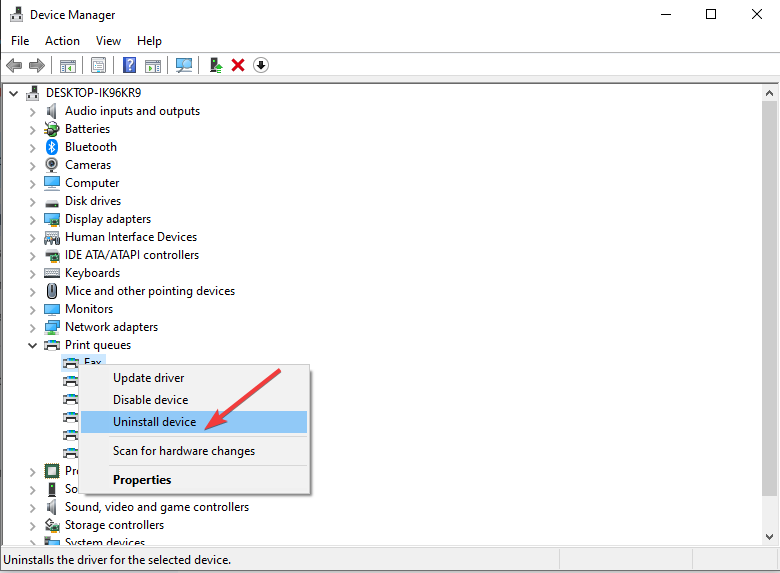
Fix 7: Uninstall Unknown Printer Drivers
Some users reported that the Event Viewer indicated that the 0x8024200B error code is related to multiple printer drivers. Some outdated printer drivers that are not fully compatible with Windows 10 migrate into the new OS after a system upgrade. The drivers cause frequent update failures.
You can fix the issue by installing other pending Windows updates other than the particular one that keeps failing. If that doesn’t work, go to the Device Manager and uninstall the incompatible drivers:
- Open the Run dialog and type “Devmgmt.msc” (no quotes) and click OK to open the Device Manager.
- Expand the Print Queues drop-down and right-click on any driver that has a yellow exclamation mark on it.
Note:
You might also find the incompatible driver under the Other Devices category.
- Click on Uninstall driver from the context menu.
- Afterward, restart your computer.
Fix 8: Scan for Malicious Files
According to some users, the Error 0x8024200B appeared on their PC due to Trojans and other malware. Run a full system scan with Windows Defender to arrest malicious items that are hidden in your computer and causing unexpected issues.
If you have a third-party antivirus program on your PC, disable it temporarily and try running WU again. If your antivirus program causes compatibility issues on your computer, we suggest you get Auslogics Anti-Malware instead. Microsoft backs the software application. A certified Microsoft Silver-Application developer developed it. Auslogics Anti-Malware is a strong and reliable tool that can detect and eliminate even the most stubborn viruses.
Fix 9: Run Sfc /Scannow
You might be dealing with some corrupt/missing system files. To see if that is the case, run the System File Checker:
- Turn on your Internet connection.
- Right-click on the Windows icon to open the Power-user menu. Alternatively, you can press the Windows Key + X.
- Click on Command Prompt (Admin) from the menu.
- When the UAC prompt comes up, click Yes to confirm that you want to grant Windows Command Processor administrator privileges to your computer.
- When the Administrator: Command Prompt window opens, enter (Type or copy and paste) “sfc /scannow” (Don’t type the quotes) and hit Enter on your keyboard.
Note: If you are to type the command, note that there is a space between ‘sfc’ and ‘/scannow.’
- The scan might take a while to complete. It could be up to 15 minutes. So, make sure that you have enough battery power or plug your computer to charge.
- You have to run a DISM scan if SFC finds problems that it cannot resolve. Simply type “Dism /Online /Cleanup-Image /RestoreHealth” (no quotes) and hit Enter to execute it.
- When the DISM scan is complete, run sfc /scannow again.
- Restart your computer and check whether you can now download and install your Windows updates.
Fix 10: Run System Restore
Performing a system restore makes your operating system regain its previous state when there were no issues. Here is how to get it done:
- Log into your PC with your administrator account.
- Go to the Start menu and type “System Restore” (no quotes) in the search field.
- Click the same option from the search results.
- Click the System Restore button when the System Protection window opens. Then click OK.
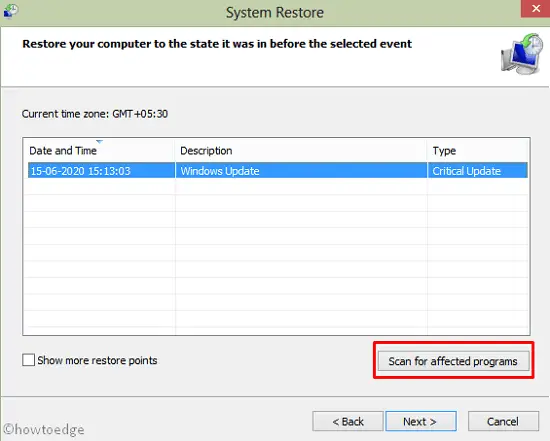
- Click Next and select a restore point.
Note:
When you initiate a restore point, it revokes the system settings, installed apps, and other changes that were made after the restore point was created.
You can click on ‘Scan for affected programs’ to see the apps that will be removed after you initiate the restore.
- Click Next and confirm your chosen restore point. Then, click Finish.
- Restart your computer after the process is complete. Then check if the WU issue has been resolved.
Fix 11: Clean Boot Your OS
Conflicting apps might cause the 0x8024200B error. Perform a clean boot to find out if that is the case and identify the culprits:
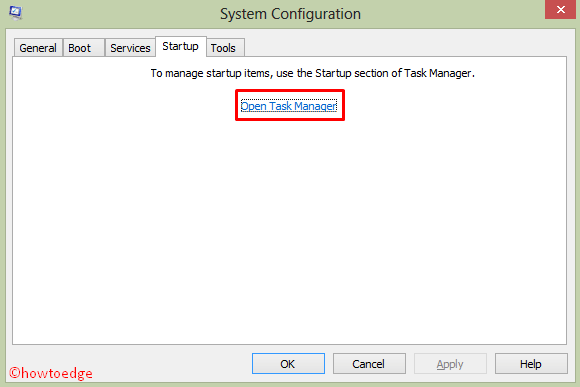
- Open the Run accessory (Press the Win key + R).
- Type “Msconfig” (no quotes) in the text field and press Enter to open the System Configuration window.
- Switch to the Startup tab and click on Open Task Manager.
- Disable each of the running applications one after the other.
- Afterward, close the Task Manager and restart your computer.
Fix 12: Contact a Microsoft Virtual Agent
You can always reach out to a Microsoft Virtual agent for support. They can determine the cause of the error you are dealing with and help you fix it. Visit https://support.microsoft.com/en-in/contact/virtual-agent/?partnerId=smc&flowId=twitter-va-deeplink&userInput=windows%20update%20error.
We hope that the solutions we presented in this guide have enabled you to get past the Windows 10 Update Download Error 0x8024200B. If you have any questions or comments, please don’t hesitate to share them with us in the comments section below.
Explore these tested methods to fix the issue
by Vladimir Popescu
Being an artist his entire life while also playing handball at a professional level, Vladimir has also developed a passion for all things computer-related. With an innate fascination… read more
Updated on December 30, 2022
Reviewed by
Alex Serban

After moving away from the corporate work-style, Alex has found rewards in a lifestyle of constant analysis, team coordination and pestering his colleagues. Holding an MCSA Windows Server… read more
- This error could appear for several reasons, including corrupt temp files, outdated drivers, corrupt Windows updates, or missing system files.
- In this guide, we will discuss all the available fixes to resolve this Windows update error.
![[Solved]Windows 10 Update Download Error 0x8024200B](https://cdn.windowsreport.com/wp-content/uploads/2022/12/SolvedWindows-10-Update-Download-Error-0x8024200B.png)
XINSTALL BY CLICKING THE DOWNLOAD FILE
This software will repair common computer errors, protect you from file loss, malware, hardware failure and optimize your PC for maximum performance. Fix PC issues and remove viruses now in 3 easy steps:
- Download Restoro PC Repair Tool that comes with Patented Technologies (patent available here).
- Click Start Scan to find Windows issues that could be causing PC problems.
- Click Repair All to fix issues affecting your computer’s security and performance
- Restoro has been downloaded by 0 readers this month.
Many users have reported getting the error code 0x8024200b when upgrading to Windows 10/11 from their previous versions. Don’t worry; we can fix this error in no time.
This guide contains all the methods to fix this error and install the Windows updates successfully. Let’s begin!
What causes Windows 10 Update download error 0x8024200b?
There could be several reasons for the error code to appear when trying to upgrade; some of the popular ones are:
- Corrupted Windows Update – If the downloaded update files got damaged, then while installing these updates, you might get this error. You need to reset Windows update components to fix the issue.
- Outdated printer driver – If your printer driver is obsolete, it might cause an issue. It is suggested to uninstall the driver to get rid of the problem.
- Damaged temp files – Your system stores temp files while updating your Windows. If these files get corrupted, then you might get this error code.
- Windows hotfix missing – Microsoft came up with a hotfix for users switching to Windows 10 from an older version of the OS to fix issues due to incompatible drivers. If the update with the hotfix is missing, then you might get this error.
- Missing system files – If your computer is missing important system files used for updating or upgrading Windows, then you can face the issue.
What can I do to fix Windows 10 Update download error 0x8024200b?
Before we go to the advanced fixes, here are a few preliminary checks you should do:
- Restart your computer.
- Use a Clean boot environment to update Windows.
- Run Disk Cleanup.
- Make sure your computer is not infected with viruses or malware.
1. Reset Windows Update components
- Go to the Search bar, type CMD and click Run as administrator.

- To stop BITS, Cryptographic, Windows Update and MSI Installer services, type all these commands one by one and press Enter after each command:
net stop wuauservnet stop cryptSvcnet stop bitsnet stop msiserver - Now to rename SoftwareDistribution and Catroot2 folder, copy and paste these commands and press Enter after each command:
ren C:WindowsSoftwareDistribution SoftwareDistribution.oldren C:WindowsSystem32catroot2 Catroot2.old - To restart the BITS, Cryptographic, Windows Update, and MSI Installer services, type all these commands one by one and press Enter after each command:
net start wuauservnet start cryptSvcnet start bitsnet start msiserver
2. Run the Windows Update troubleshooter
- Press Windows + I to get Settings.
- Go to Update & Security.

- Now, select Troubleshooting, and click Additional troubleshooters.
- Under Get up and running, click Windows Update and select Run the troubleshooter.
- Follow the on-screen instructions to complete the process.
- How to Repair Windows 10 Using a USB [Easy Steps]
- How to activate dark mode on Microsoft Paint
- 5 Quick Ways to Unlock Grayed-Out Menus in Excel
3. Use the SFC and DISM commands
- Open Command Prompt with admin rights using the steps mentioned in Method 1.
- Copy and paste the following commands and press Enter after every command:
sfc/scannowDISM /Online /Cleanup-Image /RestoreHealth
- Once the process is complete, restart your computer.
4. Uninstall printer drivers
- Press Windows + R to open the Run window.

- Type devmgmt.msc and press Enter to open Device Manager.
- Go to the Print queues and expand it. Then, inspect all the listed drivers and locate the one with the yellow triangle beside it.

- Right-click on that driver, and select Uninstall device.
- Restart your computer to let the changes take effect.
5. Clear the BITS queue
- Launch Command Prompt with administrator privileges using the steps in Method 1.
- Copy and paste the following command to clear the BITS queue and press Enter:
bitsadmin.exe /reset /allusers
So, these are methods that you need to follow to get rid of the error code 0x8024200b. Try them and let us know which worked for you in the comments below.
Still having issues? Fix them with this tool:
SPONSORED
If the advices above haven’t solved your issue, your PC may experience deeper Windows problems. We recommend downloading this PC Repair tool (rated Great on TrustPilot.com) to easily address them. After installation, simply click the Start Scan button and then press on Repair All.
![]()
Ошибка 0x8024200B является одной из многочисленных ошибок, которые возникают во время установки обновлений для операционной системы Windows. Данная проблема может возникнуть на всех(все еще поддерживаемых разработчиками) версиях Windows, начиная с Семерки.
Пользователи также могут столкнуться с ошибкой 0x8024200B во время того, как пытаются обновиться с предыдущей версии Windows до Windows 10. Итак, что же может являться причиной для этой проблемы? На самом деле она не одна – их может быть довольно много.
Например, проблемы при обновлении могли начаться из-за поврежденных/отсутствующих записей в Реестре Windows, повреждений некоторых файлов DLL, устаревших обновлений, драйверов, приложений или даже из-за вирусных атак.
Как вы уже могли понять, причин довольно много, но мы все равно попробуем сейчас исправить ошибку 0x8024200B, чтобы вы спокойно смогли загрузить требуемое для вашего компьютера обновление.
Содержание
- Методы решения ошибки 0x8024200B в Windows 7/8.1/10
- Метод №1 Запуск диагностики проблем Центра обновления Windows
- Метод №2 Запуск системной утилиты SFC
- Метод №3 Установка отложенных обновлений
- Метод №4 Проверка компьютера на наличие вирусов
Методы решения ошибки 0x8024200B в Windows 7/8.1/10
Метод №1 Запуск диагностики проблем Центра обновления Windows
Самым простым методом для борьбы с подобными проблемами является запуск Диагностики проблем Центра обновлений Windows. Данная утилита автоматически обнаружит проблему и попытается устранить ее.
- Нажмите на клавиатуре Win+S.
- Впишите в поисковой строке «Устранение неполадок» и выберите найденный результат.
- Под графой «Система и безопасность», нажмите на пункт «Устранение неполадок с помощью Центра обновления Windows».
- Запустите процесс диагностики, и дождитесь ее окончания.
Как только процесс будет завершен, снова попробуйте выполнить обновление своей Windows. Возможно, этой службе удалось исправить проблему с ошибкой 0x8024200B.
Метод №2 Запуск системной утилиты SFC
Данная ошибка может была вызвана поврежденной файловой системой. Чтобы выяснить это, вам потребуется запустить системную утилиту SFC, в функционал которой входит проверка файловой системы и устранение повреждений в ней.
- Нажмите Win+R.
- Введите в пустую строку cmd и нажмите Enter.
- Как только откроется Командная строка, введите в нее команду SFC/SCANNOW и нажмите Enter.
- После окончания процесса сканирования системы, вы увидите результаты проверки, в которой укажут на найденные поврежденные файлы и были ли они исправлены.
Если утилита SFC смогла найти что-то и, что более важно, исправить это, то попробуйте выполнить обновление своего компьютера еще раз, так как, возможно, проблема в виде ошибки 0x8024200B.
Метод №3 Установка отложенных обновлений
Порой, устаревшие драйвера, система или программное обеспечение может препятствовать установке самых новых обновлений. Итак, если дело заключается в этом, то вам всего лишь нужно установить все ранее отложенные вами обновления для операционной системы, а только затем уже попробовать провести установку нового обновления.
Метод №4 Проверка компьютера на наличие вирусов
Если ничего из вышеуказанного не помогло вам в решении ошибки 0x8024200B, то вполне вероятно, что установить обновление мешает какой-то вредоносный элемент в системе, т.е. вирус. Проверьте ваш компьютер на наличие вирусов. Если найдется хоть что-то, то удалите это, а затем снова попробуйте запустить установку обновления через Центр обновления Windows.
The Error Code 0x8024200B is a new update-related issue that prevents users from installing the recent cumulative updates on their devices. In this post, we will cover all probable causes leading to this bug and the corresponding solutions to them.
What is Error 0x8024200B and when does it appear?
The error 0x8024200B is basically an installation error that appears when you try to install pending updates on your computer. This error might occur because of poor network connectivity, corrupt Windows images, missing/infected system files, or obsolete device drivers.
In order to address this issue, try upgrading all your device drivers via optional updates. Manually downloading and installing the available updates might also help to overcome this problem. However, if not, disable external antivirus, Run the Update Troubleshooter, clean SDF, or Reset update components. If none solves this bug, use previously created restore points or clean install Windows 11/10.
To solve the installation or update error 0x8024200B in Windows 10, try the following workarounds –
1] Manually Install Windows 11/10 Updates
While receiving any kind of update-related issues, users must try manually downloading the pending cumulative update and applying it to their system. At times, this alone solves several upgrade errors including 0x8024200B. However, you need to first know the “latest update number” so as to search over the Update Catalog. To do so, follow the below guideline –
Note: If you are on Windows 11, read this tutorial. Else, follow the steps illustrated below –
Part 1: Get the “KB” number
- Press the Windows key and click over the gear icon.
- Doing so will launch the Windows Settings UI.
- Click Update & Security thereafter “View Update history” on the next page.

Part 2: Manually download/Install the Standalone Package
Since now you know the CU number, go through the below steps –
- Launch the default browser and visit Update Catalog.
- Go to the search bar and type the “KB” number you copied earlier.
- Next, locate the patch fitting as per your system architecture and OS Build version.
- Once you find the pending cumulative update, hit the Download button next to it.
- On the succeeding window, hit the top link.
- Now, reach out to the Download folder and click twice on the setup file.
- Usually, this takes a few minutes to complete installing the set-up, so wait accordingly.
2] Run Windows Update Troubleshooter
In general, manually updating to the recent security patch solves any kind of update or installation errors. But, if the error persists even after, you should try running the Windows Update troubleshooter. Here’s how to proceed –
- Launch the Windows Settings UI (WinKey + I).
- Select Update & Security henceforth Troubleshoot.
- Jump to the right pane and expand “Windows Update“.
Note: Windows 10 20H1 users should rather hit “Additional troubleshooters” first followed by “Windows Update” on the next screen.
As we all know, Windows 11 has made several changes to the Settings app, you can’t access the troubleshooter this way. Instead, you need to browse this path –
Settings > System > Troubleshoot > Other troubleshooters > Windows Update > Run
- Coming back to Windows 10, when the box expands, hit “Run the troubleshooter”.
- Now, follow the onscreen instruction to complete the remaining steps.
3] Scan for Malicious Files
At times, this error may occur due to some phishing files or trojans. Hence, we recommend performing a Full scan via Windows Defender.
Note: If you are using a third-party antivirus program, it’s better to disable or remove them and try updating your PC again.
4] Perform SFC/Scannow
If the troubleshooter doesn’t solve this issue, there may lie some corrupt/missing system files. To confirm whether this indeed is the case or not, we suggest running a code i.e. sfc/scannow on the Command Prompt. Here are the essential steps –
- Right-click on the Taskbar and click Task manager using the shortcut menu.
- Head over to the File Menu and choose Run new task.
- Type cmd (Admin) near the blinking cursor and press the Enter key.
- On the elevated console, type sfc/scannow and press Enter again.

- This takes approximately 10-15 minutes for completion, so wait accordingly.
- Once over, Restart your computer and check whether you can install new cumulative updates or not.
5] Clean Boot Windows 10
Many a time, the presence of corrupt apps or their leftover files may also cause the 0x8024200B error. To solve this, you should perform a clean boot using the below steps –
- Press Win+Q, type MSConfig, and press Enter.
- When the System Configuration window comes into view, go to the Startup tab and click “Open Task Manager“.
- Select each one of the running programs and click Disable.
- After disabling all of the running applications, close Task Manager, and Restart your PC.
6] Reset Windows Update Components
Cleaning Software Distribution folder
Sometimes, this is all about the cache stored inside the Software Distribution folder. To rule out this possibility, just clean this following the below guideline –
- Start the Run dialog (Win & R), type
services.msc, and hit OK. - On the next screen, scroll down to Windows Update.
- Make a right-click on the same and click “Stop” to temporarily disable this service.

- Now, reach out to the below location and clear all the contents that lie inside the folder –
C:WindowsSoftwareDistributionDownload
- Afterward, re-visit the Services window and start the “Windows Update” service.
- Once over, Reboot the device so as to save the recent changes.
If the error still occurs, follow the next part –
7] Reset Windows Update Components
The presence of corrupt update components may also erupt in error 0x8024200B. So, you better run a few codes on the Windows console to fix them. Here’s how to proceed –
- Press Win & S shortcut and type cmd in the text box.
- Make a right-click on the top result and choose Run as Administrator.
- When the UAC window comes into view, tap Yes to go ahead.
- On the elevated prompt area, enter the below codes one by one. These commands will stop some of the essential services like BITS, Windows Update, Cryptographic, etc.
net stop bits
net stop wuauserv
net stop appidsvc
net stop cryptsvc
- Next, remove the qmgr*.dat files by running the below command –
Del “%ALLUSERSPROFILE%\Application Data\Microsoft\Network\Downloader\qmgr*.dat”
- Subsequently, execute cd /d %windir%\system32 on the elevated interface.
- You need to now re-register the .dll files using the below codes –
exe atl.dll
exe urlmon.dll
exe mshtml.dll
exe shdocvw.dll
exe browseui.dll
exe jscript.dll
exe vbscript.dll
exe scrrun.dll
exe msxml.dll
exe msxml3.dll
exe msxml6.dll
exe actxprxy.dll
exe softpub.dll
exe wintrust.dll
exe dssenh.dll
exe rsaenh.dll
exe gpkcsp.dll
exe sccbase.dll
exe slbcsp.dll
exe cryptdlg.dll
exe oleaut32.dll
exe ole32.dll
exe shell32.dll
exe initpki.dll
exe wuapi.dll
exe wuaueng.dll
exe wuaueng1.dll
exe wucltui.dll
exe wups.dll
exe wups2.dll
exe wuweb.dll
exe qmgr.dll
exe qmgrprxy.dll
exe wucltux.dll
exe muweb.dll
exe wuwebv.dll
- Once over, Restart the Windows Services that you have stopped earlier. To do so, execute the following commands –
net start bits
net start wuauserv
net start appidsvc
net start cryptsvc
- At last, Reboot your system and see if the “Check for updates” starts working or is still causing you trouble.
8] Use System restore
The above solutions should resolve any update-related issues. However, if not, you are left with two choices i.e. use System Restore or Clean install Windows. If you haven’t created any restore points in the past, download the latest Media creation tool and make a bootable file.
The system restore points will take your PC back to the state where everything was working pretty normally. All you need is to follow the below steps –
- First of all, log into your device as an Administrator.
- Press Win & S hotkey and type System Restore in the search field.
- Click on the top result to launch the System Protection wizard.
- Tap the System Restore button then OK to proceed further.

- Click Next.
- Select the recent restore file and click “Scan for affected programs“.
- If none are found, hit Next again.
- Tap Finish and wait for this task to complete.
That’s it, I hope the above set of solutions indeed fixes the 0x8024200B error. In case, you have any queries or suggestions, let us know through the comments below.
How to stop Windows 10 Update in progress?
To stop an ongoing Windows update on your computer, do the following –
- Press Win + I to launch Settings.
- Select Update & Security and then Windows Update.
- Click “Pause updates for 7 days” and the system will stop downloading an ongoing cumulative update.
Restart your PC and check if this stops Windows 10 update in progress.
Tip: If you are facing update, activation, or driver issues on your Windows PC, try RESTORO PC Repair Tool. This software will scan your device for potential issues and resolve them automatically.

Содержание
- Что вызывает ошибку 0x8024200b в Windows?
Несколько пользователей Windows обращались к нам с вопросами после того, как не смогли установить одно или несколько разных обновлений Windows. После исследования ошибки с помощью Просмотрщик событий, затронутые пользователи обнаружили, что код ошибки связан с несколькими драйверами принтера. Оказывается, проблема не ограничивается определенной версией Windows, поскольку подтверждено, что она возникает в Windows 7, Windows 8.1 и Windows 10.

Мы исследовали эту конкретную проблему, просмотрев различные отчеты пользователей и стратегии восстановления, которые они обычно использовали для исправления этого конкретного сообщения об ошибке. Согласно нашим исследованиям, существует несколько различных возможных виновников, которые могут нести ответственность за эту проблему. Вот краткий список сценариев, которые могут привести к появлению 0x8024200b ошибка:
- Устаревший драйвер принтера — В большинстве случаев эта конкретная проблема возникает из-за устаревшего драйвера принтера, который был неправильно перенесен, когда пользователь обновил старую версию Windows до Windows 10. Если этот сценарий применим, проблема может быть решена с помощью диспетчера устройств. несовместимого драйвера принтера.
- Повреждение Центра обновления Windows — Также возможно, что проблема возникает после того, как WU загрузил обновление, но некоторые файлы, принадлежащие ему, были повреждены до того, как компонент обновления смог установить его на машину. В этом случае единственный способ установить обновление — это сбросить все компоненты Центра обновления Windows вручную или с помощью сценария.
- Исправление Windows не установлено — Как оказалось, Microsoft выпустила исправление специально для ситуаций, когда пользователи переходят на Windows 10 со старой версии и переносят несовместимый драйвер принтера. Обновление должно быть установлено автоматически через WU. Если на вашем компьютере не установлена последняя версия, вы сможете решить проблему, установив все остальные ожидающие обновления, чтобы убедиться, что исправление установлено.
Если вы в настоящее время пытаетесь решить ту же проблему 0x8024200b ошибка при установке обновления Windows эта статья предоставит вам несколько различных шагов по устранению неполадок. Ниже вы найдете набор стратегий исправления, которые другие пользователи в аналогичной ситуации успешно использовали для устранения ошибки. Эффективность каждого из возможных исправлений ниже подтверждена как минимум одним затронутым пользователем.
Если вы хотите быть максимально эффективными, мы советуем вам следовать приведенным ниже методам в том порядке, в котором они представлены, поскольку мы упорядочили их по эффективности и серьезности. В конце концов, вы должны найти исправление, которое устранит проблему независимо от виновника, который ее вызвал.
Давай начнем!
Метод 1. Запуск средства устранения неполадок Центра обновления Windows
Ваша первая остановка в устранении этой проблемы — это протестировать и убедиться, что ваша версия Windows не оборудована для автоматического решения проблемы. Несколько затронутых пользователей сообщили, что Ошибка Центра обновления Windows 0x8024200b больше не происходило после того, как они запустили Средство устранения неполадок Центра обновления Windows.
Эта утилита оснащена серией автоматических стратегий восстановления, охватывающих наиболее распространенные сценарии, которые могут нарушить функцию обновления Windows. Он доступен во всех последних версиях Windows, включая Windows 7, Windows 8.1 и Windows 10.
Эта утилита устранения неполадок проанализирует компонент WU в целом, чтобы выяснить, не затронуты ли какие-либо функции. Если это так, он автоматически порекомендует жизнеспособную стратегию ремонта в зависимости от типа выявленной проблемы.
Вот краткое руководство по запуску средства устранения неполадок Центра обновления Windows:
- Нажмите Клавиша Windows + R открыть Бегать диалоговое окно. Затем введите «ms-settings: устранение неполадок » и нажмите Войти открыть Исправление проблем вкладка Настройки таб.

- Находясь на вкладке устранения неполадок, перейдите на правую панель и прокрутите вниз до Вставай и работай категория. Оказавшись там, нажмите Центр обновления Windows а затем нажмите на Запустите средство устранения неполадок из появившегося контекстного меню.
- Как только вы войдете в утилиту устранения неполадок Центра обновления Windows, дождитесь завершения первоначального сканирования.
- Если утилитой обнаружена проблема, которая уже решена стратегией исправления, она будет автоматически рекомендована вам. Если это произойдет, все, что вам нужно сделать, это нажать на Применить это исправление, затем следуйте инструкциям на экране, чтобы применить рекомендованное исправление.
- Когда стратегия восстановления будет применена, закройте средство устранения неполадок и перезагрузите компьютер.
- После завершения следующего запуска системы повторите действие, которое ранее вызывало код ошибки, и посмотрите, решена ли проблема.


Если вы все еще видите 0x8024200b ошибка при попытке установить проблемное обновление, перейдите к следующему способу ниже.
Метод 2: установка всех ожидающих обновлений Windows
Как оказалось, в большинстве случаев эта проблема возникает из-за некоторых сильно устаревших драйверов принтера, которые попали в более новую версию WIndows. Чаще всего это происходит в ситуациях, когда пользователь обновляет более старую версию Windows до Windows 10, а старые драйверы переносятся, даже если они не полностью совместимы с новой операционной системой.
В некоторых случаях это приведет к частым сбоям обновления, пока проблема не будет решена. К счастью, поскольку проблема довольно старая, Microsoft уже выпустила исправление для этой проблемы. Он включен в одно из критических обновлений, автоматически доставляемых через WU.
Если вы не установили ожидающие обновления, скорее всего, вы сможете решить проблему, просто убедившись, что вы устанавливаете все ожидающие обновления (кроме того, которое дает сбой). Вот краткое руководство, как это сделать:
- Нажмите Клавиша Windows + R открыть Бегать диалоговое окно. Затем введите «‘ms-settings: windowsupdate » и нажмите Войти , чтобы открыть вкладку Windows Update в приложении «Настройки».
Примечание: Если у вас нет Windows 10, используйте «Wuapp» вместо этого.
- Как только вам удастся попасть на экран Центра обновления Windows, начните с нажатия Проверить обновления (с правой панели).
- Следуйте инструкциям на экране, чтобы установить каждое ожидающее обновление (оставьте обновление, которое не работает последним)
- Если у вас есть несколько ожидающих обновлений, вам может быть предложено перезагрузить компьютер перед установкой каждого обновления. Если это произойдет, сделайте это, но обязательно вернитесь к этому экрану при следующей загрузке и установите оставшиеся обновления.
- После установки каждого ожидающего обновления перезагрузите компьютер и посмотрите, будет ли решена проблема при следующем запуске, попытавшись установить обновление, которое ранее не удавалось.


Если вы все еще сталкиваетесь с 0x8024200b Ошибка при попытке установить проблемное обновление или если на вашем компьютере уже была последняя версия, перейдите к следующему способу ниже.
Метод 3: удалите неизвестный драйвер принтера
Если установка каждого ожидающего обновления вместе с исправлением проблемы не приводила к 0x8024200b код ошибки, вы можете решить проблему на неопределенный срок, просто удалив проблемный драйвер принтера с помощью диспетчера устройств.
Несколько пользователей, пытающихся решить ту же проблему, сообщили, что 0x8024200b код ошибки больше не возникал, и обновление установилось нормально после удаления устройства «Неизвестный принтер» из списка принтеров в диспетчере устройств. В результате будет удален несовместимый драйвер, который вызывает проблему, что устранит конфликт программного обеспечения.
Вот краткое руководство по удалению драйвера принтера, отвечающего за 0x8024200b код ошибки:
- Нажмите Клавиша Windows + R открыть Бегать диалоговое окно. Затем введите ‘Devmgmt.msc” и ударил Войти открыть Диспетчер устройств утилита.
- Как только вы окажетесь внутри Диспетчер устройств, прокрутите список установленных устройств и раскройте раскрывающееся меню, связанное с Принтеры (или Очереди печати).
- Внутри Принтеры (очереди печати) категории, посмотрите, удастся ли вам обнаружить несовместимый драйвер. В большинстве случаев он будет содержать восклицательный знак рядом со значком и называется «Неизвестный драйвер“.
Примечание: Вы также можете найти несовместимое устройство в Другие устройства.
- Как только вам удастся определить виновника, щелкните его правой кнопкой мыши и выберите Удалить устройство избавиться от конфликта.
- После удаления несовместимого драйвера из списка несовместимых устройств перезагрузите компьютер и посмотрите, будет ли проблема решена при следующем запуске системы.


Если то же самое 0x8024200b код ошибки все еще возникает, перейдите к следующему способу ниже.
Метод 4: сброс компонентов Центра обновления Windows
На основании наших исследований 0x8024200b Код ошибки также встречается в ситуациях, когда компонент Центра обновления Windows (WU) успешно загрузил обновление, но оно каким-то образом было повреждено до того, как компонент обновления смог установить его.
В подобных ситуациях единственное жизнеспособное решение — сбросить все компоненты Центра обновления Windows, участвующие в операции обновления, и удалить (переименовать) папки, в которых хранятся временные файлы обновлений. Несколько затронутых пользователей сообщили, что проблема была полностью решена после того, как они выполнили ряд шагов, которые позволили им эффективно сбросить все компоненты WU.
Вы можете добиться этого двумя разными способами: вы можете использовать заранее созданный скрипт, который будет выполнять все необходимые операции автоматически, или вы можете сделать это самостоятельно с терминала. Мы использовали оба подхода, поэтому не стесняйтесь следовать любому руководству, которое вам больше нравится:
Сброс WU из окна командной строки
- Откройте диалоговое окно «Выполнить», нажав Клавиша Windows + R. В окне запуска введите ‘Cmd’ и нажмите Ctrl + Shift + Enter , чтобы открыть командную строку с правами администратора. Однажды Контроль учетных записей пользователей Появится запрос (UAC), нажмите да чтобы предоставить доступ администратора.
- Когда вы находитесь в командной строке с повышенными привилегиями, вставьте или введите следующие команды в любом порядке, но убедитесь, что вы нажали Войти после каждой строки, чтобы остановить все службы, связанные с Центром обновления Windows:
net stop wuauserv net stop cryptSvc чистые стоповые биты net stop msiserver
Примечание: На этом этапе мы остановим все службы, участвующие в операциях обновления Windows: службы обновления Windows, установщик MSI, службы криптографии и службы BITS.
- После того, как все соответствующие службы будут заблокированы, введите или вставьте следующие команды и нажмите Enter после каждой, чтобы переименовать две папки (Программное обеспечение и Catroot2) используется WU:
ren C: Windows SoftwareDistribution SoftwareDistribution.old ren C: Windows System32 catroot2 Catroot2.old
Примечание: Переименовывая эти папки, мы заставляем ОС создавать новые папки, которые не испорчены повреждениями.
- После того, как две папки были переименованы, выполните следующие команды в любом порядке и нажимайте Enter после каждой, чтобы снова включить те же службы, которые мы ранее отключили на шаге 2:
net start wuauserv net start cryptSvc чистые стартовые биты net start msiserver
- После повторного включения служб перезагрузите компьютер и посмотрите, будет ли проблема решена при следующем запуске системы.

Сброс WU с помощью сценария агента WU
- Откройте эту страницу Microsoft Technet (Вот), чтобы скачать Сбросить агент обновления Windows сценарий.
- Когда загрузка будет завершена, используйте такую утилиту, как 7Zip или WinZip, чтобы извлечь содержимое ResetWUEng.zip.
- После извлечения архива дважды щелкните исполняемый файл ResetWUENG и следуйте инструкциям на экране, чтобы запустить сценарий, который сбросит все ваши компоненты WU.
- После завершения процесса и получения сообщения об успешном завершении перезагрузите компьютер и проверьте, будет ли проблема решена при следующем запуске системы.
