
hp-concentra-wrapper-portlet
![]()
Actions
Issue
A ‘Carriage Jam. The print carriage cannot move. Open the ink cartridge access door, clear any paper jam or obstruction, and select OK‘ message displays on the printer control panel.
One of the following error codes might display with the message:
-
0x61000008
-
0x6100000B
-
0x6100001D
The carriage, which holds the cartridges, stalls in the printer. A paper jam might have occurred previously.
You might also experience the following symptoms:
-
The printer does not print.
-
The print job stops unexpectedly.
Solution one: Restart the printer
Follow these steps to restart the printer, and then try to print a test page.
Step one: Restart the printer
-
Press the Power button to turn off the printer.
-
Wait 60 seconds.
-
Press the Power button to turn on the printer.
note:
The printer might go through a warm-up period which can last several minutes. Wait until the printer is idle and silent before continuing.
Step two: Print a Printer Status Report
Video on printing a test page
The following video demonstrates how to print a printer status report.
note:
This video shows the HP Officejet 4620 e-All-in-One Printer series, but the steps are the same for your printer.

Print a test page to make sure that the hardware functions correctly.
-
Load plain white U.S. letter or A4 size paper in the tray.
-
On the product control panel, press the Setup button (
 ).
). -
Press the button (
) next to the Down Arrow ( ) until Reports displays next to OK, and then press the button next to OK. -
Press the button next to the Down Arrow (
) until Printer Status Report displays next to OK, and then press the button next to OK again. The test page prints.
 ).
). ) next to the Down Arrow (
 ) until
 -
If these steps resolved the issue, and the test page prints, there is no need to continue troubleshooting.
-
If the issue persists, continue with the next solution.
-
If the test page does not print, continue with the next solution.
Solution two: Clear the jam from inside the printer
Follow these steps to clear the jam from the cartridge access area, the cleanout area, and from underneath the printer.
note:
Use a flashlight to complete these steps.
Video on clearing a carriage jam
The following video demonstrates how to clear a carriage jam.
note:
This video shows the HP Officejet 4620 e-All-in-One Printer series, but the steps are the same for your printer.
Step one: Clear the jam from the cartridge access area
Follow these steps to remove jammed paper from inside the cartridge access area.
-
Press the Power button to turn on the printer, if it is not already turned on.
-
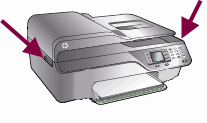
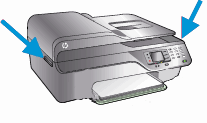
Locate the slots on the sides of the printer.
Figure : Locate the slots on the sides of the printer
-
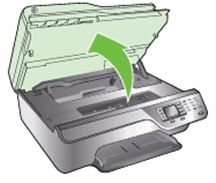
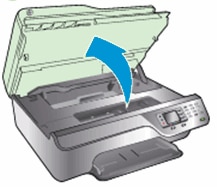
Place your fingers in the two slots on the sides of the printer, and then lift the cartridge access door. The carriage moves into the cartridge access area.
Figure : Open the cartridge access door
-
Disconnect the power cord from the rear of the printer.
warning:Do not reach into the cartridge access
area when the printer is plugged into an electrical outlet.
-
Disconnect the USB cable from the rear of the printer if you have a USB connection to the computer.
-
Gently remove any jammed paper from the cartridge access area. To avoid tearing any whole sheets of paper, pull the paper with both hands.
-
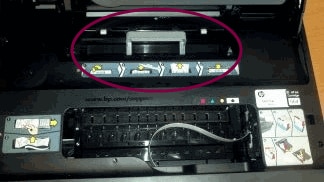
Use a flashlight to thoroughly check for torn pieces of paper that might remain in the cartridge access area. If any torn pieces of paper remain inside the printer, more jams are likely to occur.
Use a flashlight
Paper jammed in carriage path
-
Slide the carriage to the right side of the cartridge access area, and then inspect the left side of the cartridge access area for torn pieces of paper that might remain inside the printer.
-
Remove any torn pieces of paper you find.
-
Slide the carriage to the left side of the cartridge access area, and then inspect the right side of the cartridge access area for torn pieces of paper that might remain inside the printer.
-
Remove any torn pieces of paper you find.

Step two: Clear the jam from inside the cleanout door
Follow these steps to remove any jammed paper from the cleanout door.
-
Make sure that the power is off and that the power cord is disconnected from the rear of the printer.
warning:Do not reach into the cartridge access
area when the printer is plugged into an electrical outlet.
-
Make sure the USB cable is disconnected from the rear of the printer, if you have a USB connection to the computer.
-
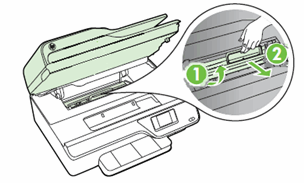
With the cartridge access door open, locate the cleanout door. The door is behind the cartridge access area towards the rear of the printer.
Figure : The cleanout door
-
Pull the cleanout door up and then out to remove it from the printer.
Figure : Remove the cleanout door
-
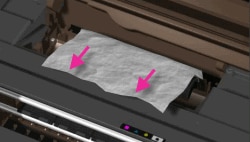
Gently remove any jammed paper. To avoid tearing any whole sheets of paper, pull the paper with both hands.
Figure : Remove any jammed paper
-
Use a flashlight to thoroughly check for torn pieces of paper that might remain in the cleanout area. If any torn pieces of paper remain inside the printer, more jams are likely to occur.
Figure : Use a flashlight
-
Remove any torn pieces of paper you find.
-
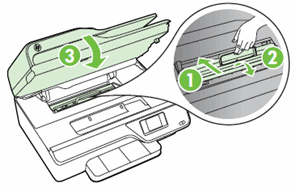
Gently reinsert the cleanout door into the cleanout area, and then press down on the handle until the door snaps into place.
-
Close the cartridge access door.
-
Insert the cleanout door into the cleanout area
-
Push down on the door handle until the door snaps into place
-
Close the cartridge access door
Figure : Reinsert the cleanout door and close the cartridge access door
-
Step three: Clear the jam from underneath the Printer
If you are unable to remove jammed paper from the cartridge access area or from inside the cleanout door, follow these steps to clear the jam from underneath the printer.
-
Press the Power button to turn off the printer, if it is not off already.
-
Disconnect the power cord from the rear of the printer, if it is not disconnected already.
-
Turn the printer onto its right side so that you can access its underside.
caution:Before turning the printer, use your hand to secure the scanner lid.
-
Slide the paper tray out until it stops.
-
Gently remove any jammed paper and bits of torn paper from the input tray area and from underneath the printer. To avoid tearing any whole sheets of paper, pull the paper with both hands.
Figure : Remove paper from underneath the printer
-
Use a flashlight to thoroughly check for torn pieces of paper that might remain inside the printer. If any torn pieces of paper remain inside the printer, more jams are likely to occur.
Figure : Use a flashlight
-
Remove any torn pieces of paper you find.
-
Slide the paper tray back in until it stops.
-
Return the printer to its normal position.
-
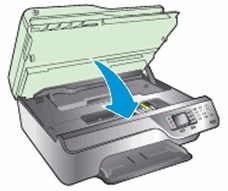
Open the cartridge access door, and then look inside the printer for any loose objects that might have shifted when you turned the printer over. Remove any loose objects you find.
-
Close the cartridge access door.
Figure : Close the cartridge access door
-
Reconnect the power cord to the rear of the printer.
-
Press the Power button to turn on the printer.

Step four: Print a Printer Status Report
Print a test page to make sure that the hardware functions correctly.
How to print a test page
Follow these steps to print a test page.
-
Load plain white U.S. letter or A4 size paper in the tray.
-
On the product control panel, press the Setup button (
). -
Press the button (
) next to the Down Arrow ( ) until Reports displays next to OK, and then press the button next to OK. -
Press the button next to the Down Arrow (
) until Printer Status Report displays next to OK, and then press the button next to OK again. The test page prints.
-
If these steps resolved the issue, and the test page prints, there is no need to continue troubleshooting.
-
If the issue persists, continue with the next solution.
-
If the test page does not print, continue with the next solution.
Solution three: Remove and reinsert the cartridges
Improper placement or installation of the cartridges can cause the printer to indicate a carriage jam error. Follow these steps to remove and then reinsert the cartridges.
Step one: Remove and reinsert the cartridges
Follow these steps to remove and then reinsert the cartridges.
-
Press the Power button to turn on the printer, if it is not already on.
-
Locate the two slots on the sides of the printer.
Figure : Slots on the sides of the printer
-
Place your fingers in the slots on the right and left sides of the printer, and then lift to open the cartridge access door. The carriage moves into the carriage access area.
Figure : Open the cartridge access door
-
Wait until the carriage is idle and silent before proceeding.
-
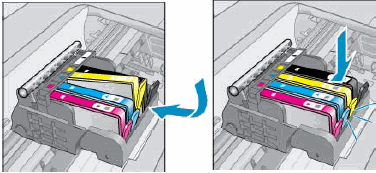
Press in the tab on the front of a cartridge to release it, and then pull up on the cartridge to remove it from the slot.
Figure : Remove the cartridge from its slot
-
Repeat these steps to remove the other cartridges.
-
To reinsert a cartridge, hold the cartridge so that the cartridge contacts are facing toward the printer.
-
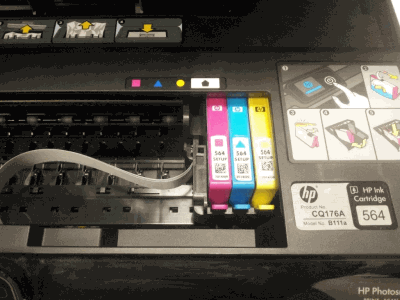
Match the colored dot on the cartridge with the dot of the same color on the carriage.
-
Slide the cartridge into its slot, and then gently press the cartridge down until it clicks into place.
note:
Make sure that the colored dot on the cartridge label matches the colored dot on the slot.
Figure : Install the cartridge
-
Repeat these steps to reinsert the other cartridges.
-
Close the cartridge access door.
Figure : Close the cartridge access door

Step two: Print a Printer Status Report
Print a test page to make sure that the hardware functions correctly.
How to print a test page
Follow these steps to print a test page.
-
Load plain white U.S. letter or A4 size paper in the tray.
-
On the product control panel, press the Setup button (
). -
Press the button (
) next to the Down Arrow ( ) until Reports displays next to OK, and then press the button next to OK. -
Press the button next to the Down Arrow (
) until Printer Status Report displays next to OK, and then press the button next to OK again. The test page prints.
-
If these steps resolved the issue, and the test page prints, there is no need to continue troubleshooting.
-
If the issue persists, continue with the next solution.
-
If the test page does not print, continue with the next solution.
Solution four: Make sure that the posts in the cartridge parking area are not blocking the carriage
The carriage might move freely to the left and right even though the error displays on the control panel. Follow these steps to check if the posts are blocking the carriage.
Step one: Make sure that the posts in the cartridge parking area are not blocking the carriage
note:
Consider using gloves to perform these steps.
-
Unplug the power cord from the power source or electrical outlet.
-
Open the cartridge access door.
Figure : Open the cartridge access door
-
Reach into the cartridge access area, and then manually move the carriage to the left of the printer and then the right. The carriage should move completely underneath the cover on the right side of the printer.
-
If you cannot move the carriage completely underneath the cover on the right side of the printer, continue with these steps.
Figure : Example of the carriage partially under the cover on the right side of the printer
-
Figure : Example of the carriage resting underneath the cover on the right side of the printer
-
-
Move the carriage to the left side of the printer, and then use a flashlight to look inside the printer under the right cover.
Figure : Example showing where to look under the printer cover
-
Make sure that the posts are not blocking the carriage from moving all the way to the right.
Figure : Example of posts that might be blocking the carriage
-
If you see posts that could be blocking the carriage, continue with these steps.
-
-
Use a long, slim object (such as the eraser-end of a pencil) to gently push in the post.
Figure : Example of pushing in the post with a pencil
-
Reach into the cartridge access area, and then manually move the carriage to the right of the printer. The carriage should move under the printer cover.
warning:Do not lift up on the carriage.
Figure : Push the carriage to the right
Figure : Example of the carriage resting under the cover
-
Close the cartridge access door.
Figure : Close the cartridge access door
-
Reconnect the power cord to the rear of the printer.
-
Plug the power cord back into the power source or electrical outlet.
-
If the printer does not turn on automatically, press the Power button to turn it on.


Step two: Print a Printer Status Report
Print a test page to make sure that the hardware functions correctly.
How to print a test page
Follow these steps to print a test page.
-
Load plain white U.S. letter or A4 size paper in the tray.
-
On the product control panel, press the Setup button (
). -
Press the button (
) next to the Down Arrow ( ) until Reports displays next to OK, and then press the button next to OK. -
Press the button next to the Down Arrow (
) until Printer Status Report displays next to OK, and then press the button next to OK again. The test page prints.
-
If these steps resolved the issue, and the test page prints, there is no need to continue troubleshooting.
-
If the issue persists, continue with the next solution.
-
If the test page does not print, continue with the next solution.
Solution five: Plug the printer directly into a wall outlet
Follow these steps to plug the printer directly into a wall outlet, and then print a test page.
Step one: Plug the printer directly into a wall outlet
Plug the printer directly into an electrical outlet to make sure that the power source functions correctly.
-
Disconnect the power cord from the rear of the printer.
-
Unplug the power cord from any power strip or surge suppressor.
-
Plug the power cord directly into an electrical outlet.
-
Reconnect the power cord to the rear of the printer.
-
Press the Power button to turn on the printer.
Step two: Print a Printer Status Report
Print a test page to make sure that the hardware functions correctly.
How to print a test page
Follow these steps to print a test page.
-
Load plain white U.S. letter or A4 size paper in the tray.
-
On the product control panel, press the Setup button (
). -
Press the button (
) next to the Down Arrow ( ) until Reports displays next to OK, and then press the button next to OK. -
Press the button next to the Down Arrow (
) until Printer Status Report displays next to OK, and then press the button next to OK again. The test page prints.
-
If these steps resolved the issue, and the test page prints, there is no need to continue troubleshooting.
-
If the issue persists, continue with the next solution.
-
If the test page does not print, continue with the next solution.
Solution six: Reset the printer
Follow these steps to reset the printer.
Step one: Perform a power reset
-
With the printer turned on, disconnect the power cord from the rear of the printer.
-
Unplug the power cord from the wall outlet.
-
Wait at least 15 seconds.
-
Plug the power cord back into the wall outlet.
-
Reconnect the power cord to the printer.
-
Turn the printer on.
Step two: Print a test page
Print a test page to make sure that the hardware functions correctly.
How to print a test page
Follow these steps to print a test page.
-
Load plain white U.S. letter or A4 size paper in the tray.
-
On the product control panel, press the Setup button (
). -
Press the button (
) next to the Down Arrow ( ) until Reports displays next to OK, and then press the button next to OK. -
Press the button next to the Down Arrow (
) until Printer Status Report displays next to OK, and then press the button next to OK again. The test page prints.
-
If these steps resolved the issue, and the test page prints, there is no need to continue troubleshooting. Reconnect the USB cable, and then try to print again.
-
If the test page prints successfully, but you continue to experience an issue with your printer, then the issue is not related to the hardware.
-
Experiencing another issue?
If your printer prints a test page and there is still an issue with your printer, go to HP Customer Support, type your printer model, and then browse for the appropriate support document to troubleshoot the issue.
-
-
If the printer does not print a test page, there is an issue with the printer hardware. Continue to the next step or solution.
Solution seven: Service the printer
Service or replace your HP product if the issue persists after completing all the preceding steps.
Go to Contact HP Customer Support to schedule a product repair or replacement. If you are in Asia Pacific, you will be directed to a local service center in your area.
To confirm your warranty status, go to HP Product Warranty Check. Repair fees might apply for out-of-warranty products.
Ошибка 0х6100000b в МФУ HP DeskJet 3070A обычно связана с неисправностью каретки принтера. Попробуйте выполнить следующие действия для решения проблемы:
1. Выключите принтер и отсоедините от него кабель питания и USB.
2. Проверьте каретку принтера на наличие застрявшей бумаги, затвердевшего чернила или других препятствий. Очистите ее при необходимости.
3. Проверьте справа и слева от каретки на предмет наличия любых осколков и обломков пластика. Возможно, что они заблокировали каретку.
4. Включите принтер и дайте ему время на инициализацию. Если ошибка по-прежнему появляется, попробуйте выполнить сброс параметров принтера, известный как жесткий сброс. Сброс поможет вернуть принтер к заводским настройкам и может устранить ошибку.
5. Если ничто из вышеперечисленного не сработало, то вероятно, что причиной проблемы может быть неисправность в каретке принтера или другой внутренней детали. Тогда вам следует обратиться к специалисту по ремонту принтеров для дальнейшей диагностики и ремонта принтера.
Надеюсь, эти советы будут полезными для решения вашей проблемы с МФУ HP DeskJet 3070A. Удачи!
|
0 / 0 / 0 Регистрация: 05.10.2010 Сообщений: 5 |
|
|
1 |
|
|
23.09.2012, 22:55. Показов 8478. Ответов 1
Проблема скорее всего возникла из-за неправильного отключения (пару раз отсоединялся кабель вручную) каретка стала очень резко передвигаться рывками и и в определенном месте застряет хотя движения дальше ничего не мешает. При каждом включении сначала пишет что нужно правильно выключать( хотя уже выключаю правильно) и потом выскакивает ошибка 0x6100000a или 0x6100000b. ————————————————— Мне кажется это что-то с электроникой. Скорее всего понесу в ремонт НО вдруг кто-то знает чем помочь.
0 |

|
Programming Эксперт 94731 / 64177 / 26122 Регистрация: 12.04.2006 Сообщений: 116,782 |
23.09.2012, 22:55 |
|
1 |
|
Gladhander |
|
|
27.02.2014, 10:12 |
2 |
|
Решение проблемы, в случае, если причина в загрязнении ленты энкодера [ссылка на сторонний форум] |
Обновлено: 03.06.2023
| Конфигурация компьютера | |
| Процессор: i7-8700 @3.20GHz | |
| Материнская плата: ASUS B360M-K | |
| Память: Patriot DDR4 1333 2x4Gb | |
| HDD: KINGSTON SV300S37A120G, ST1000DM003-1ER162, WD10EZEX-08WN4A0, WD5000AZLX-75K2TA0 | |
| Видеокарта: MSI GTX1050Ti 4Gb | |
| Звук: ASUS XonarDX PCI-E | |
| Блок питания: Thermaltake Hamburg 530Watts | |
| CD/DVD: TSST SH-S223C | |
| Монитор: 23′ DELL U2312HM | |
| Ноутбук/нетбук: DELL N510 | |
| ОС: Win10 x64, Mint 20 | |
| Индекс производительности Windows: 5.9 | |
| Прочее: CANON Ixus 30 digital camera |
Автор: dmitryst
Дата: 13-11-2021
Описание: Добавлены варианты решения
dmitryst, уважаемый! Если честно, правильных решений в теме нет ни одного! Все действия включаются только от того, что ни кто не знает как сделать правильно, точнее как предполагают разработчики. Из огромного опыта работы могу предположить, что правильным будет всё, что касается слова «КУПИТЬ». А это всё от доменных серверов с софтом, до сетевых устройств и принтеров в частности. Микрософт ни когда не любила простых решений и тем более простых сетей. А их великое множество, да в каждой квартире (компы, роутеры, смартфоны, планшеты и т.д.). И всё это просто. Нет прибыли. Windows 11 — давай поддерживающие железяки (деньги). Но ведь и без них работает. А некоторые HP мфу и принтера вообще в простых сетях не работают, приходится прикручивать левые дрова. Вот как-то так. Пардон, что много написал )))
PS У меня парочка простых сетей (компов по 20). Есть и разнобойные. И подмена оказалась самым безболезненным простым и главное в наше время (бюджет) — бесплатным решением. А к правильному решению ближе всего был Dr.Zlo, хотя его предложение тоже для многих очень «сложно».
Для отключения данного рекламного блока вам необходимо зарегистрироваться или войти с учетной записью социальной сети.
| Конфигурация компьютера | |
| Процессор: Intel Core i3-4130 3,4ГГц | |
| Материнская плата: ASUS B85-Plus | |
| Память: Crucial Technology DDR3 8ГБайт | |
| HDD: ST1000DM003-1CH162 (931 ГБ) SATA-III | |
| Видеокарта: Intel(R) HD Graphics 4400 | |
| Звук: Realtek ALC887 | |
| CD/DVD: ASUS DRW-24F1ST a | |
| Монитор: Acer V235HL 23» | |
| ОС: Windows 8.1 x64 | |
| Индекс производительности Windows: 4,9 |
В данной теме рассматривается вопрос о печати в простой одноранговой сети. И этот вопрос уже нашёл решение. Как правильно организовать свои сети с вывертами — это в других темах или в личке. Вариантов достаточно. Для тех, кто правильно работает с парольным доступом эта тема вообще по сути не нужна. Ещё раз спасибо за решение. »
Всё по вашей просьбе. Сеть одноранговая, без домена и ещё каких-то «вывертов».
Что говорится в ошибках уже описали:
«После установки этого обновления при Windows принтерах могут возникнуть следующие ошибки при подключении к удаленному принтеру, к которым был Windows принтера:
То есть, ругань идёт на имя принтера. Уберите пробелы (и всё такое) из имени принтера. Сократите его имя буквально до 8 символов, например.
Моя (надеюсь финальная) версия автоматического патча делающего подмену файлов и исправляющего тем самым сетевую печать в windows 10 после обновления. »
У меня одного касперский удаляет в истерике данный авто патч с криками, что это Trojan.Win32.Fsysna.iaoz .
Желающие, пробуем, отписываемся, критикуем и высказываем пожелания.
Ремонт печати (ссылка 1)
Ремонт печати (ссылка 2)
Скан на VirusTotal »
помогло, прилетело KB5006670, если верить журналу обновлений, этак 3 числа, но дало знать почему-то сегодня только при печати с windows 10 на window 7 (принтер на 7 стоит). Патчи, фиксы реестра, переназвать принтер без пробелов — все пробовал, не коннектило. По IP коннект не вариант в данном случае. Применил патч и все нормализовалось. Надолго ли. Ждем нормальной заплатки от проблемы
У меня одного касперский удаляет в истерике данный авто патч с криками, что это Trojan.Win32.Fsysna.iaoz »
k0dash, некоторые антивирусы так реагируют на sfx архивы. Вирусов там никаких нет, на время установки патча просто отключите антивирус.
Но, если вдруг сомневаетесь, то можете мой вариант попробовать, если коллега mat.86 не будет против.
Там все тоже самое, просто собран в другом инсталляторе.
Что вызывает ошибку HP 0x6100004a
Способ 1: сбросить весь механизм печати
На принтерах сброс механизма печати эквивалентен выполнению процедуры включения и выключения питания на компьютерах и игровых консолях. Многие затронутые пользователи подтвердили, что операция была решена после выполнения указанных ниже действий.
Вот краткое пошаговое руководство по сбросу механизма печати:
- Включите принтер (если он еще не включен) и дождитесь завершения последовательности запуска.
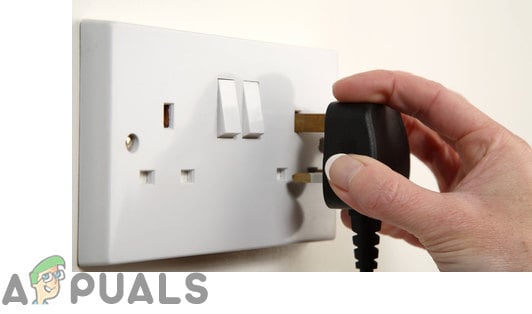
Примечание. Если вы услышите какой-либо шум, подождите, пока принтер перейдет в режим ожидания и не отключится, прежде чем переходить к следующему шагу. - Отсоедините шнур питания от задней панели принтера (пока он включен, но находится в режиме ожидания). После отключения питания отсоедините шнур питания от сетевой розетки.отсоединение шнура питания вашего принтера
- Подождите 60 секунд или более, прежде чем снова подключить шнур питания к розетке. Затем снова подключите шнур питания к задней панели принтера.
- Включите принтер и подождите, пока он не завершит начальный период прогрева.
- Как только ваш принтер отключится и перейдет в режим ожидания, попробуйте что-нибудь напечатать и посмотрите, решена ли теперь проблема.
В нем все равно отображается ошибка 0x6100004a, когда вы пытаетесь что-то напечатать, перейдите к следующему потенциальному исправлению ниже.
Способ 2: очистка вентиляционных отверстий и контактов картриджа
Важное замечание: Этот метод немного более продвинутый и может привести к повреждению некоторых дополнительных компонентов принтера, если он не будет выполнен должным образом. Если на ваш принтер распространяется гарантия, обратитесь к специалисту, поскольку приведенные ниже действия могут привести к аннулированию гарантии.
Если вы готовы пройти через это потенциальное исправление, вот что вам нужно:
Предпосылки
- Булавка (используется для очистки любых забитых вентиляционных отверстий)
- Безворсовая ткань (используется для общей чистки)
- Сухой ватный тампон (используется для общей уборки)
- Дистиллированная или бутилированная вода. Не используйте водопроводную воду, поскольку она может содержать загрязнения, которые могут повредить печатающую головку.
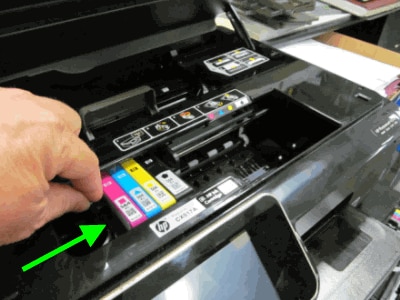
Вот что нужно сделать, чтобы очистить вентиляционные отверстия и контакты чернильного картриджа:
- Полностью выключите принтер и подождите 60 секунд или более, прежде чем начинать процедуру.
- Посмотрите на область вентиляции каждого картриджа (на верхней части компонента) и посмотрите, не заметили ли вы какие-либо засоренные вентиляционные отверстия.Проверка на наличие забитых вентиляционных отверстий
- Если какие-либо из ваших картриджей имеют засоренные вентиляционные отверстия, используйте штифт, чтобы очистить их как можно больше.
- Затем используйте безворсовую ткань, чтобы стереть скопившиеся чернила и мусор на медном контакте чернильного картриджа.Чистка медного контакта
- Повторите шаги, описанные выше, чтобы очистить каждый из контактов чернильного картриджа.
- Используйте безворсовый тампон, чтобы стереть скопившиеся чернила или мусор на медном контакте печатающей головки.
- Вставьте каждый из картриджей, которые вы только что тщательно очистили, в их слот, затем нажмите на картридж, чтобы он защелкнулся на месте.
Примечание. Очень важно убедиться, что каждый цветной слот на чернильном картридже соответствует цветной точке на каретке. - Закройте крышку доступа к картриджам и снова включите принтер.
- Повторите действие, которое ранее вызывало ошибку 0x6100004a, и посмотрите, решена ли теперь проблема.
Способ 3: обеспечение того, чтобы перевозка не была ограничена
Помните, что это можно проверить, только открыв дверцу доступа к картриджам и проведя некоторые ручные исследования (требуется фонарик или другое осветительное устройство).
Вот что вам нужно сделать:

- Включите принтер и подождите, пока он перейдет в режим ожидания (когда он отключится).
- Откройте дверцу доступа к картриджам (когда принтер включен) и отсоедините шнур питания от задней панели принтера. Затем отсоедините шнур питания от источников питания (скорее всего, от стенной розетки).Открытие дверцы доступа к картриджу
Примечание. Очень важно отсоединить шнур питания, так как вы продолжите касаться механизма подачи бумаги. Это исключает риск поражения электрическим током.
Примечание. Будьте осторожны при удалении застрявшей бумаги. Убедитесь, что вы также проверили ролики и лунки на предмет оторванных частей, которые все еще могут находиться внутри принтера. Если вы оставите какие-либо оставшиеся предметы, может произойти дальнейшее заклинивание.
Если та же проблема сохраняется, перейдите к следующему потенциальному решению ниже.
Способ 4. Обращение в службу поддержки HP
Если ни один из перечисленных методов не позволил вам устранить проблему, вполне вероятно, что вы не сможете решить проблему самостоятельно. В этом случае лучше всего обратиться к техническому специалисту HP (по телефону) и разрешить ему устранить неисправности за вас.
Вот краткое руководство по связи с техническим специалистом HP:
Читайте также:
- Запретить установку принтера групповой политикой
- Где починить принтер спб
- Установка принтера canon mg 3640
- Рейтинг мфу для офиса
- Принтер для маркировки кабеля какой выбрать
hp-concentra-wrapper-portlet
![]()
Actions
Issue
A ‘Carriage Jam. The print carriage cannot move. Open the ink cartridge access door, clear any paper jam or obstruction, and select OK‘ message displays on the printer control panel.
One of the following error codes might display with the message:
-
0x61000008
-
0x6100000B
-
0x6100001D
The carriage, which holds the cartridges, stalls in the printer. A paper jam might have occurred previously.
You might also experience the following symptoms:
-
The printer does not print.
-
The print job stops unexpectedly.
Solution one: Restart the printer
Follow these steps to restart the printer, and then try to print a test page.
Step one: Restart the printer
-
Press the Power button to turn off the printer.
-
Wait 60 seconds.
-
Press the Power button to turn on the printer.
note:
The printer might go through a warm-up period which can last several minutes. Wait until the printer is idle and silent before continuing.
Step two: Print a Printer Status Report
Video on printing a test page
The following video demonstrates how to print a printer status report.
note:
This video shows the HP Officejet 4620 e-All-in-One Printer series, but the steps are the same for your printer.
Print a test page to make sure that the hardware functions correctly.
-
Load plain white U.S. letter or A4 size paper in the tray.
-
On the product control panel, press the Setup button (
). -
Press the button (
) next to the Down Arrow ( ) until Reports displays next to OK, and then press the button next to OK. -
Press the button next to the Down Arrow (
) until Printer Status Report displays next to OK, and then press the button next to OK again. The test page prints.
-
If these steps resolved the issue, and the test page prints, there is no need to continue troubleshooting.
-
If the issue persists, continue with the next solution.
-
If the test page does not print, continue with the next solution.
Solution two: Clear the jam from inside the printer
Follow these steps to clear the jam from the cartridge access area, the cleanout area, and from underneath the printer.
note:
Use a flashlight to complete these steps.
Video on clearing a carriage jam
The following video demonstrates how to clear a carriage jam.
note:
This video shows the HP Officejet 4620 e-All-in-One Printer series, but the steps are the same for your printer.
Step one: Clear the jam from the cartridge access area
Follow these steps to remove jammed paper from inside the cartridge access area.
-
Press the Power button to turn on the printer, if it is not already turned on.
-
Locate the slots on the sides of the printer.
Figure : Locate the slots on the sides of the printer
-
Place your fingers in the two slots on the sides of the printer, and then lift the cartridge access door. The carriage moves into the cartridge access area.
Figure : Open the cartridge access door
-
Disconnect the power cord from the rear of the printer.
warning:Do not reach into the cartridge access
area when the printer is plugged into an electrical outlet.
-
Disconnect the USB cable from the rear of the printer if you have a USB connection to the computer.
-
Gently remove any jammed paper from the cartridge access area. To avoid tearing any whole sheets of paper, pull the paper with both hands.
-
Use a flashlight to thoroughly check for torn pieces of paper that might remain in the cartridge access area. If any torn pieces of paper remain inside the printer, more jams are likely to occur.
Use a flashlight
Paper jammed in carriage path
-
Slide the carriage to the right side of the cartridge access area, and then inspect the left side of the cartridge access area for torn pieces of paper that might remain inside the printer.
-
Remove any torn pieces of paper you find.
-
Slide the carriage to the left side of the cartridge access area, and then inspect the right side of the cartridge access area for torn pieces of paper that might remain inside the printer.
-
Remove any torn pieces of paper you find.
Step two: Clear the jam from inside the cleanout door
Follow these steps to remove any jammed paper from the cleanout door.
-
Make sure that the power is off and that the power cord is disconnected from the rear of the printer.
warning:Do not reach into the cartridge access
area when the printer is plugged into an electrical outlet.
-
Make sure the USB cable is disconnected from the rear of the printer, if you have a USB connection to the computer.
-
With the cartridge access door open, locate the cleanout door. The door is behind the cartridge access area towards the rear of the printer.
Figure : The cleanout door
-
Pull the cleanout door up and then out to remove it from the printer.
Figure : Remove the cleanout door
-
Gently remove any jammed paper. To avoid tearing any whole sheets of paper, pull the paper with both hands.
Figure : Remove any jammed paper
-
Use a flashlight to thoroughly check for torn pieces of paper that might remain in the cleanout area. If any torn pieces of paper remain inside the printer, more jams are likely to occur.
Figure : Use a flashlight
-
Remove any torn pieces of paper you find.
-
Gently reinsert the cleanout door into the cleanout area, and then press down on the handle until the door snaps into place.
-
Close the cartridge access door.
-
Insert the cleanout door into the cleanout area
-
Push down on the door handle until the door snaps into place
-
Close the cartridge access door
Figure : Reinsert the cleanout door and close the cartridge access door
-
Step three: Clear the jam from underneath the Printer
If you are unable to remove jammed paper from the cartridge access area or from inside the cleanout door, follow these steps to clear the jam from underneath the printer.
-
Press the Power button to turn off the printer, if it is not off already.
-
Disconnect the power cord from the rear of the printer, if it is not disconnected already.
-
Turn the printer onto its right side so that you can access its underside.
caution:Before turning the printer, use your hand to secure the scanner lid.
-
Slide the paper tray out until it stops.
-
Gently remove any jammed paper and bits of torn paper from the input tray area and from underneath the printer. To avoid tearing any whole sheets of paper, pull the paper with both hands.
Figure : Remove paper from underneath the printer
-
Use a flashlight to thoroughly check for torn pieces of paper that might remain inside the printer. If any torn pieces of paper remain inside the printer, more jams are likely to occur.
Figure : Use a flashlight
-
Remove any torn pieces of paper you find.
-
Slide the paper tray back in until it stops.
-
Return the printer to its normal position.
-
Open the cartridge access door, and then look inside the printer for any loose objects that might have shifted when you turned the printer over. Remove any loose objects you find.
-
Close the cartridge access door.
Figure : Close the cartridge access door
-
Reconnect the power cord to the rear of the printer.
-
Press the Power button to turn on the printer.
Step four: Print a Printer Status Report
Print a test page to make sure that the hardware functions correctly.
How to print a test page
Follow these steps to print a test page.
-
Load plain white U.S. letter or A4 size paper in the tray.
-
On the product control panel, press the Setup button (
). -
Press the button (
) next to the Down Arrow ( ) until Reports displays next to OK, and then press the button next to OK. -
Press the button next to the Down Arrow (
) until Printer Status Report displays next to OK, and then press the button next to OK again. The test page prints.
-
If these steps resolved the issue, and the test page prints, there is no need to continue troubleshooting.
-
If the issue persists, continue with the next solution.
-
If the test page does not print, continue with the next solution.
Solution three: Remove and reinsert the cartridges
Improper placement or installation of the cartridges can cause the printer to indicate a carriage jam error. Follow these steps to remove and then reinsert the cartridges.
Step one: Remove and reinsert the cartridges
Follow these steps to remove and then reinsert the cartridges.
-
Press the Power button to turn on the printer, if it is not already on.
-
Locate the two slots on the sides of the printer.
Figure : Slots on the sides of the printer
-
Place your fingers in the slots on the right and left sides of the printer, and then lift to open the cartridge access door. The carriage moves into the carriage access area.
Figure : Open the cartridge access door
-
Wait until the carriage is idle and silent before proceeding.
-
Press in the tab on the front of a cartridge to release it, and then pull up on the cartridge to remove it from the slot.
Figure : Remove the cartridge from its slot
-
Repeat these steps to remove the other cartridges.
-
To reinsert a cartridge, hold the cartridge so that the cartridge contacts are facing toward the printer.
-
Match the colored dot on the cartridge with the dot of the same color on the carriage.
-
Slide the cartridge into its slot, and then gently press the cartridge down until it clicks into place.
note:
Make sure that the colored dot on the cartridge label matches the colored dot on the slot.
Figure : Install the cartridge
-
Repeat these steps to reinsert the other cartridges.
-
Close the cartridge access door.
Figure : Close the cartridge access door
Step two: Print a Printer Status Report
Print a test page to make sure that the hardware functions correctly.
How to print a test page
Follow these steps to print a test page.
-
Load plain white U.S. letter or A4 size paper in the tray.
-
On the product control panel, press the Setup button (
). -
Press the button (
) next to the Down Arrow ( ) until Reports displays next to OK, and then press the button next to OK. -
Press the button next to the Down Arrow (
) until Printer Status Report displays next to OK, and then press the button next to OK again. The test page prints.
-
If these steps resolved the issue, and the test page prints, there is no need to continue troubleshooting.
-
If the issue persists, continue with the next solution.
-
If the test page does not print, continue with the next solution.
Solution four: Make sure that the posts in the cartridge parking area are not blocking the carriage
The carriage might move freely to the left and right even though the error displays on the control panel. Follow these steps to check if the posts are blocking the carriage.
Step one: Make sure that the posts in the cartridge parking area are not blocking the carriage
note:
Consider using gloves to perform these steps.
-
Unplug the power cord from the power source or electrical outlet.
-
Open the cartridge access door.
Figure : Open the cartridge access door
-
Reach into the cartridge access area, and then manually move the carriage to the left of the printer and then the right. The carriage should move completely underneath the cover on the right side of the printer.
-
If you cannot move the carriage completely underneath the cover on the right side of the printer, continue with these steps.
Figure : Example of the carriage partially under the cover on the right side of the printer
-
Figure : Example of the carriage resting underneath the cover on the right side of the printer
-
-
Move the carriage to the left side of the printer, and then use a flashlight to look inside the printer under the right cover.
Figure : Example showing where to look under the printer cover
-
Make sure that the posts are not blocking the carriage from moving all the way to the right.
Figure : Example of posts that might be blocking the carriage
-
If you see posts that could be blocking the carriage, continue with these steps.
-
-
Use a long, slim object (such as the eraser-end of a pencil) to gently push in the post.
Figure : Example of pushing in the post with a pencil
-
Reach into the cartridge access area, and then manually move the carriage to the right of the printer. The carriage should move under the printer cover.
warning:Do not lift up on the carriage.
Figure : Push the carriage to the right
Figure : Example of the carriage resting under the cover
-
Close the cartridge access door.
Figure : Close the cartridge access door
-
Reconnect the power cord to the rear of the printer.
-
Plug the power cord back into the power source or electrical outlet.
-
If the printer does not turn on automatically, press the Power button to turn it on.
Step two: Print a Printer Status Report
Print a test page to make sure that the hardware functions correctly.
How to print a test page
Follow these steps to print a test page.
-
Load plain white U.S. letter or A4 size paper in the tray.
-
On the product control panel, press the Setup button (
). -
Press the button (
) next to the Down Arrow ( ) until Reports displays next to OK, and then press the button next to OK. -
Press the button next to the Down Arrow (
) until Printer Status Report displays next to OK, and then press the button next to OK again. The test page prints.
-
If these steps resolved the issue, and the test page prints, there is no need to continue troubleshooting.
-
If the issue persists, continue with the next solution.
-
If the test page does not print, continue with the next solution.
Solution five: Plug the printer directly into a wall outlet
Follow these steps to plug the printer directly into a wall outlet, and then print a test page.
Step one: Plug the printer directly into a wall outlet
Plug the printer directly into an electrical outlet to make sure that the power source functions correctly.
-
Disconnect the power cord from the rear of the printer.
-
Unplug the power cord from any power strip or surge suppressor.
-
Plug the power cord directly into an electrical outlet.
-
Reconnect the power cord to the rear of the printer.
-
Press the Power button to turn on the printer.
Step two: Print a Printer Status Report
Print a test page to make sure that the hardware functions correctly.
How to print a test page
Follow these steps to print a test page.
-
Load plain white U.S. letter or A4 size paper in the tray.
-
On the product control panel, press the Setup button (
). -
Press the button (
) next to the Down Arrow ( ) until Reports displays next to OK, and then press the button next to OK. -
Press the button next to the Down Arrow (
) until Printer Status Report displays next to OK, and then press the button next to OK again. The test page prints.
-
If these steps resolved the issue, and the test page prints, there is no need to continue troubleshooting.
-
If the issue persists, continue with the next solution.
-
If the test page does not print, continue with the next solution.
Solution six: Reset the printer
Follow these steps to reset the printer.
Step one: Perform a power reset
-
With the printer turned on, disconnect the power cord from the rear of the printer.
-
Unplug the power cord from the wall outlet.
-
Wait at least 15 seconds.
-
Plug the power cord back into the wall outlet.
-
Reconnect the power cord to the printer.
-
Turn the printer on.
Step two: Print a test page
Print a test page to make sure that the hardware functions correctly.
How to print a test page
Follow these steps to print a test page.
-
Load plain white U.S. letter or A4 size paper in the tray.
-
On the product control panel, press the Setup button (
). -
Press the button (
) next to the Down Arrow ( ) until Reports displays next to OK, and then press the button next to OK. -
Press the button next to the Down Arrow (
) until Printer Status Report displays next to OK, and then press the button next to OK again. The test page prints.
-
If these steps resolved the issue, and the test page prints, there is no need to continue troubleshooting. Reconnect the USB cable, and then try to print again.
-
If the test page prints successfully, but you continue to experience an issue with your printer, then the issue is not related to the hardware.
-
Experiencing another issue?
If your printer prints a test page and there is still an issue with your printer, go to HP Customer Support, type your printer model, and then browse for the appropriate support document to troubleshoot the issue.
-
-
If the printer does not print a test page, there is an issue with the printer hardware. Continue to the next step or solution.
Solution seven: Service the printer
Service or replace your HP product if the issue persists after completing all the preceding steps.
Go to Contact HP Customer Support to schedule a product repair or replacement. If you are in Asia Pacific, you will be directed to a local service center in your area.
To confirm your warranty status, go to HP Product Warranty Check. Repair fees might apply for out-of-warranty products.