
HP MFP M438N ошибка #C3-1312
Сообщение
nicksun » 31 янв 2022, 10:59
Code: C3-1312, C3-1411, C3-1414
Display:
C3-1312, C3-1411, C3-1414 Imaging unit errors
Description:
– C3-1312, Error: #C3-1312 / Imaging Unit Failure: #C3-1312. Install IMG. Unit – C3-1411, IMG. Not Installed / Imaging unit is not installed. Install the unit – C3-1414, Error: #C3-1414 / Imaging Unit Failure: #C3-1414. Install imaging unit again
The imaging unit is not installed or not detected.
Remedy:
1. Open the front cover. Check if the imaging unit is installed. 2. Remove and reinstall the imaging unit. 3. If the error persists, check if the Imaging Unit connector is contaminated or deformed. £ If the connector is damaged, replace the Imaging Unit (HP Part #: CF257.67901). 4. If the error persists, replace the Imaging Unit (HP Part #: CF257.67901).
| Текущее время: 04 июн 2023, 06:34 |
Сообщения без ответов | Активные темы
| Страница 1 из 1 [ Сообщений: 6 ] |
Показать сообщения за: Поле сортировки
|
|||||||||||||||||||||||||||||||||||||||||||||||||||||||||||||||||||


| Страница 1 из 1 [ Сообщений: 6 ] |
|
||||||||||||||||||||||||||||||||||||||
| Вы не можете начинать темы Вы не можете отвечать на сообщения Вы не можете редактировать свои сообщения Вы не можете удалять свои сообщения Вы не можете добавлять вложения |
Содержание
- Исправляем ошибку печати на принтере HP
- Способ 1: Проверка принтера
- Способ 2: Разблокирование процедуры печати
- Способ 3: Отключение брандмауэра Windows
- Способ 4: Переключение учетной записи пользователя
- Способ 5: Восстановление Windows
- Способ 6: Переустановка драйвера
- Вопросы и ответы

Обладатели печатной продукции от компании HP иногда сталкиваются с тем, что на экране появляется уведомление «Ошибка печати». Причин возникновения этой неполадки может быть несколько и каждая из них решается по-разному. Сегодня мы подготовили для вас разбор основных способов исправления рассматриваемой проблемы.
Каждый приведенный ниже метод имеет разную эффективность и будет наиболее подходящим в определенной ситуации. Мы по порядку рассмотрим все варианты, начиная от самого простого и действенного, а вы, следуя инструкциям, решите поставленную задачу. Однако сначала мы рекомендуем обратить внимание на эти советы:
- Перезапустите компьютер и переподключите устройство печати. Желательно, чтобы перед следующим подключением принтер находится в выключенном состоянии не менее одной минуты.
- Проверьте картридж. Иногда ошибка появляется в тех случаях, когда в чернильнице закончилась краска. О том, как заменить картридж вы можете прочитать в статье по ссылке ниже.
- Осмотрите провода на наличие физических повреждений. Кабель выполняет передачу данных между компьютером и принтером, поэтому важно, чтобы он не только был подключен, но и находился полностью в исправном состоянии.
- Кроме этого советуем проверить, не закончилась ли бумага или не зажевало ли ее внутри механизма оборудования. Вытащить лист А4 вам поможет инструкция, которая прилагается в комплекте с продукцией.
Подробнее: Замена картриджа в принтере
Если приведенные советы ничем не помогли, переходите к осуществлению следующих методов решения «Ошибка печати» при использовании периферии компании HP.
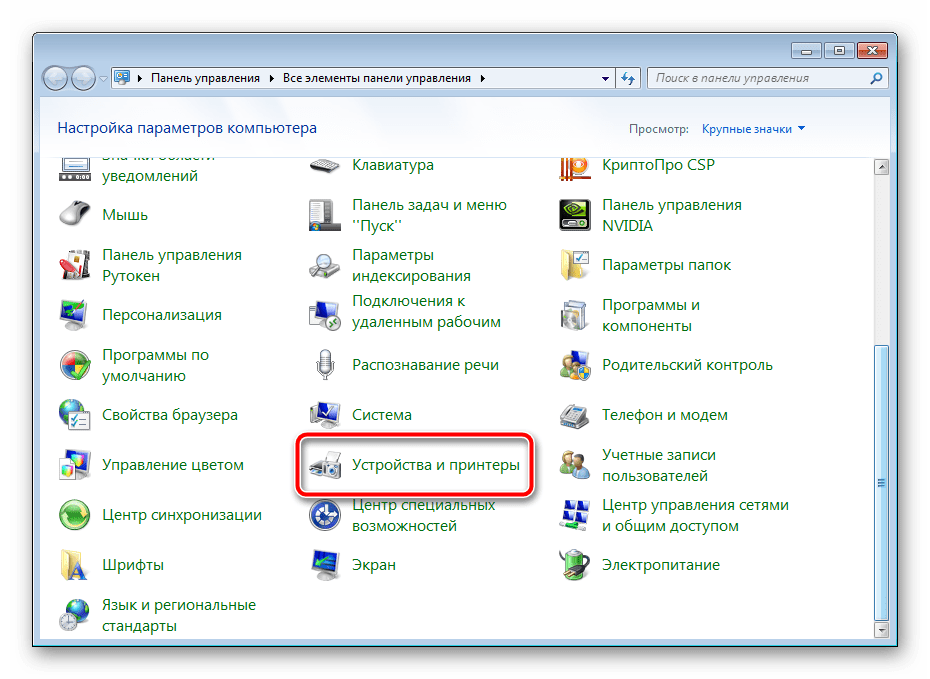
Способ 1: Проверка принтера
В первую очередь советуем проверить отображение и конфигурацию оборудования в меню «Устройства и принтеры». От вас потребуется произвести всего несколько действий:
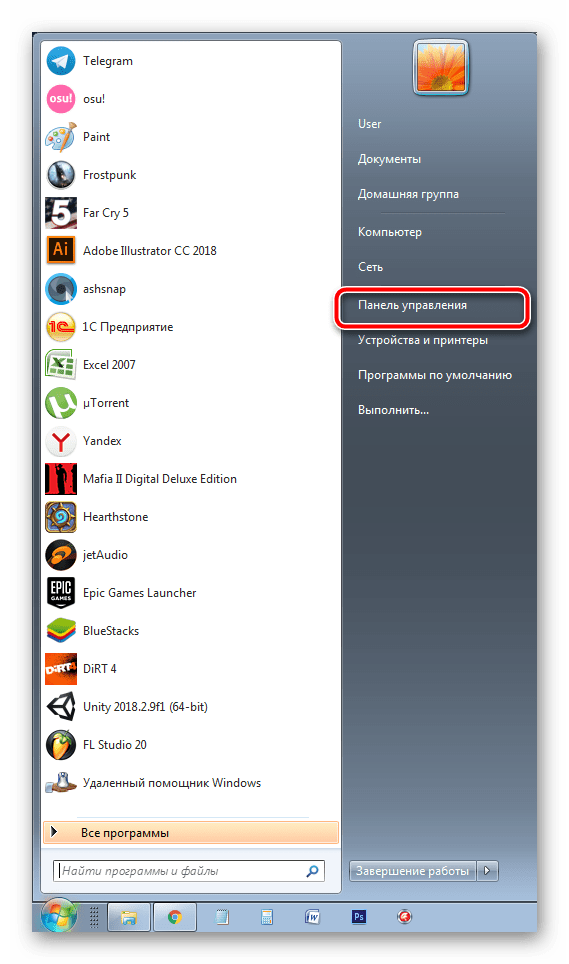
- Через меню «Панель управления» и переместитесь в «Устройства и принтеры».
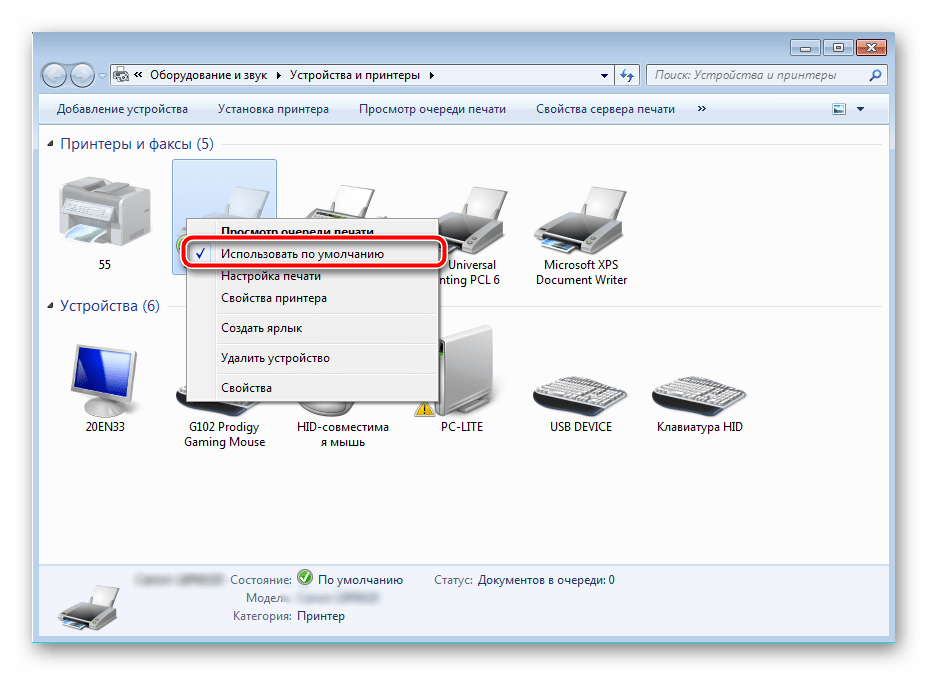
- Убедитесь, что устройство не подсвечивается серым цветом, после чего нажмите на нем ПКМ и кликните на пункт «Использовать по умолчанию».
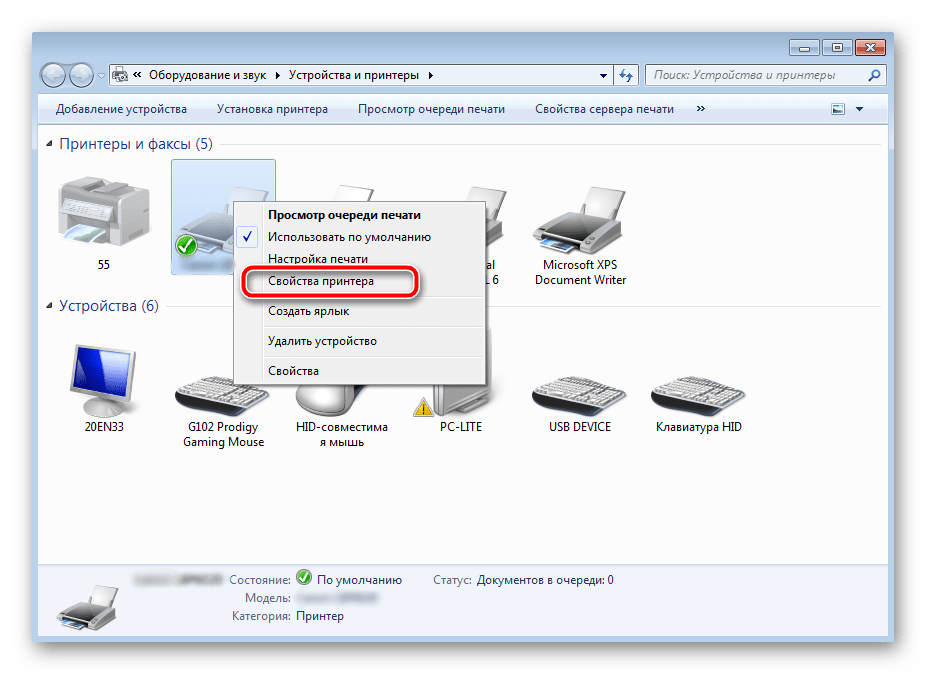
- Кроме этого рекомендуется проверить параметры передачи данных. Зайдите в меню «Свойства принтера».
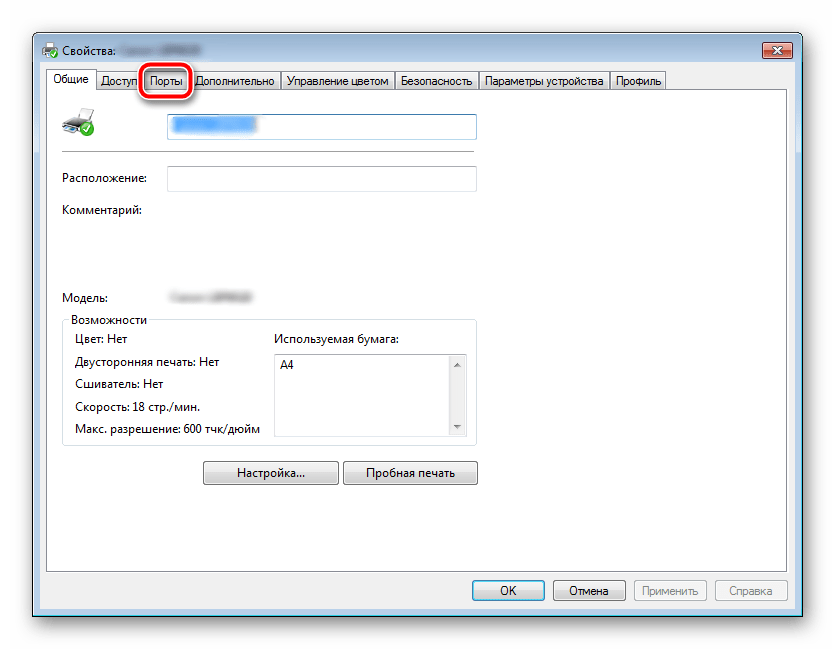
- Здесь вас интересует вкладка «Порты».
- Отметьте галочкой пункт «Разрешить двусторонний обмен данными» и не забудьте применить изменения.
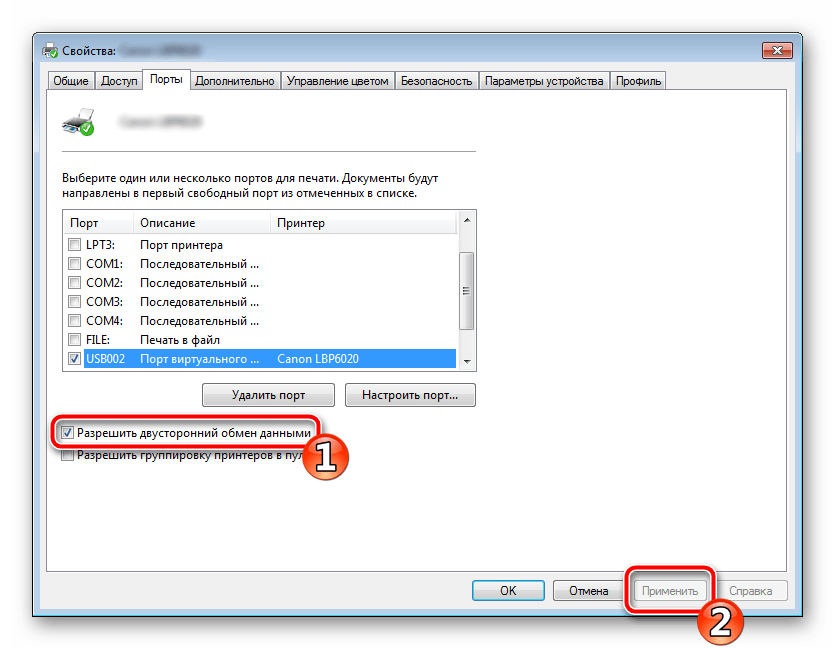
По окончании процесса рекомендуется перезагрузить ПК и переподключить оборудование, чтобы все изменения точно стали активными.
Способ 2: Разблокирование процедуры печати
Иногда происходят скачки напряжения или различные системные сбои, вследствие чего периферия и ПК перестают нормально выполнять определенные функции. По таким причинам и может возникать ошибка печати. В таком случае вам следует проделать следующие манипуляции:
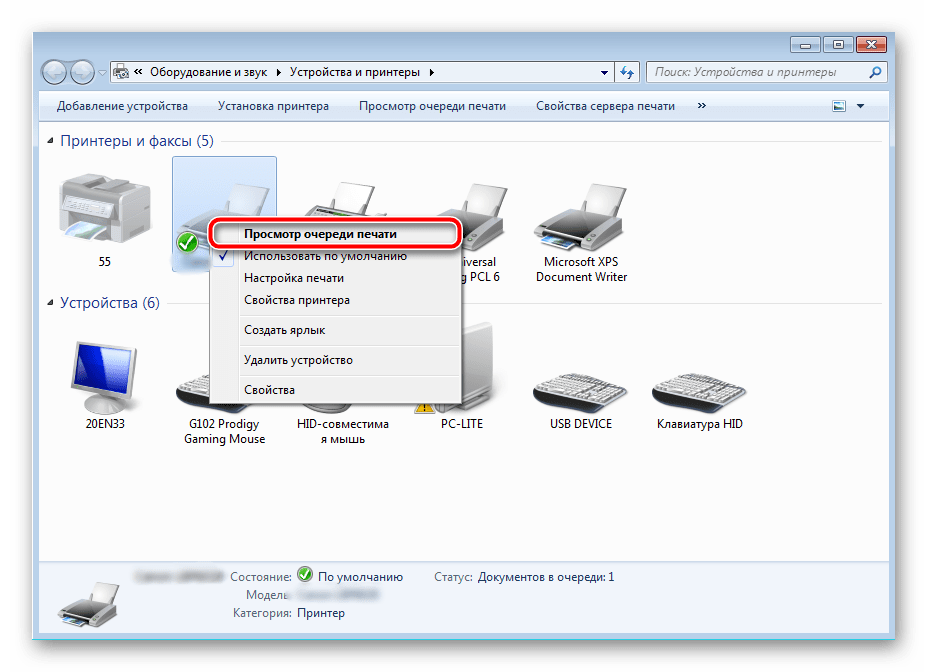
- Снова перейдите в «Устройства и принтеры», где правым кликом мыши на активном оборудовании выберите пункт «Просмотр очереди печати».
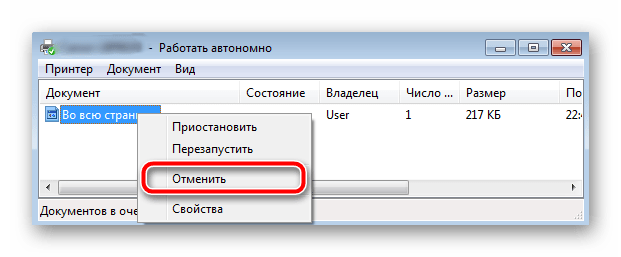
- Нажмите ПКМ на документ и укажите «Отменить». Повторите это со всеми присутствующими файлами. Если процесс по каким-либо причинам не отменяется, советуем ознакомиться с материалом по ссылке ниже, чтобы осуществить эту процедуру одним из других доступных методов.
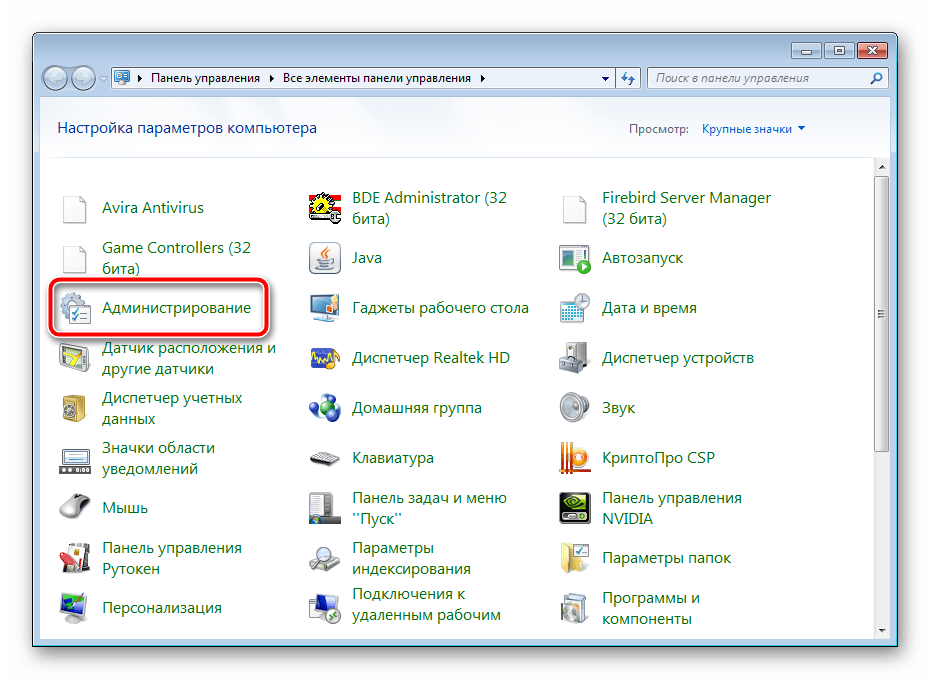
- Вернитесь в «Панель управления».
- В ней откройте категорию «Администрирование».
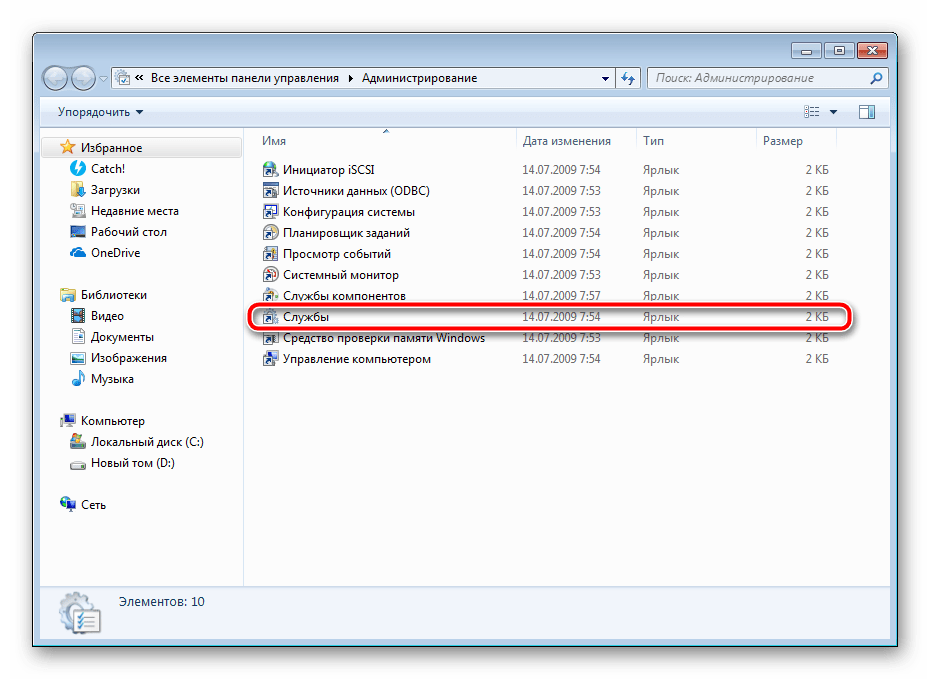
- Здесь вас интересует строка «Службы».
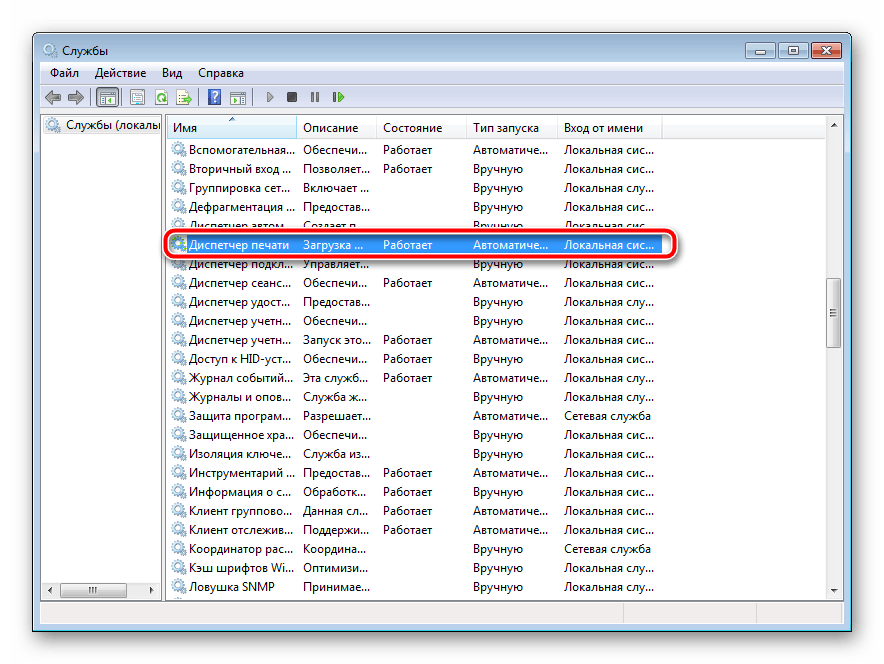
- В списке отыщите «Диспетчер печати» и дважды нажмите на нем ЛКМ.
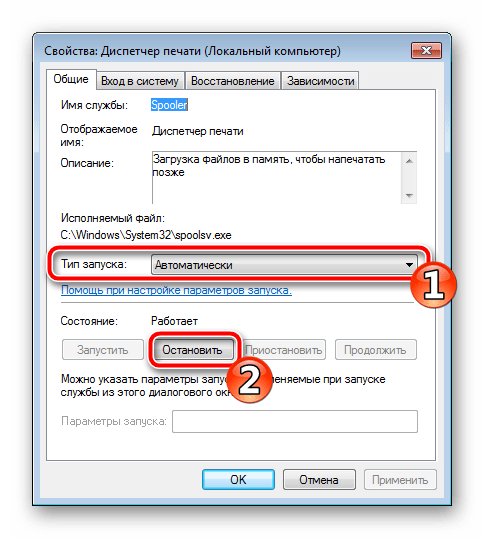
- В «Свойства» обратите внимание на вкладку «Общие», где убедитесь, что тип запуска стоит «Автоматический», после чего следует остановить службу и применить настройки.
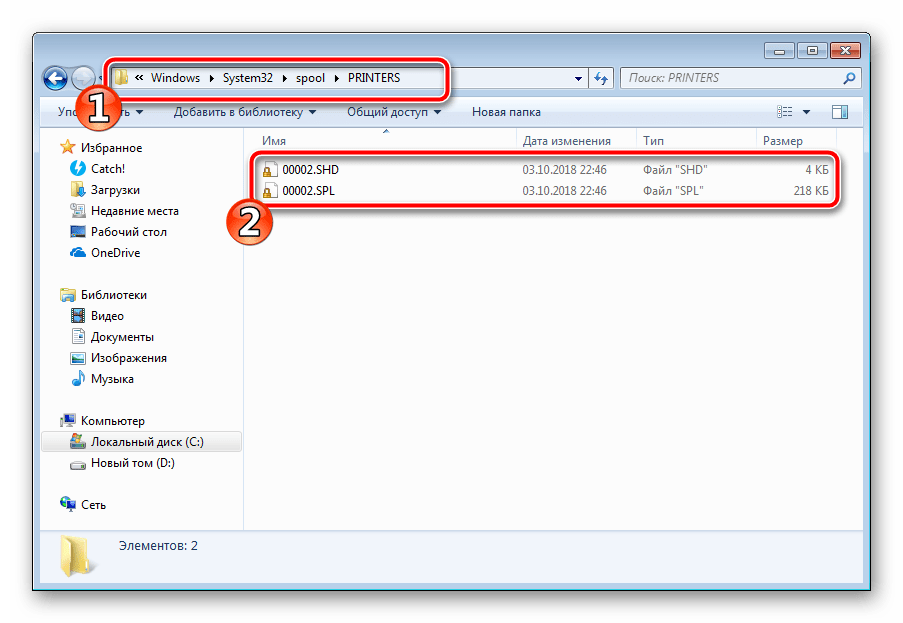
- Закройте окно, запустите «Мой компьютер», переместитесь по следующему адресу:
C:WindowsSystem32SpoolPRINTERS - Удалите все присутствующие файлы в папке.

Подробнее: Как очистить очередь печати на принтере HP
Осталось только выключить продукт компании HP, отключить его от питания, дать так постоять примерно минуту. После этого перезагрузите ПК, соедините оборудование и повторите процесс печати.
Способ 3: Отключение брандмауэра Windows
Иногда защитник Windows блокирует отправленные данных с компьютера на устройство. Связано это может быть с некорректной работой брандмауэра или различными системными сбоями. Мы советуем на время отключить защитник Виндовс и повторить попытку печати. Детальнее о деактивации этого инструмента читайте в другом нашем материале по следующим ссылкам:
Подробнее: Отключение брандмауэра в Windows XP, Windows 7, Windows 8
Способ 4: Переключение учетной записи пользователя
Рассматриваемая проблема порой возникает тогда, когда попытка отправки в печать производится не с той учетной записи пользователя Windows, с которой происходило добавление периферии. Дело в том, что каждый профиль имеет свои привилегии и ограничения, что приводит к появлению подобного рода неполадок. В таком случае нужно попробовать сменить запись юзера, если у вас их конечно добавлено больше, чем одна. Развернуто о том, как это сделать в разных версиях Виндовс читайте в статьях ниже.
Подробнее: Как сменить учетную запись пользователя в Windows 7, Windows 8, Windows 10
Способ 5: Восстановление Windows
Часто случается, что ошибки печати связаны с определенными изменениями в операционной системе. Самостоятельно обнаружить их достаточно сложно, однако состояние ОС можно вернуть, откатив все изменения. Осуществляется данная процедура с помощью встроенного компонента Виндовс, а детальное руководство по этой теме вы найдете в другом материале от нашего автора.
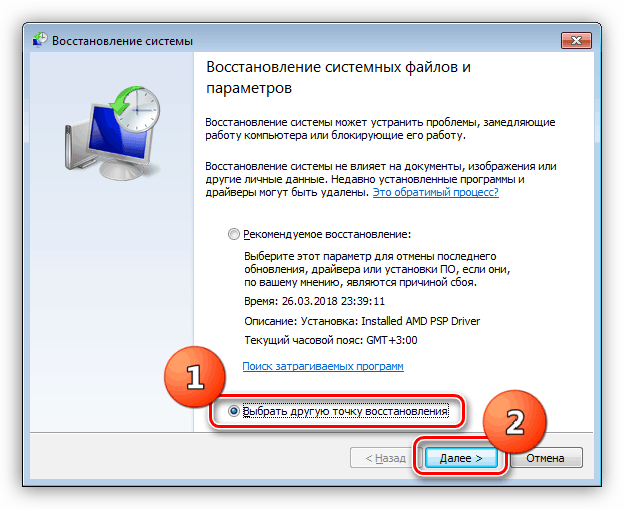
Подробнее: Варианты восстановления ОС Windows
Способ 6: Переустановка драйвера
Мы поставили этот способ последним, поскольку он требует от пользователя выполнения большого количества различных манипуляций, а также является достаточно сложным для новичков. Если никакие приведенные выше инструкции вам не помогли, значит остается только переустановить драйвер устройства. Для начала следует избавиться от старого. О том, как это сделать, читайте далее:
Читайте также: Удаление старого драйвера принтера
По завершении процедуры удаления задействуйте один из методов инсталляции программного обеспечения для периферии. Всего существует пять доступных способов. Развернуто с каждыми из них знакомьтесь в другой нашей статье.
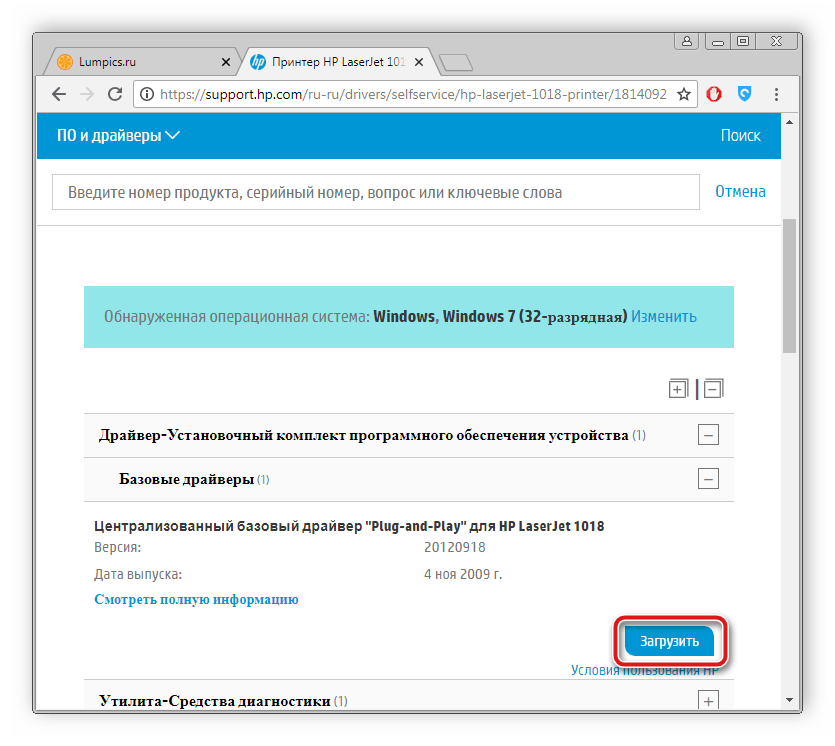
Подробнее: Установка драйверов для принтера
Как видите, методов исправления ошибки печати принтера HP существует достаточно большое количество, и каждый из них будет полезен в разных ситуациях. Надеемся, приведенные выше инструкции помогли вам без труда решить возникшую проблему, а продукт компании снова функционирует корректно.
Содержание этого документа относится к принтерам HP LaserJet M232dw, M232dwc, M233sdn, M233sdw, M233dw, M234sdwe, M234sdw, M234sdne, M234sdn, M234dwe, M234dw, M236sdn, M236sdw, M236dw и M236d.
В следующих разделах описаны основные ошибки, о которых свидетельствуют сочетания мигающих индикаторов на панели управления принтера, а также способы устранения неполадок для каждой комбинации. Определите последовательность мигающих индикаторов на панели управления, затем выполните действие по устранению той или иной проблемы.
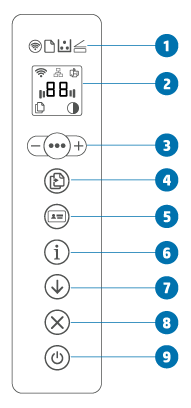
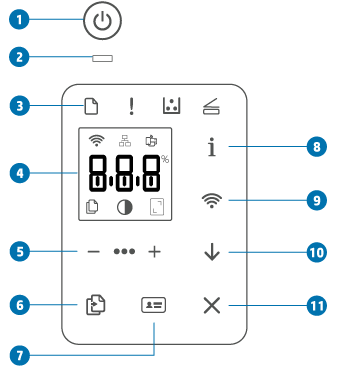
МФУ HP LaserJet M232dw, M232dwc, M233dw, M234dwe, M234dw, M236dw и M236d (без устройства подачи документов)
-
Индикаторы панели управления
-
Дисплей панели управления
-
Параметры копирования
-
Кнопка/индикатор копирования
-
Кнопка копирования удостоверения
-
Кнопка/индикатор информации
-
Кнопка/индикатор возобновления печати
-
Кнопка индикатор «Отмена»
-
Кнопка питания
МФУ HP LaserJet M233sdn, M233sdw, M234sdwe, M234sdw, M234sdne, M234sdn, M236sdn и M236sdw (с устройством подачи документов)
-
Клавиша питания
-
Индикатор состояния
-
Индикаторы на панели управления
-
Дисплей панели управления
-
Параметры копирования
-
Кнопка/индикатор копирования
-
Кнопка копирования удостоверения
-
Кнопка/индикатор информации
-
Кнопка/индикатор беспроводной связи
-
Кнопка/индикатор «Возобновить»
-
Кнопка индикатор «Отмена»
Коды Er (ошибки)
На панели управления отображается Er, затем 2-значный код ошибки.
Отображается Er/01
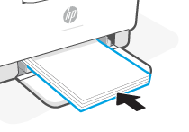
Сообщение об ошибке Er/01 означает, что входной лоток пуст.
Загрузите бумагу во входной лоток или извлеките и повторно загрузите стопку бумаги.
Отображается Er/02
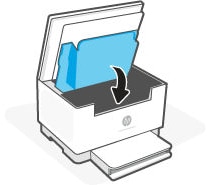
Сообщение об ошибке Er/02 указывает, что дверца доступа к картриджам открыта.
Убедитесь, что дверца доступа к картриджам полностью закрыта.
Отображается Er/03
Сообщение об ошибке Er/03 указывает, что принтеру не удалось захватить лист бумаги для печати.
Извлеките стопку бумаги из лотка и проверьте состояние бумаги. Повторно загрузите бумагу и повторите попытку печати, копирования или сканирования. Более подробные сведения об устранении неполадок см. в разделе Принтер не захватывает бумагу.
Отображаются коды Er/04, Er/05 или Er/06
Сообщение об ошибке Er/04, Er/05 или Er/06 обозначает замятие бумаги.
Найдите и извлеките всю замятую бумагу из принтера или перезагрузите принтер, если в нем нет замятой бумаги. Более подробные сведения об устранении неполадок см. в разделе Ошибка замятия бумаги.
Отображается Er/07
Сообщение об ошибке Er/07 указывает, что картридж с тонером отсутствует или установлен неправильно.
Для устранения этой проблемы установите отсутствующий картридж с тонером. Если картридж с тонером отсутствует, перейдите к шагу Установите новый картридж с тонером.
Приобретайте сменные картриджи и другие расходные материалы в магазине HP Store или в местных магазинах розничной торговли.
Шаг 1. Извлеките и снова установите картридж с тонером
Откройте дверцу доступа к картриджам, извлеките картридж с тонером, переустановите его и повторите попытку печати. Более подробные сведения см. в разделе Замена картриджа с тонером.
Если устранить ошибку не удается, перейдите к следующему шагу.
Шаг 2. Установите новый картридж с тонером
Замените картридж с тонером на новый и повторите попытку печати.
Если устранить ошибку не удается, перейдите к следующему шагу.
Шаг 3. Отправьте принтер на сервисное обслуживание
Если вы выполнили все приведенные выше действия, но устранить проблему не удалось, перейдите к разделу Сервисное обслуживание принтера в конце этого документа.
Отображается Er/08
Ошибка Er/08 указывает, что тонер в картридже заканчивается и выставленный для картриджа параметр приведет к прекращению его использования.
Чтобы продолжить печать, выполните следующие действия.
-
Откройте HP Smart и выберите принтер.
-
Выберите пункт Дополнительные параметры.
Примечание.
В Windows 7 и 8 откройте HP Printer Assistant, выберите Печать, затем щелкните Главная страница принтера (EWS).
-
Откройте Система, затем Параметры расходных материалов.
-
Измените Параметр очень низкого уровня на Продолжить.
Чтобы устранить неполадку, замените картридж.
Приобретайте сменные картриджи и другие расходные материалы в магазине HP Store или в местных магазинах розничной торговли.
Шаг 1. Замените пустой картридж или картридж с низким уровнем тонера
Замените картридж с тонером на новый и повторите попытку печати. Если устранить ошибку не удается, перейдите к следующему шагу. Более подробные сведения см. в разделе Замена картриджа с тонером.
Шаг 2. Отправьте принтер на сервисное обслуживание
Если вы выполнили все приведенные выше действия, но устранить проблему не удалось, перейдите к разделу Сервисное обслуживание принтера в конце этого документа.
Отображаются коды Er/11, Er/14 или Er/17
Ошибки могут отображаться по следующим причинам:
-
Картридж с тонером несовместим с принтером.
-
Картридж с тонером был защищен на другом принтере.
Замените затрагиваемые расходные материалы.
Приобретайте сменные картриджи и другие расходные материалы в магазине HP Store или в местных магазинах розничной торговли.
Шаг 1. Замените несовместимый картридж с тонером
Замените картридж с тонером на новый и повторите попытку печати. Если устранить ошибку не удается, перейдите к следующему шагу. Более подробные сведения см. в разделе Замена картриджа с тонером.
Шаг 2. Отправьте принтер на сервисное обслуживание
Если вы выполнили все приведенные выше действия, но устранить проблему не удалось, перейдите к разделу Сервисное обслуживание принтера в конце этого документа.
Отображается Er/20
Сообщение об ошибке Er/20 указывает на ошибку с датчикам картриджа с тонером.
Извлеките картридж с тонером и повторно вставьте его. Если ошибка не устранена, отключите принтер от основного питания, подождите 30 секунд, затем снова включите его. Если ошибка не устранена, перейдите к следующим шагам.
Шаг 1. Замена картриджа с тонером
Для замены отсутствующего или старого картриджа с тонером откройте дверцу доступа к картриджу, извлеките картридж со старым тонером и установите новый картридж. Более подробные сведения см. в разделе Замена картриджа с тонером.
Шаг 2. Отправьте принтер на сервисное обслуживание
Если вы выполнили все приведенные выше действия, но устранить проблему не удалось, перейдите к разделу Сервисное обслуживание принтера в конце этого документа.
Отображается Er/23
Сообщение об ошибке Er/23 указывает, что в принтере заканчивается память.
Чтобы устранить эту ошибку, нажмите кнопку Отмена для отмены текущего задания. Разбейте задание на несколько более мелких заданий, содержащих меньшее число страниц, и повторите отправку. Избегайте одновременного выполнения различных задач, например сканирования во время печати.
Отображается Er/26
Сообщение об ошибке Er/26 указывает, что в принтере возникла общая ошибка привода.
Чтобы устранить эту ошибку и продолжить, нажмите кнопку Возобновить. Если ошибка повторяется, выключите принтер, подождите 30 секунд и включите принтер. Если проблема не устранена, обратитесь в службу поддержки клиентов HP.
Отображается Er/30
Сообщение об ошибке Er/30 указывает на проблему со сканером.
Чтобы устранить ошибку, убедитесь, что защитный лист снят со стекла сканера. Выключите устройство, подождите 30 секунд и снова включите его. Если проблема не устранена, обратитесь в службу поддержки клиентов HP.
Отображается Er/50, Er/51, Er/52, Er/54, Er/55, Er/58 или Er/59
Сообщение об ошибке Er/50, Er/51, Er/52, Er/54, Er/55, Er/58 или Er/59 указывает, что принтер находится в состоянии ошибки из-за проблемы основного привода.
Чтобы устранить эту ошибку, выключите устройство, подождите 30 секунд и снова включите его. Если проблема не устранена, обратитесь в службу поддержки клиентов HP.
Отображается Er/66
Сообщение об ошибке Er/66 указывает, что оборудование Wi-Fi не найдено.
Чтобы устранить ошибку, нажмите кнопку Возобновить для продолжения работы без оборудования Wi-Fi или выключите принтер, подождите 30 секунд, затем включите принтер. Если проблема не устранена, обратитесь в службу поддержки клиентов HP.
Отображается Er/77
Сообщение об ошибке Er/77 указывает на сбой безопасного устройства.
Чтобы устранить ошибку, выключите принтер, подождите 30 секунд, затем снова включите его. Если проблема не устранена, обратитесь в службу поддержки клиентов HP.
Коды Go и P
На панели управления индикатор счетчика страниц показывает Go или P, а затем 2-значный код.
Отображается Go/01
Это условие указывает, что принтер работает в режиме ручной подачи бумаги.
Загрузите во входной лоток бумаги, тип и формат которой подходит для задания печати, затем нажмите кнопку Возобновить , чтобы продолжить печать, или кнопку Отмена
 , чтобы отменить задание печати.
Отображается Go/02
Это условие указывает, что принтер обрабатывает задание ручной двусторонней печати и нуждается в вашей помощи, чтобы завершить это задание.
Чтобы завершить задание печати, извлеките стопку напечатанных листов из приемного лотка, затем загрузите стопку печатной стороной вниз и верхним краем к принтеру. Нажмите кнопку Возобновить, чтобы продолжить, или кнопку Отмена, чтобы отменить задание печати.
Отображается Go/03
Это условие указывает, что тип и размер бумаги, загруженной во входной лоток, отличается от типа и размер бумаги, указанных в настройках задания печати.
Чтобы завершить задание печати, загрузите во входной лоток бумагу нужного формата и типа в соответствии с параметрами задания печати. Нажмите кнопку Возобновить, чтобы продолжить, или кнопку Отмена, чтобы отменить задание печати.
Отображается Go/06 (только для беспроводных принтеров)
Это состояние показывает, что принтер принял запрос для подключения к этому принтеру с помощью Wi-Fi Direct.
Нажмите кнопку Возобновить, чтобы подключиться, или кнопку Отмена, чтобы остановить задание.
Отображается P2
Это состояние указывает, что начато задание по копированию удостоверения.
Если мигает индикатор Откройте крышку , откройте крышку и переверните удостоверение, закройте крышку и нажмите кнопку Возобновить для продолжения или кнопку Отмена для отмены задания.
Цветовые схемы индикатора состояния (M232dw, M232dwc, M233dw, M234dw, M234dwe и M236dw)
Найдите в документе наблюдаемую комбинацию мигающих индикаторов состояния и выполните указанные действия для устранения возникшей неполадки.
Панель горит белым цветом
Принтер находится в режиме ожидания и не подключен к сети Wi-Fi. Подключите принтер к сети Wi-Fi.

Панель горит белым цветом, горит индикатор картриджа
Низкий уровень тонера в картридже. Замените картридж с тонером; дополнительные сведения см. в документе Замена картриджа с тонером.

Панель горит белым цветом, а индикатор картриджа мигает
Очень низкий уровень картриджа. Замените картридж с тонером; дополнительные сведения см. в документе Замена картриджа с тонером.
Примечание.
В случае, если во встроенном веб-сервере задано значение параметра Продолжить, а уровень тонера в картридже очень низкий, никакой код ошибки не отображается. Если для параметра задано значение Стоп, отображается Er/08.

На панели мигает белый индикатор
Принтер обрабатывает и печатает задание.

Белый индикатор по центру панели
Принтер находится в спящем режиме.

Панель непрерывно горит желтым цветом
Открыта дверца. Дверцы принтера могут не быть закрыты надлежащим образом. Убедитесь, что дверцы доступа к картриджам и тыльная дверца доступа надлежащим образом закрыты.

На панели горит желтый индикатор, индикатор бумаги мигает
В принтере могла закончиться бумага или бумага загружена ненадлежащим образом или возникло замятие бумаги. Загрузите бумагу, затем нажмите кнопку Возобновить, чтобы продолжить, или устраните замятие бумаги. Дополнительные сведения о замятии бумаги см в документе Ошибка замятия бумаги.

Индикатор на панели непрерывно светится желтым, а кнопка «Информация» мигает или непрерывно светится
В приложении HP Smart или в информационном отчете отображается сообщение Настройка принтера не завершена, Проверьте учетную запись или Принтеру не удается выполнить печать
На панели горит желтый индикатор, индикатор картриджа мигает
Если индикатор картриджа мигает, уровень картриджа может быть очень низким или возникла ошибка картриджа, например несовместимый, неавторизованный или защищенный картридж. Замените картридж с тонером. Дополнительные сведения см. в документе Замена картриджа с тонером.

Индикатор на панели быстро мигает желтым
На принтере возникла проблема. Выключите принтер, подождите 30 секунд, затем включите принтер. Если проблема не устранена, обратитесь в службу поддержки клиентов HP.
Панель непрерывно горит голубым цветом
Принтер находится в режиме ожидания и подключен к сети Wi-Fi. Компьютер или мобильное устройство напрямую подключено к принтеру через Wi-Fi Direct. Выполнение каких-либо действий не требуется.

Панель мигает голубым цветом
Принтер пытается подключиться к сети Wi-Fi. Дождитесь подключения принтера к сети или к изменению состояния индикатора.

Панель мигает синим, затем желтым цветом
Принтер пытается подключиться к сети Wi-Fi. Проверьте подключение.

Панель горит зеленым цветом
Принтер инициализируется, ожидает подтверждения, выполняет автоматическую очистку, загрузку и установку обновления принтера или охлаждается.
Примечание.
На время охлаждения задание печати может приостановиться; оно возобновиться, когда принтер будет готов. Это может занять несколько минут.

Зеленый индикатор мигает на панели
Принтер выполняет регулярное обслуживание. Выполнение каких-либо действий не требуется.

Панель мигает пурпурным цветом
Принтер находится в режиме настройки Wi-Fi. Если мигает кнопка Информация , нажмите эту кнопку, чтобы подключиться к Wi-Fi.

Панель быстро мигает пурпурным, затем мигает желтым
Истекло время, выделенное на подключение в режиме Wi-Fi Protected Setup (WPS). Нажмите кнопку Отмена, чтобы сбросить ошибку.

Состояние индикатора внимания (M233sdn, M233sdw, M234sdwe, M234sdw, M234sdne, M234sdn, M236d, M236sdn и M236sdw)
Найдите наблюдаемое состояние индикатора внимания и выполните указанные действия для устранения возникшей неполадки.
Индикатор внимания включен, и мигает индикатор бумаги
В принтере могла закончиться бумага, бумага загружена ненадлежащим образом, или возникло замятие бумаги. Загрузите бумагу, затем нажмите кнопку Возобновить, чтобы продолжить, или устраните замятие бумаги. Дополнительные сведения о замятии бумаги см в документе Ошибка замятия бумаги.

Индикатор внимания включен, и мигает индикатор картриджа
Низкий уровень тонера в картридже. Замените картридж с тонером; дополнительные сведения см. в документе Замена картриджа с тонером.

Индикатор внимания мигает
Возможно, дверцы принтера закрыты ненадлежащим образом. Убедитесь, что дверцы доступа к картриджам и тыльная дверца доступа надлежащим образом закрыты.
Индикатор внимания выключен, а индикатор картриджа включен
Низкий уровень тонера в картридже. Если качество печати становится неприемлемым, приготовьте запасной картридж для замены.

Модератор: vetal
-
-
Taskalfa 180 ошибка «Е» и «Встряхните картр. с тонером»
manik.76 в форуме Принтеры, МФУ, копиры формата A3
- 3
- 9645
dviz

Пн фев 20, 2017 1:35 pm
-
Taskalfa 180 ошибка «Е» и «Встряхните картр. с тонером»
-
-
«ошибка принтера HSYNC»
Sunat в форуме Xerox 3100 и иже с ним…
- 10
- 29003
Sunat
Сб май 10, 2014 6:19 am
-
«ошибка принтера HSYNC»
-
-
BROTHER DCP-1512R ошибка «Фотобарабан !»
VIRT в форуме Принтеры, МФУ, факсы, копиры формата A4
- 1
- 3900
kvg
Чт сен 05, 2019 1:35 pm
-
BROTHER DCP-1512R ошибка «Фотобарабан !»
-
-
brother DCP 7030R «ошибка барабана»
vg2804 в форуме Принтеры, МФУ, факсы, копиры формата A4
- 14
- 19740
Rexvil
Пт окт 09, 2020 8:01 am
-
brother DCP 7030R «ошибка барабана»
-
-
Samsung SCX 4300 V 1.15. Ошибка «Нет картриджа»
PrintFree в форуме Картриджи, их заправка и дефекты.
- 9
- 10373
С.Н.Н.
Пт авг 19, 2011 7:16 pm
-
Samsung SCX 4300 V 1.15. Ошибка «Нет картриджа»
Вернуться в Принтеры, МФУ, факсы, копиры формата A4
Кто сейчас на форуме
Сейчас этот форум просматривают: нет зарегистрированных пользователей и гости: 71
You are here: Home / error code / HP LaserJet M438 MFP error codes with quick guide
– Compatible Printer model: HP LaserJet M438 MFP
– HP LaserJet M438 MFP Error Codes with instructions guide:
HP LaserJet M438 MFP
- Code: 11-2T11
- Display: 11-2T11, Paper mismatch Tray 2 Load [A4] [Plain] Continue • Cancel X
- Description: Paper in tray 2 is not proper.
- Remedy: If you want to print the current paper, press “OK”. If not, select “X” and change the paper.
- Code: 11-2T21
- Display: 11-2T21, Paper mismatch Tray 3 Load [A4] [Plain] Continue • Cancel X
- Description: Paper in tray 3 is not proper.
- Remedy: If you want to print the current paper, press “OK”. If not, select “X” and change the paper.
- Code: 11-2T61
- Display: 11-2T61, Paper mismatch Tray 1Load [A4] [Plain] Continue • Cancel X
- Description: Paper in tray 1 is not proper.
- Remedy: If you want to print the current paper, press “OK”. If not, select “X” and change the paper.
- Code: A1-1110
- Display: A1-1110, Error: #A1-1110 / Motor Failure: #A1-1110. Turn off then on. Call for service if the problem persists
- Description: The Main Motor, its harness, or the Main Board PBA is defective.
- Remedy: 1. Turn the printer off then on. 2. If the error persists, send an on-site technician to perform the remaining steps. 3. Turn the printer off. 4. Remove the rear cover. 5. Check the connection the motor connector on main board is connected properly. Reconnect the harness. 6. If the connection is OK, replace the Main Motor (HP Part #: SAM-JC31–00145A).7. If the problem persists, replace the Main Board PBA:M436n/M436dn SAM-JC92–02607G
M436nda SAM-JC92–02607H
- Code: A1-5513
- Display: A1–5513, Error: #A1–5513 / Motor Failure: #A1-1110. Turn off then on. Call for service if the problem persists
- Description: The motor related to toner supply has a problem.
- Remedy: action1. Turn the printer off then on.2. If the error persists, send an on-site technician to perform the remaining steps.3. Open the front cover. If the toner pipe is blocked, open it.4. Check the seal is removed on toner and cartridge drum.5. Turn the printer off then on. If the error persists, check the following steps.6. From the control panel, enter Tech Mode and select the toner supply motor test: Menu > # > 10043616 > Menu > Tech Menu > Diagnostics > Engine Diagnostics > Engine Test Routines > 111–00307. If the motor does not operate, measure the motor power with DVM. a. If 24V power is supplied, replace the Toner Drive Motor (HP Part #: SAM-JC31–00078A).b. If 24V power is not supplied, check the LVPS-SMPS Power Supply and Main Board PBA.c. If 24V power is not generated, replace the LVPS-SMPS Power Supply (HP Part #: SAM-JC44-00223A) AND Main Board PBA: M436n/M436dn SAM-JC92–02607G
M436nda SAM-JC92–02607H d. If the control signal is abnormal, replace the Main Board PBA: M436n/M436dn SAM-JC92–02607G M436nda SAM-JC92–02607H
- Code: A2-1210
- Display: A2-1210, Error: #A2-1210 / Fan Failure: #A2-1210. Turn off then on. Call for service if the problem persists
- Description: SMPS fan does not operate.
- Remedy: 1. Turn the printer off then on.2. If the error persists, send an on-site technician to perform the remaining steps.3. Turn the printer off.4. Check if the SMPS fan connector is connected to the main board correctly.5. If the connection is OK, replace the SMPS Fan (HP Part #: SAM-JC31–00152B).
- Code: A2-2110
- Display: A2-2110, Error: #A2-2110 / Fan Failure: #A2-2110. Turn off then on. Call for service if the problem persists
- Description: Fuser fan does not operate.
- Remedy: 1. Turn the printer off then on.2. If the error persists, send an on-site technician to perform the remaining steps.3. Turn the printer off.4. Remove the rear cover.5. Check if the fuser fan connector is connected to the main board correctly. 6. If the connection is OK, replace the Fuser Fan (HP Part #: SAM-JC31–00160A).
- Code: A3-3311, A3-3312, A3-3320
- Display: A3-3311, A3-3312, A3-3320, A3-3411, A3-3412 Sensor errors
- Description: –A3-3311, Error: #A3-3311 / Sensor Failure: #A3-3311. Turn off then on. Call for service if the problem persists–A3-3312, Error: #A3-3312 / Sensor Failure: #A3-3312. Turn off then on. Call for service if the problem persists–A3-3320, Not proper Room Temp / The room temperature is not suitable for this set use. Please adjust room temperature–A3-3411, Error: #A3-3411 / Sensor Failure: #A3-3411. Turn off then on. Call for service if the problem persists–A3-3412, Error: #A3-3412 / Sensor Failure: #A3-3412. Turn off then on. Call for service if the problem persists
Temperature/Humidity sensor is defective. - Remedy: 1. Turn the printer off then on.2. If the error persists, send an on-site technician to perform the remaining steps.3. Remove the left cover. 4. Measure the resistance value of the connector at both ends.› If the values is not in 10KOm +- 1% (@ 25 C), replace the Temp./humidity Sensor (HP Part #: SAM-JC66.03969A). 5. If the sensor is normal, replace the Main Board PBA: M436n/M436dn SAM-JC92–02607G M436nda SAM-JC92–02607H
- Code: A3-3411, A3-3412
- Display: A3-3311, A3-3312, A3-3320, A3-3411, A3-3412 Sensor errors
- Description: –A3-3311, Error: #A3-3311 / Sensor Failure: #A3-3311. Turn off then on. Call for service if the problem persists–A3-3312, Error: #A3-3312 / Sensor Failure: #A3-3312. Turn off then on. Call for service if the problem persists–A3-3320, Not proper Room Temp / The room temperature is not suitable for this set use. Please adjust room temperature–A3-3411, Error: #A3-3411 / Sensor Failure: #A3-3411. Turn off then on. Call for service if the problem persists–A3-3412, Error: #A3-3412 / Sensor Failure: #A3-3412. Turn off then on. Call for service if the problem persists
Temperature/Humidity sensor is defective. - Remedy: 1. Turn the printer off then on.2. If the error persists, send an on-site technician to perform the remaining steps.3. Remove the left cover. 4. Measure the resistance value of the connector at both ends.› If the values is not in 10KOm +- 1% (@ 25 C), replace the Temp./humidity Sensor (HP Part #: SAM-JC66.03969A). 5. If the sensor is normal, replace the Main Board PBA: M436n/M436dn SAM-JC92–02607G M436nda SAM-JC92–02607H
- Code: C1-1110, C1-111A
- Display: C1-1110, C1-111A Toner error
- Description: –C1-1110, Prepare new toner / Prepare new toner cartridge–C1-111A, Shake toner cart. / Shake toner cartridge and then install. Replace toner cartridge if the problem persists
Toner remaining is 5 ~ 30% of its life. - Remedy: 1. Check the life remaining of the toner cartridge.2. Open the front cover. 3. Take out the toner cartridge. 4. Shake the toner cartridge horizontally to distribute the toner evenly inside the cartridge. 5. Reinstall the toner cartridge. 6. If the toner cartridge yield is expired, have the customer purchase a new toner cartridge (HP Part #: CF-256A).
- Code: C1-1140, C1-1160, C1-1170
- Display: C1-1140, C1-1160, C1-1170 Toner errors
- Description: – C1-1140, Replace new toner / End of life, Replace with new toner cartridge – C1-1160, Replace new toner / Replace with new toner cartridge – C1-1170, Replace new toner / End of life, Replace with new toner cartridge
The toner cartridge is at the end of its life. - Remedy: 1. Check the life remaining of the toner cartridge. 2. If the toner cartridge yield is expired, have the customer purchase a new toner cartridge (HP Part #: CF-256A).
- Code: C1-1313, C1-1314
- Display: C1-1313, C1-1314 Errors
- Description: – C1-1313, Shake toner cart. / Shake toner cartridge and then install. Call for service if the problem persists – C1-1314, Remove seal tape / Did not supply enough toner. Remove seal tape of toner cartridge or shake it. Call for service if the problem persists
Toner supply is inefficient or abnormal. - Remedy: 1. Turn the printer off. 2. Open the front cover. 3. Take out the toner cartridge. 4. Shake the toner cartridge horizontally to distribute the toner evenly inside the cartridge. 5. Check if the seal tape is removed. If not, remove it. 6. If the error persists, send an on-site technician to perform the remaining steps. 7. Remove the rear cover. 8. From the control panel, enter Tech Mode and run the toner drive motor test: Menu > # > 10043616 > Menu > Tech Menu > Diagnostics > Engine > Test Routines > 111.Toner > 0030. Supply Mot K £ If the test fails, replace the Toner Drive Motor (HP Part #: SAM-JC31.00078A). 9. If the problem persists, replace the toner cartridge (HP Part #: CF256A-67901).
- Code: C1-1411
- Display: C1-1411 Toner Not Installed / Toner cartridge is not installed. Install it
- Description: The toner cartridge is not installed or not detected.
- Remedy: 1. Open the front cover. Check if the toner cartridge is installed.2. Remove and reinstall the toner cartridge.3. If the error persists, check if the toner cartridge modular jack is contaminated or deformed.£ If the jack is damaged, replace the cartridge (HP Part #: CF256A-67901). 4. Replace the toner cartridge with a new one (HP Part #: CF256A-67901).
- Code: C1-1512
- Display: C1-1512, Toner Not Compatible / Toner cartridge is not compatible. Check guide
- Description: Toner cartridge is not compatible.
- Remedy: 1. Open the front cover. Check if the toner cartridge is installed.2. Remove the toner cartridge and re-install.3. If the error persists, remove the toner cartridge. 4. If the toner cartridge is not HP genuine, have the customer purchase a new toner cartridge (HP Part #: CF-256A).
- Code: C1-1711, C1-1712
- Display: C1-1711, C1-1712 Errors
- Description: –C1-1711, Error: #C1-1711 / Toner Cart Failure: #C1-1711. Call for service–C1-1712, Error: #C1-1712 / Toner Cart Failure: #C1-1712. Call for service The toner cartridge is not installed or not detected.
- Remedy: 1. Open the front cover. Check if the toner cartridge is installed.2. Remove the toner cartridge and re-install.3. If the error persists, check if the toner cartridge modular jack is contaminated or deformed.£ If the jack is damaged, replace the cartridge (HP Part #: CF256A-67901).
- Code: C3-1110
- Display: C3-1110, Prepare IMG. Unit / Prepare new imaging unit
- Description: Imaging unit remaining is 5 ~ 30% of its life.
- Remedy: 1. Check the life remaining of the drum unit. 2. If its life is at the end, turn the printer off and open the front cover. 3. Remove the toner cartridge. 4. Have the customer purchase a new Imaging Unit (HP Part #: CF257A).
- Code: C3-1140, C3-1150, C3-1170
- Display: C3-1140, C3-1150, C3-1170 Imaging unit errors
- Description: – C3-1140, Replace IMG. Unit / End of life, Replace with new imaging unit – C3-1150, Replace IMG. Unit / Replace with new imaging unit – C3-1170, Replace IMG. Unit / End of life, Replace with new imaging unit
The imaging unit has almost reached the end of its life. - Remedy: 1. Check the life remaining of the Imaging Unit. NOTE: The life of the Imaging Unit is approximately 80k pages. 2. If its life is at the end, have the customer purchase a new Imaging Unit (HP Part #: CF257A).
- Code: C3-1312, C3-1411, C3-1414
- Display: C3-1312, C3-1411, C3-1414 Imaging unit errors
- Description: – C3-1312, Error: #C3-1312 / Imaging Unit Failure: #C3-1312. Install IMG. Unit – C3-1411, IMG. Not Installed / Imaging unit is not installed. Install the unit – C3-1414, Error: #C3-1414 / Imaging Unit Failure: #C3-1414. Install imaging unit again
The imaging unit is not installed or not detected. - Remedy: 1. Open the front cover. Check if the imaging unit is installed. 2. Remove and reinstall the imaging unit. 3. If the error persists, check if the Imaging Unit connector is contaminated or deformed. £ If the connector is damaged, replace the Imaging Unit (HP Part #: CF257.67901). 4. If the error persists, replace the Imaging Unit (HP Part #: CF257.67901).
- Code: C3-1512
- Display: C3-1512, IMG. Not compatible / Imaging unit is not compatible. Check guide
- Description: The imaging unit is not installed or not detected.
- Remedy: 1. Open the front cover. Remove the toner cartridge. 2. Remove and reinstall the Imaging Unit. 3. Install the toner cartridge and close the front cover.. 4. Check the part # of the installed Imaging Unit. (HP part numbers are CF257A and CF257.67901.) £ If the Imaging Unit is not HP genuine, have the customer purchase a new Imaging Unit (HP Part #: CF257A).
- Code: C3-1711, C3-1712
- Display: C3-1711, C3-1712 Imaging unit errors
- Description: – C3-1711, Error: #C3-1711 / Imaging Unit Failure: #C3-1711. Call for service – C3-1712, Error: #C3-1712 / Imaging Unit Failure: #C3-1712. Call for service
The imaging unit is not installed or not detected. - Remedy: 1. Open the front cover. Check if the imaging unit is installed. 2. Remove and reinstall the Imaging Unit. 3. If the error persists, check if the Imaging Unit connector is contaminated or deformed. £ If the connector is damaged, replace the Imaging Unit (HP Part #: CF257.67901). 4. If the error persists, replace the Imaging Unit (HP Part #: CF257.67901).
- Code: C9-2110, C9-2120
- Display: C9-2110, C9-2120, Prepare TR. Roller / Prepare with new transfer roller
- Description: Transfer roller is at the end of its life.
- Remedy: 1. Open the side cover.2. Have the customer purchase a new Transfer Roller Kit (HP Part #: W7401–67901).
- Code: C9-2220
- Display: C9-2220, Error: #C9-2220 / TR Failure: #C9-2220. Install TR roller again
- Description: Transfer roller is at the end of its life.
- Remedy: 1. Open the side cover. 2. Have the customer purchase a new Transfer Roller Kit (HP Part #: W7401–67901). 3. If the error persists, send an on-site technician to replace the HVPS Board (HP Part #: SAM-JC44–00229A).
- Code: H1-1210
- Display: H1-1210, Paper jam in tray 2
- Description: Paper jam has occurred in tray 2. (Pickup roller is worn out.)
- Remedy: 1. Open the SCF right cover. Remove the jammed paper.2. Remove tray 2. Remove the jammed paper.3. Check if the pickup roller is worn out or contaminated.4. Clean the pickup roller with a lint free cloth and water only.5. If the error persists, send an on-site technician to replace the Pickup Roller and Friction Pad Kit (HP Part #: W7U01–67903).
- Code: H1-1220
- Display: H1-1220 Tray 2 door is open. Close it
- Description: Tray 2 cassette is pulled out. Insert it properly.
- Remedy: 1. Remove and insert tray 2 correctly.2. If the message persists, send an on-site technician to perform the remaining steps.3. Replace the tray 2 Photo Sensor (HP Part # SAM-0604–01393).4. If the message persists, replace the PBA Board, Secondary Cassette Feed (HP Part #: SAM-JC92–02511C).

- Code: H1-1230
- Display: H1-1230, Error: #H1-1230 / Input System Failure: #H1-1230. Check tray 3 connection
- Description: Communication error has occurred between the copier and SCF.
- Remedy: 1. Turn the printer off the on.2. If the error persists, send an on-site technician to perform the remaining steps.3. Disassemble the SCF unit.4. Check if the interface cable on SCF main board is connected correctly.5. If the error persists, replace the PBA Board, Secondary Cassette Feed (HP Part #: SAM-JC92–02511C).6. Install the copier on the SCF unit.
- Code: H1-1252, H1-1254
- Display: H1-1252, H1-1254, Paper empty in tray 2 / Paper is empty in tray 3. Load paper
- Description: Paper in tray 2 is empty or near empty. / The photo sensor is defective.
- Remedy: 1. Remove tray 2 and load the paper.2. If the message persists, send an on-site technician to replace the SCF Cassette Tray (HP Part #: SAM-JC90–01226B).
- Code: M1-1110
- Display: M1-1110, Paper jam in tray 1
- Description: Paper jam has occurred in tray 1.
- Remedy: 1. Open the side cover and check if a foreign substance or paper is jammed inside the unit.2. Remove tray 1 and remove the jammed paper. 3. If the jam error occurs frequently, send an on-site technician to replace the Pickup Roller and Friction Pad Kit (HP Part #: W7U01–67903).
- Code: M1-1610
- Display: M1-1610, Paper jam in tray 1
- Description: Paper jam has occurred in tray 1.
- Remedy: 1. Open the side cover and check if a foreign substance or paper is jammed inside the unit.2. Remove the jammed paper from tray 1.3. If the jam error occurs frequently, send an on-site technician to replace the Pickup Roller and Friction Pad Kit (HP Part #: W7U01–67903). 4. If the error persists, replace the Clutch (HP Part #: SAM-JC66–03983A).
- Code: M1-5112, M1-5113
- Display: M1-5112, M1-5113, Paper empty in tray 1 / Paper is empty in tray 1. Load paper
- Description: Paper in tray 1 is empty or almost empty. / The photo sensor is defective.
- Remedy: IMPORTANT: Before following the instruction below, remove the toner cartridge and imaging unit. If not, toner will pour inside the printer. 1. Remove tray 1 and load paper. 2. If the message persists, send an on-site technician to perform the remaining steps. 3. Remove the tray 1 and stand the copier on its left side to see the bottom. 4. Actuate the Empty Sensor to see if it moves freely. Replace the Empty Sensor if needed (HP Part #: SAM-0604–001393). 5. Check if the Empty Actuator is assembled correctly. If the actuator is defective, replace it (HP Part #: SAM-JC61–01350A).
- Code: M1-5120
- Display: M1-5120, All Trays Empty / Paper is empty in all trays. Load paper
- Description: Paper in all trays is empty or near empty. / The photo sensor is defective.
- Remedy: Refer to “H1–1252, M1–5112, M1–5612” troubleshooting.
- Code: M1-5610
- Display: M1-5610, Paper Normal in Tray 1
- Description: Paper in tray 1 is normal.
- Remedy: This message shows the printer can print the page from Tray 1 normally.
- Code: M1-5612
- Display: M1-5612, Paper empty in Tray 1. Load paper
- Description: Paper in tray 1 is empty or almost empty. / The photo sensor is defective.
- Remedy: 1. Load paper in tray 1. 2. If the message persists, send an on-site technician to perform the remaining steps. 3. Remove the toner cartridge and Imaging Unit. 4. Stand the copier on end to see the bottom. IMPORTANT: Before doing this, remove the toner cartridge and imaging unit. If not, toner will pour inside the printer. 5. Check if the Tray 1 Empty Sensor works normally. If needed, replace it (HP Part #: SAM-0604–001393). 6. Check if the Tray 1 Empty Actuator is assembled correctly. If needed, replace it (HP Part #: SAM-JC66– 03979A).
- Code: M2-1110, M2-2210
- Display: M2-1110, M2-2210 Jam inside errors
- Description: –M2-1110, Jam inside printer –M2-2210, Jam inside of duplex
Paper jam has occurred inside the printer. - Remedy: 1. Open the side cover. Remove the jammed paper.2. If the error persists, send an on-site technician to perform the remaining steps.3. If jammed paper occurs continually, check the following.a. Check if there is any obstacle or contamination on paper path. Remove and clean it.b. From the control panel, enter Tech Mode and execute the main motor tests:Menu > # > 10043616 > Menu > Tech Menu > Diagnostics > Engine Diagnostics > Engine Test Routines > 100 – Motor > 0000 – Main Motor & 0001 — Main Slowc. If the motor operation has a problem, turn the printer off.d. Remove the rear cover.e. Check if the main motor cable is connected correctly. Reconnect the cable. f. If the connection is OK, replace the Main Motor (HP Part #: SAM-JC31–00145A).g. Check if the Regi Sensor connector is connected correctly.h. If the error persists, replace the Regi Sensor (HP Part # SAM-0604–001393).
- Code: M3-1110
- Display: M3-1110, Jam in exit area
- Description: Paper jam has occurred in the exit area.
- Remedy: 1. Remove any jammed paper from the output tray.2. If the message persists, send an on-site technician to perform the remaining steps.3. Turn the printer off.4. Remove the Exit Unit. If there are any defective parts, replace the Exit Unit (HP Part #: SAM-JC90.01221A).5. Check if the Exit Motor works normally.£ Unplug and reconnect the motor cable. If the connection is OK, replace the Exit Motor (HP Part #: SAM-JCP3.00452A). 6. If the message continually displays, replace the Fuser Unit (HP Part #: SAM-JC91–01217).
- Code: S2-331D
- Display: S2-331D, Waiting for low temp / Waiting delay time for lower fixing temperature…
- Description: The printer is stopped because the temperature of the Fuser Unit is in an abnormal state.
- Remedy: Please wait. This error will disappear.
- Description: The printer is calibrating.
- Remedy: Please wait. This error will disappear.
- Code: S2-4210
- Display: S2-4210, Front door is open. Close it
- Description: Front cover is open or the cover open sensor is defective.
- Remedy: 1. Check if the front cover is closed correctly.2. If the message persists, send an on-site technician to perform the remaining steps.3. Check if the cover open sensor connector is connected properly. Reconnect it.4. If the sensor is defective, replace it (HP Part #: SAM-0604–01393).
- Code: S2-4410
- Display: S2-4410, Right door is open. Close it
- Description: Side cover is open or the cover open sensor is defective.
- Remedy: 1. Check if the side cover is closed correctly.2. If the message persists, send an on-site technician to perform the remaining steps.3. Check if the cover open sensor connector is connected properly. Reconnect it.4. If the sensor is defective, replace it (HP Part #: SAM-0604–01393).
- Code: S3-3122
- Display: S3-3122, Scanner Locked / Scanner is locked. Press Stop button
- Description: Scanner lock error has occurred. Scanner Imaging Bar (SIB) does not move.
- Remedy: 1. Turn the printer off then on.2. If the error persists, send an on-site technician to perform the remaining steps.3. Check if the Scanner Imaging Bar (SIB) unit is moving when powering on.4. Check if the flat cable is connected to the SIB unit properly. Reconnect or replace the flat flexible cable (HP Part # SAM-JC39.02518A).5. If the SIB is defective, replace it (HP Part #: SAM-0609.001508).6. Check if there is any defective part in the scanner unit. (Belt, Motor etc.)
› Belt
› Scan Motor
Motor7. If the error persists, replace the Main Board PBA: M436n/M436dn SAM-JC92–02607G M436nda SAM-JC92–02607H
- Code: S6-3123
- Display: S6-3123, IP Conflict / This IP address conflicts with that of other system
- Description: IP address conflicts with that of other system. / There is no response when checking the ping test.
- Remedy: Change the printer’s IP address.– Set-up the IP address in this order, Network -> TCP/IP (IPv4) -> STATIC.– In case of DHCP or Bootp, reboot the printer to receive a new IP address.
- Code: U1-2132, U1-2315, U1-2320
- Display: U1-2132, U1-2315, U1-2320, U1-2330, U1-2334, U1-2340, U1-234H Fuser unit failure errors
- Description: –U1-2132, Error: #U1-2132 / Fuser Unit Failure: #U1-2132. Turn off then on. Call for service if the problem persists–U1-2315, Error: #U1-2315 / Fuser Unit Failure: #U1-2315. Turn off then on. Call for service if the problem persists–U1-2320, Error: #U1-2320 / Fuser Unit Failure: #U1-2320. Turn off then on. Call for service if the problem persists–U1-2330, Error: #U1-2330 / Fuser Unit Failure: #U1-2330. Turn off then on. Call for service if the problem persists–U1-2334, Error: #U1-2334 / Fuser Unit Failure: #U1-2334. Turn off then on. Call for service if the problem persists–U1-2340, Error: #U1-2340 / Fuser Unit Failure: #U1-2340. Turn off then on. Call for service if the problem persists–U1-234H, Error: #U1-234H / Fuser Unit Failure: #U1-234H. Turn off then on. Call for service if the problem persists
The temperature control of the Fuser Unit is abnormal. - Remedy: 1. Turn the printer off then on.2. If the error persists, send an on-site technician to perform the remaining steps.3. Turn the printer off, remove, then re-install the Fuser Unit.4. If the error persists. Turn the printer off and remove the Fuser Unit.a. Check the fuser connector for bent or broken pins.b. Check if the input voltage is normal.c. Check if the thermistor is twisted or contaminated; and is in contact with the Heat Roller.5. After confirming continuity in the fuser connector and the error still exists; replace the below parts in order: › Fuser Unit (HP Part #: SAM-JC91.01217A) › LVPS.SMPS Power Supply (HP Part #: SAM-JC44.00223A) › HVPS (HP Part #: SAM-JC44.00229A)
- Code: U1-2330, U1-2334
- Display: U1-2132, U1-2315, U1-2320, U1-2330, U1-2334, U1-2340, U1-234H Fuser unit failure errors
- Description: –U1-2132, Error: #U1-2132 / Fuser Unit Failure: #U1-2132. Turn off then on. Call for service if the problem persists–U1-2315, Error: #U1-2315 / Fuser Unit Failure: #U1-2315. Turn off then on. Call for service if the problem persists–U1-2320, Error: #U1-2320 / Fuser Unit Failure: #U1-2320. Turn off then on. Call for service if the problem persists–U1-2330, Error: #U1-2330 / Fuser Unit Failure: #U1-2330. Turn off then on. Call for service if the problem persists–U1-2334, Error: #U1-2334 / Fuser Unit Failure: #U1-2334. Turn off then on. Call for service if the problem persists–U1-2340, Error: #U1-2340 / Fuser Unit Failure: #U1-2340. Turn off then on. Call for service if the problem persists–U1-234H, Error: #U1-234H / Fuser Unit Failure: #U1-234H. Turn off then on. Call for service if the problem persists
The temperature control of the Fuser Unit is abnormal. - Remedy: 1. Turn the printer off then on.2. If the error persists, send an on-site technician to perform the remaining steps.3. Turn the printer off, remove, then re-install the Fuser Unit.4. If the error persists. Turn the printer off and remove the Fuser Unit.a. Check the fuser connector for bent or broken pins.b. Check if the input voltage is normal.c. Check if the thermistor is twisted or contaminated; and is in contact with the Heat Roller.5. After confirming continuity in the fuser connector and the error still exists; replace the below parts in order: › Fuser Unit (HP Part #: SAM-JC91.01217A) › LVPS.SMPS Power Supply (HP Part #: SAM-JC44.00223A) › HVPS (HP Part #: SAM-JC44.00229A)
- Code: U1-2340, U1-234H
- Display: U1-2132, U1-2315, U1-2320, U1-2330, U1-2334, U1-2340, U1-234H Fuser unit failure errors
- Description: –U1-2132, Error: #U1-2132 / Fuser Unit Failure: #U1-2132. Turn off then on. Call for service if the problem persists–U1-2315, Error: #U1-2315 / Fuser Unit Failure: #U1-2315. Turn off then on. Call for service if the problem persists–U1-2320, Error: #U1-2320 / Fuser Unit Failure: #U1-2320. Turn off then on. Call for service if the problem persists–U1-2330, Error: #U1-2330 / Fuser Unit Failure: #U1-2330. Turn off then on. Call for service if the problem persists–U1-2334, Error: #U1-2334 / Fuser Unit Failure: #U1-2334. Turn off then on. Call for service if the problem persists–U1-2340, Error: #U1-2340 / Fuser Unit Failure: #U1-2340. Turn off then on. Call for service if the problem persists–U1-234H, Error: #U1-234H / Fuser Unit Failure: #U1-234H. Turn off then on. Call for service if the problem persists
The temperature control of the Fuser Unit is abnormal. - Remedy: 1. Turn the printer off then on.2. If the error persists, send an on-site technician to perform the remaining steps.3. Turn the printer off, remove, then re-install the Fuser Unit.4. If the error persists. Turn the printer off and remove the Fuser Unit.a. Check the fuser connector for bent or broken pins.b. Check if the input voltage is normal.c. Check if the thermistor is twisted or contaminated; and is in contact with the Heat Roller.5. After confirming continuity in the fuser connector and the error still exists; replace the below parts in order: › Fuser Unit (HP Part #: SAM-JC91.01217A) › LVPS.SMPS Power Supply (HP Part #: SAM-JC44.00223A) › HVPS (HP Part #: SAM-JC44.00229A)
- Code: U2-1111, U2-1112
- Display: U2-1111, U2-1112, U2-1113, U2-1114 LSU failure errors
- Description: –U2-1111, Error: #U2-1111 / LSU Failure: #U2-1111. Turn off then on. Call for service if the problem persists–U2-1112, Error: #U2-1112 / LSU Failure: #U2-1112. Turn off then on. Call for service if the problem persists–U2-1113, Error: #U2-1113 / LSU Failure: #U2-1113. Turn off then on. Call for service if the problem persists–U2-1114, Error: #U2-1114 / LSU Failure: #U2-1114. Turn off then on. Call for service if the problem persists The Laser Scanner Unit (LSU) has experienced an error.
- Remedy: 1. Turn the printer off then on.2. If the error persists, send an on-site technician to perform the remaining steps.3. From the control panel, enter Tech Mode and execute the LSU motor tests:Menu > # > 10043616 > Menu > Tech Menu > Diagnostics > Engine > Test Routines > 110 – LSU > 0000 – LSU Mot 1Rdy & 00602 – LSU Mot 1Run4. If there is no sound, remove the platen unit. Check if the LSU harness is connected on the main board properly.5. If it is OK, remove the top cover. Check if the LSU harness is connected on the LSU board properly.6. Check if the LSU harness is defective. If needed replace it (HP Part #: SAM-JC39–01996A).7. Reconnect the LSU harness and then execute the LSU motor test again. 8. If the error persists, replace the LSU (HP Part #: SAM-JC97–04301A). 9. If the error persists after replacing the LSU, replace the Main Board PBA: M436n/M436dn SAM-JC92–02607G M436nda SAM-JC92–02607H
- Code: U2-1113, U2-1114
- Display: U2-1111, U2-1112, U2-1113, U2-1114 LSU failure errors
- Description: –U2-1111, Error: #U2-1111 / LSU Failure: #U2-1111. Turn off then on. Call for service if the problem persists–U2-1112, Error: #U2-1112 / LSU Failure: #U2-1112. Turn off then on. Call for service if the problem persists–U2-1113, Error: #U2-1113 / LSU Failure: #U2-1113. Turn off then on. Call for service if the problem persists–U2-1114, Error: #U2-1114 / LSU Failure: #U2-1114. Turn off then on. Call for service if the problem persists The Laser Scanner Unit (LSU) has experienced an error.
- Remedy: 1. Turn the printer off then on.2. If the error persists, send an on-site technician to perform the remaining steps.3. From the control panel, enter Tech Mode and execute the LSU motor tests:Menu > # > 10043616 > Menu > Tech Menu > Diagnostics > Engine > Test Routines > 110 – LSU > 0000 – LSU Mot 1Rdy & 00602 – LSU Mot 1Run4. If there is no sound, remove the platen unit. Check if the LSU harness is connected on the main board properly.5. If it is OK, remove the top cover. Check if the LSU harness is connected on the LSU board properly.6. Check if the LSU harness is defective. If needed replace it (HP Part #: SAM-JC39–01996A).7. Reconnect the LSU harness and then execute the LSU motor test again. 8. If the error persists, replace the LSU (HP Part #: SAM-JC97–04301A). 9. If the error persists after replacing the LSU, replace the Main Board PBA: M436n/M436dn SAM-JC92–02607G M436nda SAM-JC92–02607H
- Code: U3-3211, U3-3213, U3-3214
- Display: U3-3211, U3-3213, U3-3214, U3-3311, U3-3313, U3-3314 Original paper jam / Original paper jam inside of scanner. Remove jam
- Description: Jam has occurred inside the ADF unit.
- Remedy: 1. Open the ADF cover. If there is jammed paper, remove it.2. If the error persists, send an on-site technician to perform the remaining steps.3. If this error continually displays, check the Actuator Registration and ADF Registration Photo Sensor. If their operation is abnormal, replace the defective part. Actuator Registration SAM-JC66–03148A ADF Registration Photo Sensor SAM-0604–001393
4. If the ADF Registration Photo Sensor is OK, check the Scan Actuator and Actuator Scan Photo Sensor . If their operation is abnormal, replace the defective part. Scan Actuator SAM-JC66–03210A Actuator Scan Photo Sensor SAM-0604–001393
5. Check if the Registration Clutch operates normally. Check if the clutch cable is connected correctly. If the clutch is defective, replace it (HP Part #: SAM-JC47–0033G).
- Code: U3-3311, U3-3313, U3-3314
- Display: U3-3211, U3-3213, U3-3214, U3-3311, U3-3313, U3-3314 Original paper jam / Original paper jam inside of scanner. Remove jam
- Description: Jam has occurred inside the ADF unit.
- Remedy: 1. Open the ADF cover. If there is jammed paper, remove it.2. If the error persists, send an on-site technician to perform the remaining steps.3. If this error continually displays, check the Actuator Registration and ADF Registration Photo Sensor. If their operation is abnormal, replace the defective part. Actuator Registration SAM-JC66–03148A ADF Registration Photo Sensor SAM-0604–001393
4. If the ADF Registration Photo Sensor is OK, check the Scan Actuator and Actuator Scan Photo Sensor . If their operation is abnormal, replace the defective part. Scan Actuator SAM-JC66–03210A Actuator Scan Photo Sensor SAM-0604–001393
5. Check if the Registration Clutch operates normally. Check if the clutch cable is connected correctly. If the clutch is defective, replace it (HP Part #: SAM-JC47–0033G).
Solved HP LaserJet M438 MFP Error codes
- Code: U3-3411, U3-3413, U3-3414
- Display: U3-3411, U3-3413, U3-3414 Original paper jam / Original paper jam inside of scanner. Remove jam
- Description: Jam has occurred inside the ADF unit.
- Remedy: 1. Open the ADF cover. If there is jammed paper, remove it.2. If the error persists, send an on-site technician to perform the remaining steps. 3. Check if the Actuator Registration operates normally. If needed, replace it (HP Part #: SAM-JC66–03148A). 4. Re-seat the Actuator Registration Photo Sensor cable.5. If the error persists, replace the Actuator Registration Photo Sensor (HP Part #: SAM-0604–001393).
- Code: U3-3511, U3-3513, U3-3514
- Display: U3-3511, U3-3513, U3-3514 Original paper jam / Original paper jam inside of scanner. Remove jam
- Description: Jam has occurred inside the ADF unit.
- Remedy: 1. Open the ADF cover. If there is jammed paper, remove it.2. If the error persists, send an on-site technician to perform the remaining steps. 3. Check if the Scan Actuator operates normally. If needed, replace it (HP Part #: SAM-JC66–03210A). 4. Re-seat the San Actuator Photo Sensor cable.5. If the error persists, replace the San Actuator Photo Sensor (HP Part #: SAM-0604–001393).
- Code: U3-3711, U3-3713, U3-3714
- Display: U3-3711, U3-3713, U3-3714 Original paper jam / Original paper jam inside of scanner. Remove jam
- Description: Jam has occurred inside the ADF unit.
- Remedy: 1. Open the ADF cover. If there is jammed paper, remove it.2. If the error persists, send an on-site technician to perform the remaining steps. 3. Check if the Exit Actuator operates normally. If needed, replace it (HP Part #: SAM-JC66–B3184A). 4. Re-seat the Exit Actuator Photo Sensor cable.5. If the error persists, replace the Exit Actuator Photo Sensor (HP Part #: SAM-0604–001393).
- Code: U3-4210
- Display: U3-4210 Scanner door open / Top door of scanner is open. Close the door
- Description: ADF cover is open.
- Remedy: 1. Close the ADF cover properly.2. If the message persists, send an on-site technician to perform the remaining steps.3. Check the ADF Cover Open Photo Sensor and its cable. If needed, replace it (HP Part #: SAM-0604–001393).4. Check for damaged ribs or broken parts on the underside of the ADF Cover. If needed, replace it (HP Part #: SAM-JC97–04754A).
Contact us to get support with HP LaserJet M438 MFP Error case
Telegram: https://t.me/hyperaktiv
Facebook: https://www.facebook.com/dngnm/
Source:
https://dnasofts.com
https://shop.nguyendangnam.com/
https://nguyendangnam.me/