
hp-concentra-wrapper-portlet
![]()
Actions
Issue
A ‘Carriage Jam. The print carriage cannot move. Open the ink cartridge access door, clear any paper jam or obstruction, and select OK‘ message displays on the printer control panel.
One of the following error codes might display with the message:
-
0x61000008
-
0x6100000B
-
0x6100001D
The carriage, which holds the cartridges, stalls in the printer. A paper jam might have occurred previously.
You might also experience the following symptoms:
-
The printer does not print.
-
The print job stops unexpectedly.
Solution one: Restart the printer
Follow these steps to restart the printer, and then try to print a test page.
Step one: Restart the printer
-
Press the Power button to turn off the printer.
-
Wait 60 seconds.
-
Press the Power button to turn on the printer.
note:
The printer might go through a warm-up period which can last several minutes. Wait until the printer is idle and silent before continuing.
Step two: Print a Printer Status Report
Video on printing a test page
The following video demonstrates how to print a printer status report.
note:
This video shows the HP Officejet 4620 e-All-in-One Printer series, but the steps are the same for your printer.

Print a test page to make sure that the hardware functions correctly.
-
Load plain white U.S. letter or A4 size paper in the tray.
-
On the product control panel, press the Setup button (
 ).
). -
Press the button (
) next to the Down Arrow ( ) until Reports displays next to OK, and then press the button next to OK. -
Press the button next to the Down Arrow (
) until Printer Status Report displays next to OK, and then press the button next to OK again. The test page prints.
 ).
). ) next to the Down Arrow (
 ) until
 -
If these steps resolved the issue, and the test page prints, there is no need to continue troubleshooting.
-
If the issue persists, continue with the next solution.
-
If the test page does not print, continue with the next solution.
Solution two: Clear the jam from inside the printer
Follow these steps to clear the jam from the cartridge access area, the cleanout area, and from underneath the printer.
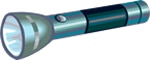
note:
Use a flashlight to complete these steps.
Video on clearing a carriage jam
The following video demonstrates how to clear a carriage jam.
note:
This video shows the HP Officejet 4620 e-All-in-One Printer series, but the steps are the same for your printer.
Step one: Clear the jam from the cartridge access area
Follow these steps to remove jammed paper from inside the cartridge access area.
-
Press the Power button to turn on the printer, if it is not already turned on.
-
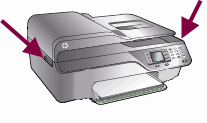
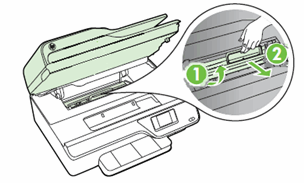
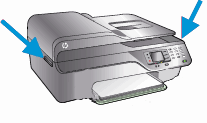
Locate the slots on the sides of the printer.
Figure : Locate the slots on the sides of the printer
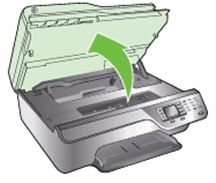
-
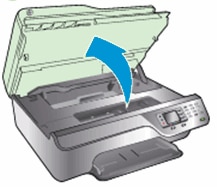
Place your fingers in the two slots on the sides of the printer, and then lift the cartridge access door. The carriage moves into the cartridge access area.
Figure : Open the cartridge access door
-
Disconnect the power cord from the rear of the printer.
warning:Do not reach into the cartridge access
area when the printer is plugged into an electrical outlet.
-
Disconnect the USB cable from the rear of the printer if you have a USB connection to the computer.
-
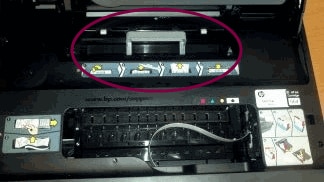
Gently remove any jammed paper from the cartridge access area. To avoid tearing any whole sheets of paper, pull the paper with both hands.
-
Use a flashlight to thoroughly check for torn pieces of paper that might remain in the cartridge access area. If any torn pieces of paper remain inside the printer, more jams are likely to occur.
Use a flashlight
Paper jammed in carriage path
-
Slide the carriage to the right side of the cartridge access area, and then inspect the left side of the cartridge access area for torn pieces of paper that might remain inside the printer.
-
Remove any torn pieces of paper you find.
-
Slide the carriage to the left side of the cartridge access area, and then inspect the right side of the cartridge access area for torn pieces of paper that might remain inside the printer.
-
Remove any torn pieces of paper you find.

Step two: Clear the jam from inside the cleanout door
Follow these steps to remove any jammed paper from the cleanout door.
-
Make sure that the power is off and that the power cord is disconnected from the rear of the printer.
warning:Do not reach into the cartridge access
area when the printer is plugged into an electrical outlet.
-
Make sure the USB cable is disconnected from the rear of the printer, if you have a USB connection to the computer.
-
With the cartridge access door open, locate the cleanout door. The door is behind the cartridge access area towards the rear of the printer.
Figure : The cleanout door
-
Pull the cleanout door up and then out to remove it from the printer.
Figure : Remove the cleanout door
-
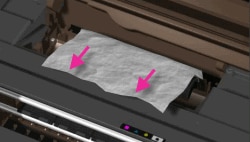
Gently remove any jammed paper. To avoid tearing any whole sheets of paper, pull the paper with both hands.
Figure : Remove any jammed paper
-
Use a flashlight to thoroughly check for torn pieces of paper that might remain in the cleanout area. If any torn pieces of paper remain inside the printer, more jams are likely to occur.
Figure : Use a flashlight
-
Remove any torn pieces of paper you find.
-
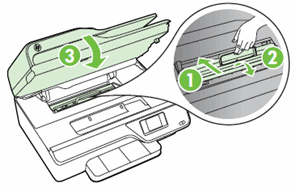
Gently reinsert the cleanout door into the cleanout area, and then press down on the handle until the door snaps into place.
-
Close the cartridge access door.
-
Insert the cleanout door into the cleanout area
-
Push down on the door handle until the door snaps into place
-
Close the cartridge access door
Figure : Reinsert the cleanout door and close the cartridge access door
-
Step three: Clear the jam from underneath the Printer
If you are unable to remove jammed paper from the cartridge access area or from inside the cleanout door, follow these steps to clear the jam from underneath the printer.
-
Press the Power button to turn off the printer, if it is not off already.
-
Disconnect the power cord from the rear of the printer, if it is not disconnected already.
-
Turn the printer onto its right side so that you can access its underside.
caution:Before turning the printer, use your hand to secure the scanner lid.
-
Slide the paper tray out until it stops.
-
Gently remove any jammed paper and bits of torn paper from the input tray area and from underneath the printer. To avoid tearing any whole sheets of paper, pull the paper with both hands.
Figure : Remove paper from underneath the printer
-
Use a flashlight to thoroughly check for torn pieces of paper that might remain inside the printer. If any torn pieces of paper remain inside the printer, more jams are likely to occur.
Figure : Use a flashlight
-
Remove any torn pieces of paper you find.
-
Slide the paper tray back in until it stops.
-
Return the printer to its normal position.
-
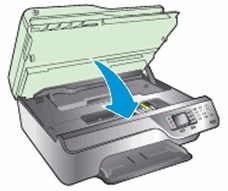
Open the cartridge access door, and then look inside the printer for any loose objects that might have shifted when you turned the printer over. Remove any loose objects you find.
-
Close the cartridge access door.
Figure : Close the cartridge access door
-
Reconnect the power cord to the rear of the printer.
-
Press the Power button to turn on the printer.

Step four: Print a Printer Status Report
Print a test page to make sure that the hardware functions correctly.
How to print a test page
Follow these steps to print a test page.
-
Load plain white U.S. letter or A4 size paper in the tray.
-
On the product control panel, press the Setup button (
). -
Press the button (
) next to the Down Arrow ( ) until Reports displays next to OK, and then press the button next to OK. -
Press the button next to the Down Arrow (
) until Printer Status Report displays next to OK, and then press the button next to OK again. The test page prints.
-
If these steps resolved the issue, and the test page prints, there is no need to continue troubleshooting.
-
If the issue persists, continue with the next solution.
-
If the test page does not print, continue with the next solution.
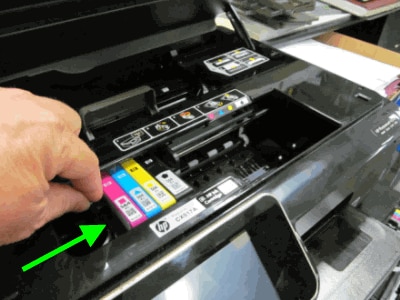
Solution three: Remove and reinsert the cartridges
Improper placement or installation of the cartridges can cause the printer to indicate a carriage jam error. Follow these steps to remove and then reinsert the cartridges.
Step one: Remove and reinsert the cartridges
Follow these steps to remove and then reinsert the cartridges.
-
Press the Power button to turn on the printer, if it is not already on.
-
Locate the two slots on the sides of the printer.
Figure : Slots on the sides of the printer
-
Place your fingers in the slots on the right and left sides of the printer, and then lift to open the cartridge access door. The carriage moves into the carriage access area.
Figure : Open the cartridge access door
-
Wait until the carriage is idle and silent before proceeding.
-
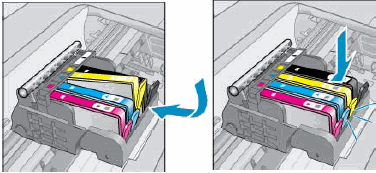
Press in the tab on the front of a cartridge to release it, and then pull up on the cartridge to remove it from the slot.
Figure : Remove the cartridge from its slot
-
Repeat these steps to remove the other cartridges.
-
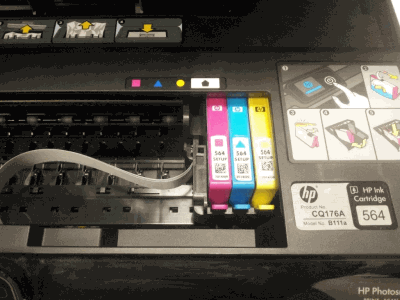
To reinsert a cartridge, hold the cartridge so that the cartridge contacts are facing toward the printer.
-
Match the colored dot on the cartridge with the dot of the same color on the carriage.
-
Slide the cartridge into its slot, and then gently press the cartridge down until it clicks into place.
note:
Make sure that the colored dot on the cartridge label matches the colored dot on the slot.
Figure : Install the cartridge
-
Repeat these steps to reinsert the other cartridges.
-
Close the cartridge access door.
Figure : Close the cartridge access door

Step two: Print a Printer Status Report
Print a test page to make sure that the hardware functions correctly.
How to print a test page
Follow these steps to print a test page.
-
Load plain white U.S. letter or A4 size paper in the tray.
-
On the product control panel, press the Setup button (
). -
Press the button (
) next to the Down Arrow ( ) until Reports displays next to OK, and then press the button next to OK. -
Press the button next to the Down Arrow (
) until Printer Status Report displays next to OK, and then press the button next to OK again. The test page prints.
-
If these steps resolved the issue, and the test page prints, there is no need to continue troubleshooting.
-
If the issue persists, continue with the next solution.
-
If the test page does not print, continue with the next solution.
Solution four: Make sure that the posts in the cartridge parking area are not blocking the carriage
The carriage might move freely to the left and right even though the error displays on the control panel. Follow these steps to check if the posts are blocking the carriage.
Step one: Make sure that the posts in the cartridge parking area are not blocking the carriage
note:
Consider using gloves to perform these steps.
-
Unplug the power cord from the power source or electrical outlet.
-
Open the cartridge access door.
Figure : Open the cartridge access door
-
Reach into the cartridge access area, and then manually move the carriage to the left of the printer and then the right. The carriage should move completely underneath the cover on the right side of the printer.
-
If you cannot move the carriage completely underneath the cover on the right side of the printer, continue with these steps.
Figure : Example of the carriage partially under the cover on the right side of the printer
-
Figure : Example of the carriage resting underneath the cover on the right side of the printer
-
-
Move the carriage to the left side of the printer, and then use a flashlight to look inside the printer under the right cover.
Figure : Example showing where to look under the printer cover
-
Make sure that the posts are not blocking the carriage from moving all the way to the right.
Figure : Example of posts that might be blocking the carriage
-
If you see posts that could be blocking the carriage, continue with these steps.
-
-
Use a long, slim object (such as the eraser-end of a pencil) to gently push in the post.
Figure : Example of pushing in the post with a pencil
-
Reach into the cartridge access area, and then manually move the carriage to the right of the printer. The carriage should move under the printer cover.
warning:Do not lift up on the carriage.
Figure : Push the carriage to the right
Figure : Example of the carriage resting under the cover
-
Close the cartridge access door.
Figure : Close the cartridge access door
-
Reconnect the power cord to the rear of the printer.
-
Plug the power cord back into the power source or electrical outlet.
-
If the printer does not turn on automatically, press the Power button to turn it on.


Step two: Print a Printer Status Report
Print a test page to make sure that the hardware functions correctly.
How to print a test page
Follow these steps to print a test page.
-
Load plain white U.S. letter or A4 size paper in the tray.
-
On the product control panel, press the Setup button (
). -
Press the button (
) next to the Down Arrow ( ) until Reports displays next to OK, and then press the button next to OK. -
Press the button next to the Down Arrow (
) until Printer Status Report displays next to OK, and then press the button next to OK again. The test page prints.
-
If these steps resolved the issue, and the test page prints, there is no need to continue troubleshooting.
-
If the issue persists, continue with the next solution.
-
If the test page does not print, continue with the next solution.
Solution five: Plug the printer directly into a wall outlet
Follow these steps to plug the printer directly into a wall outlet, and then print a test page.
Step one: Plug the printer directly into a wall outlet
Plug the printer directly into an electrical outlet to make sure that the power source functions correctly.
-
Disconnect the power cord from the rear of the printer.
-
Unplug the power cord from any power strip or surge suppressor.
-
Plug the power cord directly into an electrical outlet.
-
Reconnect the power cord to the rear of the printer.
-
Press the Power button to turn on the printer.
Step two: Print a Printer Status Report
Print a test page to make sure that the hardware functions correctly.
How to print a test page
Follow these steps to print a test page.
-
Load plain white U.S. letter or A4 size paper in the tray.
-
On the product control panel, press the Setup button (
). -
Press the button (
) next to the Down Arrow ( ) until Reports displays next to OK, and then press the button next to OK. -
Press the button next to the Down Arrow (
) until Printer Status Report displays next to OK, and then press the button next to OK again. The test page prints.
-
If these steps resolved the issue, and the test page prints, there is no need to continue troubleshooting.
-
If the issue persists, continue with the next solution.
-
If the test page does not print, continue with the next solution.
Solution six: Reset the printer
Follow these steps to reset the printer.
Step one: Perform a power reset
-
With the printer turned on, disconnect the power cord from the rear of the printer.
-
Unplug the power cord from the wall outlet.
-
Wait at least 15 seconds.
-
Plug the power cord back into the wall outlet.
-
Reconnect the power cord to the printer.
-
Turn the printer on.
Step two: Print a test page
Print a test page to make sure that the hardware functions correctly.
How to print a test page
Follow these steps to print a test page.
-
Load plain white U.S. letter or A4 size paper in the tray.
-
On the product control panel, press the Setup button (
). -
Press the button (
) next to the Down Arrow ( ) until Reports displays next to OK, and then press the button next to OK. -
Press the button next to the Down Arrow (
) until Printer Status Report displays next to OK, and then press the button next to OK again. The test page prints.
-
If these steps resolved the issue, and the test page prints, there is no need to continue troubleshooting. Reconnect the USB cable, and then try to print again.
-
If the test page prints successfully, but you continue to experience an issue with your printer, then the issue is not related to the hardware.
-
Experiencing another issue?
If your printer prints a test page and there is still an issue with your printer, go to HP Customer Support, type your printer model, and then browse for the appropriate support document to troubleshoot the issue.
-
-
If the printer does not print a test page, there is an issue with the printer hardware. Continue to the next step or solution.
Solution seven: Service the printer
Service or replace your HP product if the issue persists after completing all the preceding steps.
Go to Contact HP Customer Support to schedule a product repair or replacement. If you are in Asia Pacific, you will be directed to a local service center in your area.
To confirm your warranty status, go to HP Product Warranty Check. Repair fees might apply for out-of-warranty products.
hp-concentra-wrapper-portlet
![]()
Actions
Issue
A ‘Carriage Jam. The print carriage cannot move. Open the ink cartridge access door, clear any paper jam or obstruction, and select OK‘ message displays on the printer control panel.
One of the following error codes might display with the message:
-
0x61000008
-
0x6100000B
-
0x6100001D
The carriage, which holds the cartridges, stalls in the printer. A paper jam might have occurred previously.
You might also experience the following symptoms:
-
The printer does not print.
-
The print job stops unexpectedly.
Solution one: Restart the printer
Follow these steps to restart the printer, and then try to print a test page.
Step one: Restart the printer
-
Press the Power button to turn off the printer.
-
Wait 60 seconds.
-
Press the Power button to turn on the printer.
note:
The printer might go through a warm-up period which can last several minutes. Wait until the printer is idle and silent before continuing.
Step two: Print a Printer Status Report
Video on printing a test page
The following video demonstrates how to print a printer status report.
note:
This video shows the HP Officejet 4620 e-All-in-One Printer series, but the steps are the same for your printer.
Print a test page to make sure that the hardware functions correctly.
-
Load plain white U.S. letter or A4 size paper in the tray.
-
On the product control panel, press the Setup button (
). -
Press the button (
) next to the Down Arrow ( ) until Reports displays next to OK, and then press the button next to OK. -
Press the button next to the Down Arrow (
) until Printer Status Report displays next to OK, and then press the button next to OK again. The test page prints.
-
If these steps resolved the issue, and the test page prints, there is no need to continue troubleshooting.
-
If the issue persists, continue with the next solution.
-
If the test page does not print, continue with the next solution.
Solution two: Clear the jam from inside the printer
Follow these steps to clear the jam from the cartridge access area, the cleanout area, and from underneath the printer.
note:
Use a flashlight to complete these steps.
Video on clearing a carriage jam
The following video demonstrates how to clear a carriage jam.
note:
This video shows the HP Officejet 4620 e-All-in-One Printer series, but the steps are the same for your printer.
Step one: Clear the jam from the cartridge access area
Follow these steps to remove jammed paper from inside the cartridge access area.
-
Press the Power button to turn on the printer, if it is not already turned on.
-
Locate the slots on the sides of the printer.
Figure : Locate the slots on the sides of the printer
-
Place your fingers in the two slots on the sides of the printer, and then lift the cartridge access door. The carriage moves into the cartridge access area.
Figure : Open the cartridge access door
-
Disconnect the power cord from the rear of the printer.
warning:
Do not reach into the cartridge access
area when the printer is plugged into an electrical outlet.
-
Disconnect the USB cable from the rear of the printer if you have a USB connection to the computer.
-
Gently remove any jammed paper from the cartridge access area. To avoid tearing any whole sheets of paper, pull the paper with both hands.
-
Use a flashlight to thoroughly check for torn pieces of paper that might remain in the cartridge access area. If any torn pieces of paper remain inside the printer, more jams are likely to occur.
Use a flashlight
Paper jammed in carriage path
-
Slide the carriage to the right side of the cartridge access area, and then inspect the left side of the cartridge access area for torn pieces of paper that might remain inside the printer.
-
Remove any torn pieces of paper you find.
-
Slide the carriage to the left side of the cartridge access area, and then inspect the right side of the cartridge access area for torn pieces of paper that might remain inside the printer.
-
Remove any torn pieces of paper you find.
Step two: Clear the jam from inside the cleanout door
Follow these steps to remove any jammed paper from the cleanout door.
-
Make sure that the power is off and that the power cord is disconnected from the rear of the printer.
warning:
Do not reach into the cartridge access
area when the printer is plugged into an electrical outlet.
-
Make sure the USB cable is disconnected from the rear of the printer, if you have a USB connection to the computer.
-
With the cartridge access door open, locate the cleanout door. The door is behind the cartridge access area towards the rear of the printer.
Figure : The cleanout door
-
Pull the cleanout door up and then out to remove it from the printer.
Figure : Remove the cleanout door
-
Gently remove any jammed paper. To avoid tearing any whole sheets of paper, pull the paper with both hands.
Figure : Remove any jammed paper
-
Use a flashlight to thoroughly check for torn pieces of paper that might remain in the cleanout area. If any torn pieces of paper remain inside the printer, more jams are likely to occur.
Figure : Use a flashlight
-
Remove any torn pieces of paper you find.
-
Gently reinsert the cleanout door into the cleanout area, and then press down on the handle until the door snaps into place.
-
Close the cartridge access door.
-
Insert the cleanout door into the cleanout area
-
Push down on the door handle until the door snaps into place
-
Close the cartridge access door
Figure : Reinsert the cleanout door and close the cartridge access door
-
Step three: Clear the jam from underneath the Printer
If you are unable to remove jammed paper from the cartridge access area or from inside the cleanout door, follow these steps to clear the jam from underneath the printer.
-
Press the Power button to turn off the printer, if it is not off already.
-
Disconnect the power cord from the rear of the printer, if it is not disconnected already.
-
Turn the printer onto its right side so that you can access its underside.
caution:
Before turning the printer, use your hand to secure the scanner lid.
-
Slide the paper tray out until it stops.
-
Gently remove any jammed paper and bits of torn paper from the input tray area and from underneath the printer. To avoid tearing any whole sheets of paper, pull the paper with both hands.
Figure : Remove paper from underneath the printer
-
Use a flashlight to thoroughly check for torn pieces of paper that might remain inside the printer. If any torn pieces of paper remain inside the printer, more jams are likely to occur.
Figure : Use a flashlight
-
Remove any torn pieces of paper you find.
-
Slide the paper tray back in until it stops.
-
Return the printer to its normal position.
-
Open the cartridge access door, and then look inside the printer for any loose objects that might have shifted when you turned the printer over. Remove any loose objects you find.
-
Close the cartridge access door.
Figure : Close the cartridge access door
-
Reconnect the power cord to the rear of the printer.
-
Press the Power button to turn on the printer.
Step four: Print a Printer Status Report
Print a test page to make sure that the hardware functions correctly.
How to print a test page
Follow these steps to print a test page.
-
Load plain white U.S. letter or A4 size paper in the tray.
-
On the product control panel, press the Setup button (
). -
Press the button (
) next to the Down Arrow ( ) until Reports displays next to OK, and then press the button next to OK. -
Press the button next to the Down Arrow (
) until Printer Status Report displays next to OK, and then press the button next to OK again. The test page prints.
-
If these steps resolved the issue, and the test page prints, there is no need to continue troubleshooting.
-
If the issue persists, continue with the next solution.
-
If the test page does not print, continue with the next solution.
Solution three: Remove and reinsert the cartridges
Improper placement or installation of the cartridges can cause the printer to indicate a carriage jam error. Follow these steps to remove and then reinsert the cartridges.
Step one: Remove and reinsert the cartridges
Follow these steps to remove and then reinsert the cartridges.
-
Press the Power button to turn on the printer, if it is not already on.
-
Locate the two slots on the sides of the printer.
Figure : Slots on the sides of the printer
-
Place your fingers in the slots on the right and left sides of the printer, and then lift to open the cartridge access door. The carriage moves into the carriage access area.
Figure : Open the cartridge access door
-
Wait until the carriage is idle and silent before proceeding.
-
Press in the tab on the front of a cartridge to release it, and then pull up on the cartridge to remove it from the slot.
Figure : Remove the cartridge from its slot
-
Repeat these steps to remove the other cartridges.
-
To reinsert a cartridge, hold the cartridge so that the cartridge contacts are facing toward the printer.
-
Match the colored dot on the cartridge with the dot of the same color on the carriage.
-
Slide the cartridge into its slot, and then gently press the cartridge down until it clicks into place.
note:
Make sure that the colored dot on the cartridge label matches the colored dot on the slot.
Figure : Install the cartridge
-
Repeat these steps to reinsert the other cartridges.
-
Close the cartridge access door.
Figure : Close the cartridge access door
Step two: Print a Printer Status Report
Print a test page to make sure that the hardware functions correctly.
How to print a test page
Follow these steps to print a test page.
-
Load plain white U.S. letter or A4 size paper in the tray.
-
On the product control panel, press the Setup button (
). -
Press the button (
) next to the Down Arrow ( ) until Reports displays next to OK, and then press the button next to OK. -
Press the button next to the Down Arrow (
) until Printer Status Report displays next to OK, and then press the button next to OK again. The test page prints.
-
If these steps resolved the issue, and the test page prints, there is no need to continue troubleshooting.
-
If the issue persists, continue with the next solution.
-
If the test page does not print, continue with the next solution.
Solution four: Make sure that the posts in the cartridge parking area are not blocking the carriage
The carriage might move freely to the left and right even though the error displays on the control panel. Follow these steps to check if the posts are blocking the carriage.
Step one: Make sure that the posts in the cartridge parking area are not blocking the carriage
note:
Consider using gloves to perform these steps.
-
Unplug the power cord from the power source or electrical outlet.
-
Open the cartridge access door.
Figure : Open the cartridge access door
-
Reach into the cartridge access area, and then manually move the carriage to the left of the printer and then the right. The carriage should move completely underneath the cover on the right side of the printer.
-
If you cannot move the carriage completely underneath the cover on the right side of the printer, continue with these steps.
Figure : Example of the carriage partially under the cover on the right side of the printer
-
Figure : Example of the carriage resting underneath the cover on the right side of the printer
-
-
Move the carriage to the left side of the printer, and then use a flashlight to look inside the printer under the right cover.
Figure : Example showing where to look under the printer cover
-
Make sure that the posts are not blocking the carriage from moving all the way to the right.
Figure : Example of posts that might be blocking the carriage
-
If you see posts that could be blocking the carriage, continue with these steps.
-
-
Use a long, slim object (such as the eraser-end of a pencil) to gently push in the post.
Figure : Example of pushing in the post with a pencil
-
Reach into the cartridge access area, and then manually move the carriage to the right of the printer. The carriage should move under the printer cover.
warning:
Do not lift up on the carriage.
Figure : Push the carriage to the right
Figure : Example of the carriage resting under the cover
-
Close the cartridge access door.
Figure : Close the cartridge access door
-
Reconnect the power cord to the rear of the printer.
-
Plug the power cord back into the power source or electrical outlet.
-
If the printer does not turn on automatically, press the Power button to turn it on.
Step two: Print a Printer Status Report
Print a test page to make sure that the hardware functions correctly.
How to print a test page
Follow these steps to print a test page.
-
Load plain white U.S. letter or A4 size paper in the tray.
-
On the product control panel, press the Setup button (
). -
Press the button (
) next to the Down Arrow ( ) until Reports displays next to OK, and then press the button next to OK. -
Press the button next to the Down Arrow (
) until Printer Status Report displays next to OK, and then press the button next to OK again. The test page prints.
-
If these steps resolved the issue, and the test page prints, there is no need to continue troubleshooting.
-
If the issue persists, continue with the next solution.
-
If the test page does not print, continue with the next solution.
Solution five: Plug the printer directly into a wall outlet
Follow these steps to plug the printer directly into a wall outlet, and then print a test page.
Step one: Plug the printer directly into a wall outlet
Plug the printer directly into an electrical outlet to make sure that the power source functions correctly.
-
Disconnect the power cord from the rear of the printer.
-
Unplug the power cord from any power strip or surge suppressor.
-
Plug the power cord directly into an electrical outlet.
-
Reconnect the power cord to the rear of the printer.
-
Press the Power button to turn on the printer.
Step two: Print a Printer Status Report
Print a test page to make sure that the hardware functions correctly.
How to print a test page
Follow these steps to print a test page.
-
Load plain white U.S. letter or A4 size paper in the tray.
-
On the product control panel, press the Setup button (
). -
Press the button (
) next to the Down Arrow ( ) until Reports displays next to OK, and then press the button next to OK. -
Press the button next to the Down Arrow (
) until Printer Status Report displays next to OK, and then press the button next to OK again. The test page prints.
-
If these steps resolved the issue, and the test page prints, there is no need to continue troubleshooting.
-
If the issue persists, continue with the next solution.
-
If the test page does not print, continue with the next solution.
Solution six: Reset the printer
Follow these steps to reset the printer.
Step one: Perform a power reset
-
With the printer turned on, disconnect the power cord from the rear of the printer.
-
Unplug the power cord from the wall outlet.
-
Wait at least 15 seconds.
-
Plug the power cord back into the wall outlet.
-
Reconnect the power cord to the printer.
-
Turn the printer on.
Step two: Print a test page
Print a test page to make sure that the hardware functions correctly.
How to print a test page
Follow these steps to print a test page.
-
Load plain white U.S. letter or A4 size paper in the tray.
-
On the product control panel, press the Setup button (
). -
Press the button (
) next to the Down Arrow ( ) until Reports displays next to OK, and then press the button next to OK. -
Press the button next to the Down Arrow (
) until Printer Status Report displays next to OK, and then press the button next to OK again. The test page prints.
-
If these steps resolved the issue, and the test page prints, there is no need to continue troubleshooting. Reconnect the USB cable, and then try to print again.
-
If the test page prints successfully, but you continue to experience an issue with your printer, then the issue is not related to the hardware.
-
Experiencing another issue?
If your printer prints a test page and there is still an issue with your printer, go to HP Customer Support, type your printer model, and then browse for the appropriate support document to troubleshoot the issue.
-
-
If the printer does not print a test page, there is an issue with the printer hardware. Continue to the next step or solution.
Solution seven: Service the printer
Service or replace your HP product if the issue persists after completing all the preceding steps.
Go to Contact HP Customer Support to schedule a product repair or replacement. If you are in Asia Pacific, you will be directed to a local service center in your area.
To confirm your warranty status, go to HP Product Warranty Check. Repair fees might apply for out-of-warranty products.
Содержание
- Сброс ошибок принтеров HP Photosmart
- Итак, последовательность сброса ошибок в фотопринтерах HP Photosmart:
- 0x6100001d hp photosmart 5510
- 0x6100001d hp photosmart 5510
- Сбой системы чернил в принтерах HP
- Сбой системы чернил 0xc19a 0xc18a
- Ошибка HP 0xc19a0013
- Коды ошибок системы чернил HP
- Ошибки чернил и головки HP 0xc18a
- Ошибки головки 0xc19a
- Другие ошибки системы чернил струйных принтеров HP
- Сброс ошибок 0xc19 и 0xc18
- Вход в сервисное меню HP
- Возврат к заводским установкам
Сброс ошибок принтеров HP Photosmart
Внимание: воспользуйтесь интерактивным прайс-листом для определения стоимости заправки Вашего картриджа (принтера):
Для многих не секрет, что фотопринтеры HP имеют достаточно сложное устройство и логику работы. Логика работы запрограммирована в прошивке — firmware.
Некорректное взаимодействие прошивки с датчиками часто приводит к ошибках системы печати. В частности, мы уже писали о серьезных дефектах в прошивке таких принтеров в этой статье.
Однако, обнаружен метод сброса большинства ошибок в принтерах HP Photosmart, который был предоставлен самой техподдержкой Hewlett-Packard.
Итак, последовательность сброса ошибок в фотопринтерах HP Photosmart:
- Зажимаем [стрелку Влево], потом нажимаем кнопку «Настройка (Setup)», потом отпускаем — появляется меню «Enter Special Key Combo». Нажимаем OK.
- Рекомендовано, но мне это не понадобилось: Зажать обе кнопки «Печать фото (Print Photos)» и «Коррекция фотографии (Red Eye Removal)», потом отпустить их. На дисплее должно появиться «Enter Special Key Combo». После этого нажать и отпустить по очереди «Коррекция фотографии (Red Eye Removal)», «Печать фото (Print Photos)», «Коррекция фотографии (Red Eye Removal)».
- На дисплее должно появиться «Техподдержка (Support)» и отобразится версия прошивки FW rev (что-то типа R0616R).
- Теперь нажимаем [стрелку Вправо], пока не перейдем на пункт «System Configuration».
- Нажимаем OK.
- Нажимаем [стрелку Вправо], пока не дойдем до «Hardware failure status: Clear. Press OK to clear».
Если у Вас принтер работает нормально, то этого пункта в меню не будет.
Важно: не печатать после этого! После нажатия OK сообщение должно смениться на «Hardware failure status Cleared. Press Cancel to continue».
Нажимайте «CANCEL» столько раз, сколько необходимо, пока не появится сообщение «Welcome to Photosmart Express» или «Ink System Failure».
Сервис-инженер, Александр Дудкин
Не забудьте сказать автору «Спасибо», «лайкнуть» или сделать перепост:
Источник
0x6100001d hp photosmart 5510
С выходом новых аппаратов серии HP Photosmart и других на картриджах 178 производитель подкинул пользователям и новые проблемы. Попробуем разобраться с ними.
Сообщение «установите картриджи с меткой SETUP»
Новые аппараты этой серии используют картриджи 178. С аппаратами этой серии производитель поставляет картриджи с меткой SETUP. Первый запуск принтера нужно делать с ними. Для чего? С этими картриджами принтер производит инициализацию принтера. Т.е. аппарат считывает данные чипа и понимает, что установлены оригинальные картриджи из комплекта принтера. После этого аппарат готов к работе. Поэтому не спешите выбрасывать эти картриджи и сразу устанавливать СНПЧ или ПЗК, они Вам еще понадобятся. Бывают ситуации когда картриджей SETUP нет: утеряны, выбросили не подумав и т.д. Как быть в этом случае? Нужно произвести инициализацию вручную. Для этого нужно войти в Support menu.
1. Для входа в Support Menu быстро набираем
HP Photosmart 5510/5515
назад — влево — домой — влево — назад — назад
HP DeskJet 3070A
назад — стоп — назад — назад
Для большинства принтеров
Зажимаем Стрелку Влево, потом нажимаем кнопку Настройка (Setup). Отпускаем. Появляется меню «Enter Special Key Combo». Теперь нужно зажать обе кнопки «Печать фото (Print Photos)» и «Коррекция фотографии (Red Eye Removal)» и отпустить их. На дисплее должно появиться «Техподдержка (Support)» и отобразится версия прошивки FW rev.
2. В Support Menu вошли. Далее входим в System Configuration Menu и выбираем Ink Initialization Status. Выбираем значение Clear кнопкой OK, выходим из этого меню нажав несколько раз Cancel и перезапускаем принтер.
Стоит отметить, что аппарат может потребовать картриджи с меткой SETUP в любое время, хотя так быть не должно. Используете Вы оригинальные картриджи или нет, значения не имеет. Просто будьте готовы к этому.
Ошибки системы печати 0xc*******
С такими ошибками пользователи сталкиваются не сразу и не на всех аппаратах. На дисплее при очередном включении появляется сообщение: Ink System Failure Error «0xc. «. Это ошибка системы печати. Это связано с сложной системой контроля проводимости чернил в помпе принтера. Насос прокачивает чернила от печатающих головок до абсорбера, и в помпе специальными датчиками проверяет проводимость чернил, для выявления их оригинальности. Для чего это было сделано? Таким образом HP борется с использованием СНПЧ.
Но суть в том, что проблема возникает и с оригинальными картриджами HP! При простое принтера проводимость чернил меняется. При производстве в различных регионах проводимость чернил тоже может отличаться.
Есть несколько способов борьбы с этой ошибкой, но не все их можно использовать в домашних условиях. Опишем наиболее действенный: сброс ошибки из Support Menu.
1) Входим в Support Menu. Как войти описано выше.
2) Теперь нажимаем Стрелка Вправо, пока не перейдем на пункт «System Configuration». Нажимаем OK. Нажимаем Стрелка Вправо, пока не дойдем до «Hardware failure status: Clear. Press OK to clear» (если принтер работает нормально, то этого пункта в меню не будет). После нажатия OK сообщение должно смениться на «Hardware failure status Cleared. Press Cancel to continue».
3) Нажимаем «CANCEL», пока не появится сообщение «Welcome to Photosmart Express» или «Ink System Failure». Выключаем принтер кнопкой и выдергивает вилку из розетки на 1-2 минуты. Включаем снова. После инициализации принтер должен выйти в готовность.
Источник
0x6100001d hp photosmart 5510

06-06-2018 04:34 AM
- Mark as New
- Bookmark
- Subscribe
- Permalink
- Flag Post
Hi, first time hp officejet 4620 is on, it ask to insert cartridge, i follow the istruction, and it didn’t recognise i add them. If i restart the printer, it recognise cartridge and it show error 0x6100001d (Problem of printer or ink system). I try everything in the guide (https://support.hp.com/it-it/document/c03436940 and https://support.hp.com/it-it/product/hp-officejet-4620-e-all-in-one-printer-series/5101229/document/. )
the garancy is expired, the cartridge are new and original. can i try something else?
06-06-2018 06:47 AM
- Mark as New
- Bookmark
- Subscribe
- Permalink
- Flag Post
The error mentioned relates to Carriage Jam, that could happen due to Paper Jam.
I see that you have tried using the documents and were not successful .
It seems that you have tried all the possible troubleshooting step.
At this point i’d say its time to get the printer serviced ( by contacting HP Tech Support ) or going in for new printer.
Give Kudos to say «thanks» by clicking on the «thumps Up icon» .
Click » Accept as Solution » if it solved your problem, so others can find it.
Although I am an HP employee, I am speaking for myself and not for HP.
06-06-2018 03:58 PM
- Mark as New
- Bookmark
- Subscribe
- Permalink
- Flag Post
Could I try with an hard reset? or the cartridge may be difected?
06-07-2018 06:38 AM
- Mark as New
- Bookmark
- Subscribe
- Permalink
- Flag Post
Below are the steps to perform Hard Reset.
- While the printer is ON, unplug the power cord from back of the printer and then from the power outlet.
- Wait for 60 seconds.
- Now Plug in the power cord to printer and the other end directly to wall outlet ( bypass the surge protector or power strip )
- If printer does not power on automatically, press the Power button to do so.
- If issue still persists, its time to get the printer serviced.
Give Kudos to say «thanks» by clicking on the «thumps Up icon» .
Click » Accept as Solution » if it solved your problem, so others can find it.
Although I am an HP employee, I am speaking for myself and not for HP.
Источник
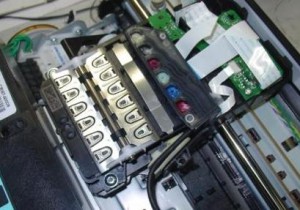
 У многих принтеров HP Photosmart, DeskJet и OfficeJet случаются серьезные ошибки сбой системы чернил, ошибка системы чернил, а также неисправность системы чернил в зависимости от перевода. Разбираем причины и решение проблемы.
Сбой системы чернил 0xc19a 0xc18a
Ошибки системы чернил типа 0xc19a — это аппаратные ошибки принтера. Поэтому устраняются они ремонтом принтера. Самые тяжелые ошибки связаны с неисправностью печатающей головки, которые рассмотрим ниже.
Ошибки системы чернил типа 0xc18a — это проблемы, связанные с чернилами. Самое важное — эти проблемы решаемые.
Ошибка HP 0xc19a0013
Ошибка 0xc19a0013 наиболее часто встречается в струйных принтерах HP с сообщением «Сбой системы чернил 0xc19a0013» или «Ошибка системы чернил». Наиболее вероятно, что ошибка 0xc19a0013 — это перегрев головки. Она не страшная, обычно ее можно устранить. В случае ошибки 0xc19a0013 головку нужно хорошо почистить от чернил, промыть, а если не помогло, головку нужно менять.
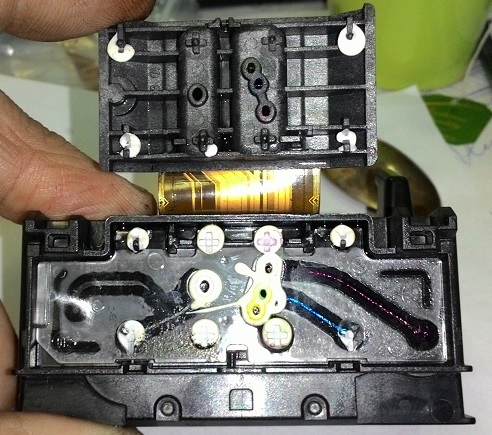
Конкретный случай. Принесли в ремонт принтер HP Photosmart C6283 с полным отсутствием черного цвета. Чистка головки силами принтера ничего не давала. Чернила были оригинальными и не просроченными, проблема качества чернил не стояла.
 Сняв печатающую головку, я увидел, что ее плата залита чернилами. Вытер, но черный цвет не появился. После промывки головки при печати что-то появилось, но сразу после копии выскочила ошибка 0xc19a0013 Сбой системы чернил. Ошибка появлялась при печати с любым качеством (ч/б или цветной).
Удалось убрать эту ошибку, войдя в сервисное меню, выполнив сброс и сделав прочистку несколько раз. После этого ошибка исчезла, но качество печати было отвратительным, чернила проходили очень слабо, только в отдельных местах. Еще три прочистки. Получилось хорошее качество в половине дюз. Только снятие головки, отмачивание в растворе и длительная чистка помогли. Сначала качество было неважным, но через 4-5 прочисток все дюзы заработали. Т.о. ошибка была вызвана тем, что черные чернила не поступали в головку.
Вот фото разобранной головки HP B210B. На фото видно, что каналы чернил к дюзам имеют разную длину и форму. Цвета с длинным каналом чистить труднее и дольше. Белые кружки — это герметик вокруг выходов каналов. При его нарушении чернила разных цветов смешиваются. Вывод — нельзя прикладывать большое давление при чистке головки.
Очень неприятная ошибка 0xc18a0001 (несоответствие чернил в картридже оригинальным от HP), которая после сброса появляется вновь. Как убрать ее описано тут.
Коды ошибок системы чернил HP
Ошибки чернил и головки HP 0xc18a
В помощь страдающим от сбоя системы чернил на принтерах HP Photosmart, Deskjet и Officejet привожу коды ошибок.
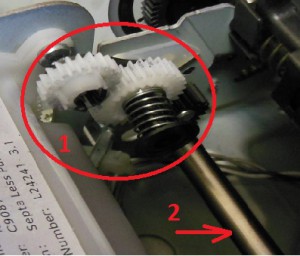
0xc05d0281 — ошибка когда не работает механизм управления клапанами при прокачке дюз головки. Связано с поломкой :
- шестеренок перекидного редуктора 1 (открывает, закрывает клапана );
- шестерней, расположенных далее на оси 2 глубоко внутри принтера;
- головки, сломан рычаг клапанов (клапаны не поднимаются);
- неправильной установкой головки
0xc05d1281 — ошибка, связанная с теми же клапанами головки HP Photosmart C7283, C5183 и подобных МФУ, когда сломана шестерня вала, приводящая перекидной редуктор.
0xc18a — Ошибки системы подачи чернил. Кстати, ошибки 0xc18a можно сбросить.
0xc18a0106 — отключен датчик проводимости чернил, отключена помпа; на принтере HP Photosmart С8256, например, сбрасывается снятием шлейфа головки, ближайшего к кардридеру.
Ошибки 0xc18a0007, 0xc18a0107, 0xc18a0207, 0xc18a0307, 0xc18a0407, 0xc18a0507 — проводимость чернил одного из 6 цветов вне диапазона. Датчики проводимости чернил находятся прямо в чернильном насосе.

Можно, в принципе, изменить показания датчиков путем подпайки дополнительных сопротивлений резисторам на плате. Таким образом можно добиться снятия ошибки. Но проще подобрать чернила.
0xc18a0206 — отключен насос, засохла головка. Обычно возникает при засохших дюзах печатающей головки. Для устранения нужно снять печатающую головку, тщательно прочистить ее до открытия всех дюз, проверить работу насоса, выполнить сброс принтера.
0xc18a0501 — возникла после использования совместимых чернил
Ошибки головки 0xc19a
0xc19a0002 — нет головки, например, отключен шлейф, сломана головка, плохие контакты в шлейфе
0xc19a0003 — критическая ошибка головки: неисправна или грязные контакты, часто после снятия ошибки сменяется ошибкой «нет печатающей головки»
0xc19a0005 — критическая ошибка головки или главной платы управления
0xc19a0013 — возможны ошибка картриджей, чернил, головки (например, из-за забитых дюз и перегрева головки). 0xc19a0013 не страшная ошибка, во многих случаях проблему можно решить
0xc19a0020, 0xc19a0023,0xc19a0024, 0xc19a0027 — ошибка, связанная с головкой, главной платой; ошибки 0xc19a0023 и 0xc19a0027 могут чередоваться, чаще всего после таких ошибок приходится менять головку, ошибка фатальная
0xc19a0034, 0xc19a0036 — критическая ошибка головки, скорее всего, поврежден шлейф или контакты, не вставлен шлейф головки
0xc19a0028, 0xc19a0035 — в головке неправильные чернила (отличаются по проводимости), залит датчик ширины бумаги справа снизу каретки — нужно промыть и высушить;
0xc19a0028 кто-то написал, что в головке вода вместо чернил — полная чушь. Датчики чернил находятся в насосе, а не в головке, к тому же, они измеряют только проводимость, причем в насосе. Более того, состав чернил датчики не определяют. Чернила в головке и в насосе могут отличаться, поскольку в головке 6 демпферных камер весьма существенного объема.
0xc19a0041 — грязная или неисправная головка
Обычно ошибки 0xc19a0002, 0xc19a0003, 0xc19a0020, 0xc19a0023,0xc19a0024, 0xc19a0027, 0xc19a0042 связаны с неисправностью печатающей головки. А также шлейфа.
Другие ошибки системы чернил струйных принтеров HP
0xc05d0281- неисправность рычага шестерни печатающей головки, отказ клапана, плохой маятник, неправильная регулировка высоты вала головки. Например, ошибка 0xc05d0281 возникает в HP С5183, С6183, С6283 и других 6-цветных принтерах с картриджами 177, когда не поднимается коромысло клапанов головки.
0x61011beb, 0x61011bed — общая ошибка принтера, связанная с узлом парковки, замятием каретки, бумаги, а также поломкой маятникового редуктора. Аналогичная ошибка 0x61011be5 связана с узлом обслуживания purge unit.
0x6100000b — ошибка принтера, связанная с невозможностью определить начальное положение каретки. Связана ошибка может с лентой энкодера, датчиком энкодера, двигателем. Для начала нужно почистить ленту.
Сброс ошибок 0xc19 и 0xc18
Варианты сброса ошибок.
Выдернуть шлейф головки, включить принтер и выключить после обнаружения новой ошибки 0xc19a0002 — нет головки. Эта ошибка сотрет предыдущую критическую ошибку. Затем вставить шлейф головки и включить принтер.
1. Общий сброс в HP Photosmart C5183.
Вынуть штекер питания. Нажать одновременно влево и справку, или ОК и справку, вставить питание, держать кнопки вплоть до выключения принтера.
Держать крест и стрелку вниз, включить принтер.
2. Рекалибровка — держать сразу 4 кнопки Cancel, OK, Black, Color и выключить принтер, вынуть питание, подождать минуту, включить принтер.
3. Вынуть батарейку, которая обычно располагается на или рядом с форматером. Подождать 15 минут. Включить принтер.
Некоторые ошибки можно сбросить через сервисное меню.
Вход в сервисное меню HP
1. нажать кнопку вкл. и держать 10 секунд
затем
лев. вверх
лев. вниз
2 раза лев. вверх
2. Нажать и отпустить кнопки кнопки «Печать фото» (“Print Photos”) и «Устранение красных глаз» (“Red Eye Removal”).
Появится экран с надписью Enter Special Key Combo. Нажать и отпустить «Устранение красных глаз», «Печать фото», «Устранение красных глаз»
В сервисном меню выбрать Resets, затем Semi/Full Reset.
Либо нажать и отпустить кнопки кнопки Настройка (ключ) и Стрелка влево, появится Enter Special Key Combo, затем ОК. System Configuration Menu.
3. Для Officejet 6500A для входа в сервисное меню использовать: выключить МФУ кнопкой, нажать вкл. и удерживать несколько секунд пока не загорится светодиод карты, затем нажать Q, отмена, 2 раза Q (home- back-home-home). Далее пользоваться навигацией по краям экрана.
4. Для Officejet Pro 8600 Plus нажать вкл. и удерживать несколько секунд, пока не потухнет экран, затем нажать слева вверху (home), отмена (X), 2 раза home. Далее использовать навигацию по краям экрана.
5. При включении держать # и 3, либо # и 6.
6. Для HP Photosmart 5520. Слева внизу (back, возврат), слева-вверху (home), Слева-внизу (back, возврат), справа-снизу (отмена, cross), Слева внизу (back, возврат).
7. Для Officejet Pro 8500A — в основном меню перейти вправо, появится подсветка стрелки «Возврат», 4 раза нажать на кнопку возврат, появится инженерное меню, в нем можно выбрать reset, partial reset и др.
8. Для HP Photosmart D7363 одновременно Вкл и Х, затем -, кнопка улучшения изображения с человечком и снова — .
Возврат к заводским установкам
В некоторых принтерах HP, например, в Photosmart C7283 ошибки чернил типа 0xc18a можно сбросить через возврат к начальному состоянию. Для сброса нужно зажать Справку и Ок, вставить шнур питания и держать до сброса.
Задать вопрос, сделать заказ можно в чате. Мы ответим в любом случае.
Источник
Сбой системы чернил в принтерах HP
У многих принтеров HP Photosmart, DeskJet и OfficeJet случаются серьезные ошибки сбой системы чернил, ошибка системы чернил, а также неисправность системы чернил в зависимости от перевода. Разбираем причины и решение проблемы.
Ошибки системы чернил типа 0xc19a — это аппаратные ошибки принтера. Поэтому устраняются они ремонтом принтера. Самые тяжелые ошибки связаны с неисправностью печатающей головки, которые рассмотрим ниже.
Ошибки системы чернил типа 0xc18a — это проблемы, связанные с чернилами. Самое важное — эти проблемы решаемые.
Ошибка HP 0xc19a0013
Ошибка 0xc19a0013 наиболее часто встречается в струйных принтерах HP с сообщением «Сбой системы чернил 0xc19a0013» или «Ошибка системы чернил». Наиболее вероятно, что ошибка 0xc19a0013 — это перегрев головки. Она не страшная, обычно ее можно устранить. В случае ошибки 0xc19a0013 головку нужно хорошо почистить от чернил, промыть, а если не помогло, головку нужно менять.
Конкретный случай. Принесли в ремонт принтер HP Photosmart C6283 с полным отсутствием черного цвета. Чистка головки силами принтера ничего не давала. Чернила были оригинальными и не просроченными, проблема качества чернил не стояла.
Сняв печатающую головку, я увидел, что ее плата залита чернилами. Вытер, но черный цвет не появился. После промывки головки при печати что-то появилось, но сразу после копии выскочила ошибка 0xc19a0013 Сбой системы чернил. Ошибка появлялась при печати с любым качеством (ч/б или цветной).
Удалось убрать эту ошибку, войдя в сервисное меню, выполнив сброс и сделав прочистку несколько раз. После этого ошибка исчезла, но качество печати было отвратительным, чернила проходили очень слабо, только в отдельных местах. Еще три прочистки. Получилось хорошее качество в половине дюз. Только снятие головки, отмачивание в растворе и длительная чистка помогли. Сначала качество было неважным, но через 4-5 прочисток все дюзы заработали. Т.о. ошибка была вызвана тем, что черные чернила не поступали в головку.
Вот фото разобранной головки HP B210B. На фото видно, что каналы чернил к дюзам имеют разную длину и форму. Цвета с длинным каналом чистить труднее и дольше. Белые кружки — это герметик вокруг выходов каналов. При его нарушении чернила разных цветов смешиваются. Вывод — нельзя прикладывать большое давление при чистке головки.
Очень неприятная ошибка 0xc18a0001 (несоответствие чернил в картридже оригинальным от HP), которая после сброса появляется вновь. Как убрать ее описано тут.
Коды ошибок системы чернил HP
Ошибки чернил и головки HP 0xc18a
В помощь страдающим от сбоя системы чернил на принтерах HP Photosmart, Deskjet и Officejet привожу коды ошибок.
0xc05d0281 — ошибка когда не работает механизм управления клапанами при прокачке дюз головки. Связано с поломкой :
- шестеренок перекидного редуктора 1 (открывает, закрывает клапана );
- шестерней, расположенных далее на оси 2 глубоко внутри принтера;
- головки, сломан рычаг клапанов (клапаны не поднимаются);
- неправильной установкой головки
0xc05d1281 — ошибка, связанная с теми же клапанами головки HP Photosmart C7283, C5183 и подобных МФУ, когда сломана шестерня вала, приводящая перекидной редуктор.
0xc18a — Ошибки системы подачи чернил. Кстати, ошибки 0xc18a можно сбросить.
0xc18a0106 — отключен датчик проводимости чернил, отключена помпа; на принтере HP Photosmart С8256, например, сбрасывается снятием шлейфа головки, ближайшего к кардридеру.
Ошибки 0xc18a0007, 0xc18a0107, 0xc18a0207, 0xc18a0307, 0xc18a0407, 0xc18a0507 — проводимость чернил одного из 6 цветов вне диапазона. Датчики проводимости чернил находятся прямо в чернильном насосе.
Можно, в принципе, изменить показания датчиков путем подпайки дополнительных сопротивлений резисторам на плате. Таким образом можно добиться снятия ошибки. Но проще подобрать чернила.
0xc18a0206 — отключен насос, засохла головка. Обычно возникает при засохших дюзах печатающей головки. Для устранения нужно снять печатающую головку, тщательно прочистить ее до открытия всех дюз, проверить работу насоса, выполнить сброс принтера.
0xc18a0501 — возникла после использования совместимых чернил
Ошибки головки 0xc19a
0xc19a0002 — нет головки, например, отключен шлейф, сломана головка, плохие контакты в шлейфе
0xc19a0003 — критическая ошибка головки: неисправна или грязные контакты, часто после снятия ошибки сменяется ошибкой «нет печатающей головки»
0xc19a0005 — критическая ошибка головки или главной платы управления
0xc19a0013 — возможны ошибка картриджей, чернил, головки (например, из-за забитых дюз и перегрева головки). 0xc19a0013 не страшная ошибка, во многих случаях проблему можно решить
0xc19a0020, 0xc19a0023,0xc19a0024, 0xc19a0027 — ошибка, связанная с головкой, главной платой; ошибки 0xc19a0023 и 0xc19a0027 могут чередоваться, чаще всего после таких ошибок приходится менять головку, ошибка фатальная
0xc19a0034, 0xc19a0036 — критическая ошибка головки, скорее всего, поврежден шлейф или контакты, не вставлен шлейф головки
0xc19a0028, 0xc19a0035 — в головке неправильные чернила (отличаются по проводимости), залит датчик ширины бумаги справа снизу каретки — нужно промыть и высушить;
0xc19a0028 кто-то написал, что в головке вода вместо чернил — полная чушь. Датчики чернил находятся в насосе, а не в головке, к тому же, они измеряют только проводимость, причем в насосе. Более того, состав чернил датчики не определяют. Чернила в головке и в насосе могут отличаться, поскольку в головке 6 демпферных камер весьма существенного объема.
0xc19a0041 — грязная или неисправная головка
Обычно ошибки 0xc19a0002, 0xc19a0003, 0xc19a0020, 0xc19a0023,0xc19a0024, 0xc19a0027, 0xc19a0042 связаны с неисправностью печатающей головки. А также шлейфа.
Другие ошибки системы чернил струйных принтеров HP
0xc05d0281- неисправность рычага шестерни печатающей головки, отказ клапана, плохой маятник, неправильная регулировка высоты вала головки. Например, ошибка 0xc05d0281 возникает в HP С5183, С6183, С6283 и других 6-цветных принтерах с картриджами 177, когда не поднимается коромысло клапанов головки.
0x61011beb, 0x61011bed — общая ошибка принтера, связанная с узлом парковки, замятием каретки, бумаги, а также поломкой маятникового редуктора. Аналогичная ошибка 0x61011be5 связана с узлом обслуживания purge unit.
0x6100000b — ошибка принтера, связанная с невозможностью определить начальное положение каретки. Связана ошибка может с лентой энкодера, датчиком энкодера, двигателем. Для начала нужно почистить ленту.
Сброс ошибок 0xc19 и 0xc18
Варианты сброса ошибок.
Выдернуть шлейф головки, включить принтер и выключить после обнаружения новой ошибки 0xc19a0002 — нет головки. Эта ошибка сотрет предыдущую критическую ошибку. Затем вставить шлейф головки и включить принтер.
1. Общий сброс в HP Photosmart C5183.
Вынуть штекер питания. Нажать одновременно влево и справку, или ОК и справку, вставить питание, держать кнопки вплоть до выключения принтера.
Держать крест и стрелку вниз, включить принтер.
2. Рекалибровка — держать сразу 4 кнопки Cancel, OK, Black, Color и выключить принтер, вынуть питание, подождать минуту, включить принтер.
3. Вынуть батарейку, которая обычно располагается на или рядом с форматером. Подождать 15 минут. Включить принтер.
Некоторые ошибки можно сбросить через сервисное меню.
Вход в сервисное меню HP
1. нажать кнопку вкл. и держать 10 секунд
затем
лев. вверх
лев. вниз
2 раза лев. вверх
2. Нажать и отпустить кнопки кнопки «Печать фото» (“Print Photos”) и «Устранение красных глаз» (“Red Eye Removal”).
Появится экран с надписью Enter Special Key Combo. Нажать и отпустить «Устранение красных глаз», «Печать фото», «Устранение красных глаз»
В сервисном меню выбрать Resets, затем Semi/Full Reset.
Либо нажать и отпустить кнопки кнопки Настройка (ключ) и Стрелка влево, появится Enter Special Key Combo, затем ОК. System Configuration Menu.
3. Для Officejet 6500A для входа в сервисное меню использовать: выключить МФУ кнопкой, нажать вкл. и удерживать несколько секунд пока не загорится светодиод карты, затем нажать Q, отмена, 2 раза Q (home- back-home-home). Далее пользоваться навигацией по краям экрана.
4. Для Officejet Pro 8600 Plus нажать вкл. и удерживать несколько секунд, пока не потухнет экран, затем нажать слева вверху (home), отмена (X), 2 раза home. Далее использовать навигацию по краям экрана.
5. При включении держать # и 3, либо # и 6.
6. Для HP Photosmart 5520. Слева внизу (back, возврат), слева-вверху (home), Слева-внизу (back, возврат), справа-снизу (отмена, cross), Слева внизу (back, возврат).
7. Для Officejet Pro 8500A — в основном меню перейти вправо, появится подсветка стрелки «Возврат», 4 раза нажать на кнопку возврат, появится инженерное меню, в нем можно выбрать reset, partial reset и др.
8. Для HP Photosmart D7363 одновременно Вкл и Х, затем -, кнопка улучшения изображения с человечком и снова — .
Возврат к заводским установкам
В некоторых принтерах HP, например, в Photosmart C7283 ошибки чернил типа 0xc18a можно сбросить через возврат к начальному состоянию. Для сброса нужно зажать Справку и Ок, вставить шнур питания и держать до сброса.
Читать про ремонт струйных принтеров.
Задать вопрос, сделать заказ можно в чате. Мы ответим в любом случае.
Посетители также читают по этой теме:
Ремонт струйных принтеров
- Принтер не печатает
- Ремонт принтеров, МФУ
- Устройство печатающих головок HP
- Чистка печатающей головки
- Чистка головки Brother
- Ремонт принтеров Epson
hp-concentra-wrapper-portlet
![]()
Actions
Issue
A ‘Carriage Jam. The print carriage cannot move. Open the ink cartridge access door, clear any paper jam or obstruction, and select OK‘ message displays on the printer control panel.
One of the following error codes might display with the message:
-
0x61000008
-
0x6100000B
-
0x6100001D
The carriage, which holds the cartridges, stalls in the printer. A paper jam might have occurred previously.
You might also experience the following symptoms:
-
The printer does not print.
-
The print job stops unexpectedly.
Solution one: Restart the printer
Follow these steps to restart the printer, and then try to print a test page.
Step one: Restart the printer
-
Press the Power button to turn off the printer.
-
Wait 60 seconds.
-
Press the Power button to turn on the printer.
note:
The printer might go through a warm-up period which can last several minutes. Wait until the printer is idle and silent before continuing.
Step two: Print a Printer Status Report
Video on printing a test page
The following video demonstrates how to print a printer status report.
note:
This video shows the HP Officejet 4620 e-All-in-One Printer series, but the steps are the same for your printer.
Print a test page to make sure that the hardware functions correctly.
-
Load plain white U.S. letter or A4 size paper in the tray.
-
On the product control panel, press the Setup button (
). -
Press the button (
) next to the Down Arrow ( ) until Reports displays next to OK, and then press the button next to OK. -
Press the button next to the Down Arrow (
) until Printer Status Report displays next to OK, and then press the button next to OK again. The test page prints.
-
If these steps resolved the issue, and the test page prints, there is no need to continue troubleshooting.
-
If the issue persists, continue with the next solution.
-
If the test page does not print, continue with the next solution.
Solution two: Clear the jam from inside the printer
Follow these steps to clear the jam from the cartridge access area, the cleanout area, and from underneath the printer.
note:
Use a flashlight to complete these steps.
Video on clearing a carriage jam
The following video demonstrates how to clear a carriage jam.
note:
This video shows the HP Officejet 4620 e-All-in-One Printer series, but the steps are the same for your printer.
Step one: Clear the jam from the cartridge access area
Follow these steps to remove jammed paper from inside the cartridge access area.
-
Press the Power button to turn on the printer, if it is not already turned on.
-
Locate the slots on the sides of the printer.
Figure : Locate the slots on the sides of the printer
-
Place your fingers in the two slots on the sides of the printer, and then lift the cartridge access door. The carriage moves into the cartridge access area.
Figure : Open the cartridge access door
-
Disconnect the power cord from the rear of the printer.
warning:Do not reach into the cartridge access
area when the printer is plugged into an electrical outlet.
-
Disconnect the USB cable from the rear of the printer if you have a USB connection to the computer.
-
Gently remove any jammed paper from the cartridge access area. To avoid tearing any whole sheets of paper, pull the paper with both hands.
-
Use a flashlight to thoroughly check for torn pieces of paper that might remain in the cartridge access area. If any torn pieces of paper remain inside the printer, more jams are likely to occur.
Use a flashlight
Paper jammed in carriage path
-
Slide the carriage to the right side of the cartridge access area, and then inspect the left side of the cartridge access area for torn pieces of paper that might remain inside the printer.
-
Remove any torn pieces of paper you find.
-
Slide the carriage to the left side of the cartridge access area, and then inspect the right side of the cartridge access area for torn pieces of paper that might remain inside the printer.
-
Remove any torn pieces of paper you find.
Step two: Clear the jam from inside the cleanout door
Follow these steps to remove any jammed paper from the cleanout door.
-
Make sure that the power is off and that the power cord is disconnected from the rear of the printer.
warning:Do not reach into the cartridge access
area when the printer is plugged into an electrical outlet.
-
Make sure the USB cable is disconnected from the rear of the printer, if you have a USB connection to the computer.
-
With the cartridge access door open, locate the cleanout door. The door is behind the cartridge access area towards the rear of the printer.
Figure : The cleanout door
-
Pull the cleanout door up and then out to remove it from the printer.
Figure : Remove the cleanout door
-
Gently remove any jammed paper. To avoid tearing any whole sheets of paper, pull the paper with both hands.
Figure : Remove any jammed paper
-
Use a flashlight to thoroughly check for torn pieces of paper that might remain in the cleanout area. If any torn pieces of paper remain inside the printer, more jams are likely to occur.
Figure : Use a flashlight
-
Remove any torn pieces of paper you find.
-
Gently reinsert the cleanout door into the cleanout area, and then press down on the handle until the door snaps into place.
-
Close the cartridge access door.
-
Insert the cleanout door into the cleanout area
-
Push down on the door handle until the door snaps into place
-
Close the cartridge access door
Figure : Reinsert the cleanout door and close the cartridge access door
-
Step three: Clear the jam from underneath the Printer
If you are unable to remove jammed paper from the cartridge access area or from inside the cleanout door, follow these steps to clear the jam from underneath the printer.
-
Press the Power button to turn off the printer, if it is not off already.
-
Disconnect the power cord from the rear of the printer, if it is not disconnected already.
-
Turn the printer onto its right side so that you can access its underside.
caution:Before turning the printer, use your hand to secure the scanner lid.
-
Slide the paper tray out until it stops.
-
Gently remove any jammed paper and bits of torn paper from the input tray area and from underneath the printer. To avoid tearing any whole sheets of paper, pull the paper with both hands.
Figure : Remove paper from underneath the printer
-
Use a flashlight to thoroughly check for torn pieces of paper that might remain inside the printer. If any torn pieces of paper remain inside the printer, more jams are likely to occur.
Figure : Use a flashlight
-
Remove any torn pieces of paper you find.
-
Slide the paper tray back in until it stops.
-
Return the printer to its normal position.
-
Open the cartridge access door, and then look inside the printer for any loose objects that might have shifted when you turned the printer over. Remove any loose objects you find.
-
Close the cartridge access door.
Figure : Close the cartridge access door
-
Reconnect the power cord to the rear of the printer.
-
Press the Power button to turn on the printer.
Step four: Print a Printer Status Report
Print a test page to make sure that the hardware functions correctly.
How to print a test page
Follow these steps to print a test page.
-
Load plain white U.S. letter or A4 size paper in the tray.
-
On the product control panel, press the Setup button (
). -
Press the button (
) next to the Down Arrow ( ) until Reports displays next to OK, and then press the button next to OK. -
Press the button next to the Down Arrow (
) until Printer Status Report displays next to OK, and then press the button next to OK again. The test page prints.
-
If these steps resolved the issue, and the test page prints, there is no need to continue troubleshooting.
-
If the issue persists, continue with the next solution.
-
If the test page does not print, continue with the next solution.
Solution three: Remove and reinsert the cartridges
Improper placement or installation of the cartridges can cause the printer to indicate a carriage jam error. Follow these steps to remove and then reinsert the cartridges.
Step one: Remove and reinsert the cartridges
Follow these steps to remove and then reinsert the cartridges.
-
Press the Power button to turn on the printer, if it is not already on.
-
Locate the two slots on the sides of the printer.
Figure : Slots on the sides of the printer
-
Place your fingers in the slots on the right and left sides of the printer, and then lift to open the cartridge access door. The carriage moves into the carriage access area.
Figure : Open the cartridge access door
-
Wait until the carriage is idle and silent before proceeding.
-
Press in the tab on the front of a cartridge to release it, and then pull up on the cartridge to remove it from the slot.
Figure : Remove the cartridge from its slot
-
Repeat these steps to remove the other cartridges.
-
To reinsert a cartridge, hold the cartridge so that the cartridge contacts are facing toward the printer.
-
Match the colored dot on the cartridge with the dot of the same color on the carriage.
-
Slide the cartridge into its slot, and then gently press the cartridge down until it clicks into place.
note:
Make sure that the colored dot on the cartridge label matches the colored dot on the slot.
Figure : Install the cartridge
-
Repeat these steps to reinsert the other cartridges.
-
Close the cartridge access door.
Figure : Close the cartridge access door
Step two: Print a Printer Status Report
Print a test page to make sure that the hardware functions correctly.
How to print a test page
Follow these steps to print a test page.
-
Load plain white U.S. letter or A4 size paper in the tray.
-
On the product control panel, press the Setup button (
). -
Press the button (
) next to the Down Arrow ( ) until Reports displays next to OK, and then press the button next to OK. -
Press the button next to the Down Arrow (
) until Printer Status Report displays next to OK, and then press the button next to OK again. The test page prints.
-
If these steps resolved the issue, and the test page prints, there is no need to continue troubleshooting.
-
If the issue persists, continue with the next solution.
-
If the test page does not print, continue with the next solution.
Solution four: Make sure that the posts in the cartridge parking area are not blocking the carriage
The carriage might move freely to the left and right even though the error displays on the control panel. Follow these steps to check if the posts are blocking the carriage.
Step one: Make sure that the posts in the cartridge parking area are not blocking the carriage
note:
Consider using gloves to perform these steps.
-
Unplug the power cord from the power source or electrical outlet.
-
Open the cartridge access door.
Figure : Open the cartridge access door
-
Reach into the cartridge access area, and then manually move the carriage to the left of the printer and then the right. The carriage should move completely underneath the cover on the right side of the printer.
-
If you cannot move the carriage completely underneath the cover on the right side of the printer, continue with these steps.
Figure : Example of the carriage partially under the cover on the right side of the printer
-
Figure : Example of the carriage resting underneath the cover on the right side of the printer
-
-
Move the carriage to the left side of the printer, and then use a flashlight to look inside the printer under the right cover.
Figure : Example showing where to look under the printer cover
-
Make sure that the posts are not blocking the carriage from moving all the way to the right.
Figure : Example of posts that might be blocking the carriage
-
If you see posts that could be blocking the carriage, continue with these steps.
-
-
Use a long, slim object (such as the eraser-end of a pencil) to gently push in the post.
Figure : Example of pushing in the post with a pencil
-
Reach into the cartridge access area, and then manually move the carriage to the right of the printer. The carriage should move under the printer cover.
warning:Do not lift up on the carriage.
Figure : Push the carriage to the right
Figure : Example of the carriage resting under the cover
-
Close the cartridge access door.
Figure : Close the cartridge access door
-
Reconnect the power cord to the rear of the printer.
-
Plug the power cord back into the power source or electrical outlet.
-
If the printer does not turn on automatically, press the Power button to turn it on.
Step two: Print a Printer Status Report
Print a test page to make sure that the hardware functions correctly.
How to print a test page
Follow these steps to print a test page.
-
Load plain white U.S. letter or A4 size paper in the tray.
-
On the product control panel, press the Setup button (
). -
Press the button (
) next to the Down Arrow ( ) until Reports displays next to OK, and then press the button next to OK. -
Press the button next to the Down Arrow (
) until Printer Status Report displays next to OK, and then press the button next to OK again. The test page prints.
-
If these steps resolved the issue, and the test page prints, there is no need to continue troubleshooting.
-
If the issue persists, continue with the next solution.
-
If the test page does not print, continue with the next solution.
Solution five: Plug the printer directly into a wall outlet
Follow these steps to plug the printer directly into a wall outlet, and then print a test page.
Step one: Plug the printer directly into a wall outlet
Plug the printer directly into an electrical outlet to make sure that the power source functions correctly.
-
Disconnect the power cord from the rear of the printer.
-
Unplug the power cord from any power strip or surge suppressor.
-
Plug the power cord directly into an electrical outlet.
-
Reconnect the power cord to the rear of the printer.
-
Press the Power button to turn on the printer.
Step two: Print a Printer Status Report
Print a test page to make sure that the hardware functions correctly.
How to print a test page
Follow these steps to print a test page.
-
Load plain white U.S. letter or A4 size paper in the tray.
-
On the product control panel, press the Setup button (
). -
Press the button (
) next to the Down Arrow ( ) until Reports displays next to OK, and then press the button next to OK. -
Press the button next to the Down Arrow (
) until Printer Status Report displays next to OK, and then press the button next to OK again. The test page prints.
-
If these steps resolved the issue, and the test page prints, there is no need to continue troubleshooting.
-
If the issue persists, continue with the next solution.
-
If the test page does not print, continue with the next solution.
Solution six: Reset the printer
Follow these steps to reset the printer.
Step one: Perform a power reset
-
With the printer turned on, disconnect the power cord from the rear of the printer.
-
Unplug the power cord from the wall outlet.
-
Wait at least 15 seconds.
-
Plug the power cord back into the wall outlet.
-
Reconnect the power cord to the printer.
-
Turn the printer on.
Step two: Print a test page
Print a test page to make sure that the hardware functions correctly.
How to print a test page
Follow these steps to print a test page.
-
Load plain white U.S. letter or A4 size paper in the tray.
-
On the product control panel, press the Setup button (
). -
Press the button (
) next to the Down Arrow ( ) until Reports displays next to OK, and then press the button next to OK. -
Press the button next to the Down Arrow (
) until Printer Status Report displays next to OK, and then press the button next to OK again. The test page prints.
-
If these steps resolved the issue, and the test page prints, there is no need to continue troubleshooting. Reconnect the USB cable, and then try to print again.
-
If the test page prints successfully, but you continue to experience an issue with your printer, then the issue is not related to the hardware.
-
Experiencing another issue?
If your printer prints a test page and there is still an issue with your printer, go to HP Customer Support, type your printer model, and then browse for the appropriate support document to troubleshoot the issue.
-
-
If the printer does not print a test page, there is an issue with the printer hardware. Continue to the next step or solution.
Solution seven: Service the printer
Service or replace your HP product if the issue persists after completing all the preceding steps.
Go to Contact HP Customer Support to schedule a product repair or replacement. If you are in Asia Pacific, you will be directed to a local service center in your area.
To confirm your warranty status, go to HP Product Warranty Check. Repair fees might apply for out-of-warranty products.
Помогаю со студенческими работами здесь
Как проверить сгорела ли печатающая головка на принтере canon ip1000
Здравствуйте! Я всё перепробывал, а печатающую головку принтера canon ip1000 запустить не могу. По…
ошибка загрузки пк после замены видеокарты
при переустановки видеокарты nvidia gts 250gt на nvidia 6600gt перестает проходить процесс…
") Подскажите , что за ошибка , после замены железа
Подскажите , что за ошибка , после замены железа
Поменял полностью железо, кроме жёсткого диска, всё поставил и при запуске появляется вот такая…
Ошибка 0x0000007B после замены системы охлаждения
Поменял охлаждение для проца, во время смены охлаждения выдергивал все кабеля, предварительно…
Искать еще темы с ответами
Или воспользуйтесь поиском по форуму:
1
Обновлено: 08.02.2023
1. Запустите Средство устранения неполадок Принтера.
Наша первая рекомендация — это простое, но иногда эффективное средство устранения неполадок Windows. Это встроенная утилита, предлагающая автоматическое восстановление многих сервисов и приложений Windows. Запустите ее, используя инструкцию ниже:
- Нажмите Windows Key + I и перейдите в Обновление и безопасность > Устранение неполадок.
- На правой панели найдите Принтер и нажмите Запустить средство устранения неполадок.
- Завершите процесс, следуя инструкциям на экране, и перезагрузите компьютер.
2. Измените значение принтера в Редакторе реестра.
Если у вас возникли проблемы во время установки принтера по умолчанию, то его можно изменить непосредственно в редакторе реестра. Весь пошаговый процесс представлен ниже:
- Нажмите Windows Key + R кнопки, вставьте regedit и нажмите Enter , чтобы открыть редактор.
- Перейдите по этим папкам HKEY_CURRENT_USERSoftwareMicrosoftWindowsNTCurrentVersionWindows .
- После открытия папки Windows , переместите взгляд на правую панель и дважды щелкните на запись с именем Device .
- Под Значение, проверьте, написано ли имя принтера, с которым вы хотите работать по умолчанию. Если нет, измените значение, изменив только имя принтера (PrinterNAME, winspool, Ne01 :). Чтобы найти имя вашего принтера, введите Панель управления в поиске, перейдите в Оборудование и звук > Устройства и принтеры. Таким образом вы сможете увидеть все когда-либо использовавшиеся принтеры.
Если вам интересно, что такое «Ne01», то это номер порта вашего принтера, который назначается случайным образом при подключении устройства в систему. Оставьте его таким же, как было написано у вас изначально.
- Щелкните правой кнопкой мыши по Windows папке, которую мы находили из пути сверху, и выберите Разрешения.
- Под Группы и пользователи, найдите и выберите ОГРАНИЧЕННЫЕ.
- Затем установите все флажки рядом с Полный контроль и Чтение. Нажмите Применить и OK после этого.
- После выполнения этих шагов вы сможете изменить значения в Device без ограничений.
Проверьте, остается ли та же проблема. Если да, переходите к другим решениям, представленным ниже.
3. Выключите Управление принтером по умолчанию.
Изначально эта опция должна облегчать работу и позволять Windows запоминать, какой принтер вы использовали последним, чтобы установить его по умолчанию для дальнейшей печати. Однако бывают случаи, когда некоторые функции Windows перестают работать правильно. Поэтому рекомендуется отключить эту опцию и посмотреть, измениться ли что-либо. Вот как:
- Нажмите Windows Key + I и перейдите в Устройства > Принтеры и сканеры.
- Посмотрите на правую панель и отключите Разрешить Windows управлять принтером, используемым по умолчанию функцию.
- Закройте окно и перезагрузите компьютер, чтобы применить затронутые изменения.
Теперь вы можете попробовать настроить любой принтер по умолчанию, какой захотите.
4. Обновите драйверы принтера.
- Щелкните левой кнопкой мыши на Меню Пуск и выберите Диспетчер устройств.
- Найдите Контроллеры USB и откройте весь список.
- Затем нажмите правой кнопкой мыши по Составное USB устройство и выберите Обновить драйвер.
- Позвольте Windows найти новые драйверы и загрузить их, следуя инструкциям на экране.
Вы также можете использовать утилиту IOBit Driver Booster , которая просканирует ваше устройство на предмет отсутствия драйверов и мгновенно заменит их на самые новые. Это очень полезная утилита, которая будет поддерживать все существующие драйверы в актуальном состоянии на протяжении всего пользования ПК. Загрузите ее, нажав на кнопку ниже.

Обладатели печатной продукции от компании HP иногда сталкиваются с тем, что на экране появляется уведомление «Ошибка печати». Причин возникновения этой неполадки может быть несколько и каждая из них решается по-разному. Сегодня мы подготовили для вас разбор основных способов исправления рассматриваемой проблемы.
Каждый приведенный ниже метод имеет разную эффективность и будет наиболее подходящим в определенной ситуации. Мы по порядку рассмотрим все варианты, начиная от самого простого и действенного, а вы, следуя инструкциям, решите поставленную задачу. Однако сначала мы рекомендуем обратить внимание на эти советы:
- Перезапустите компьютер и переподключите устройство печати. Желательно, чтобы перед следующим подключением принтер находится в выключенном состоянии не менее одной минуты.
- Проверьте картридж. Иногда ошибка появляется в тех случаях, когда в чернильнице закончилась краска. О том, как заменить картридж вы можете прочитать в статье по ссылке ниже.
Если приведенные советы ничем не помогли, переходите к осуществлению следующих методов решения «Ошибка печати» при использовании периферии компании HP.
Способ 1: Проверка принтера
В первую очередь советуем проверить отображение и конфигурацию оборудования в меню «Устройства и принтеры». От вас потребуется произвести всего несколько действий:
-
Через меню «Панель управления» и переместитесь в «Устройства и принтеры».


По окончании процесса рекомендуется перезагрузить ПК и переподключить оборудование, чтобы все изменения точно стали активными.
Способ 2: Разблокирование процедуры печати
Иногда происходят скачки напряжения или различные системные сбои, вследствие чего периферия и ПК перестают нормально выполнять определенные функции. По таким причинам и может возникать ошибка печати. В таком случае вам следует проделать следующие манипуляции:
-
Снова перейдите в «Устройства и принтеры», где правым кликом мыши на активном оборудовании выберите пункт «Просмотр очереди печати».


Осталось только выключить продукт компании HP, отключить его от питания, дать так постоять примерно минуту. После этого перезагрузите ПК, соедините оборудование и повторите процесс печати.
Способ 3: Отключение брандмауэра Windows
Иногда защитник Windows блокирует отправленные данных с компьютера на устройство. Связано это может быть с некорректной работой брандмауэра или различными системными сбоями. Мы советуем на время отключить защитник Виндовс и повторить попытку печати. Детальнее о деактивации этого инструмента читайте в другом нашем материале по следующим ссылкам:
Подробнее: Отключение брандмауэра в Windows XP, Windows 7, Windows 8
Способ 4: Переключение учетной записи пользователя
Рассматриваемая проблема порой возникает тогда, когда попытка отправки в печать производится не с той учетной записи пользователя Windows, с которой происходило добавление периферии. Дело в том, что каждый профиль имеет свои привилегии и ограничения, что приводит к появлению подобного рода неполадок. В таком случае нужно попробовать сменить запись юзера, если у вас их конечно добавлено больше, чем одна. Развернуто о том, как это сделать в разных версиях Виндовс читайте в статьях ниже.
Подробнее: Как сменить учетную запись пользователя в Windows 7, Windows 8, Windows 10
Способ 5: Восстановление Windows
Часто случается, что ошибки печати связаны с определенными изменениями в операционной системе. Самостоятельно обнаружить их достаточно сложно, однако состояние ОС можно вернуть, откатив все изменения. Осуществляется данная процедура с помощью встроенного компонента Виндовс, а детальное руководство по этой теме вы найдете в другом материале от нашего автора.

Способ 6: Переустановка драйвера
Мы поставили этот способ последним, поскольку он требует от пользователя выполнения большого количества различных манипуляций, а также является достаточно сложным для новичков. Если никакие приведенные выше инструкции вам не помогли, значит остается только переустановить драйвер устройства. Для начала следует избавиться от старого. О том, как это сделать, читайте далее:
По завершении процедуры удаления задействуйте один из методов инсталляции программного обеспечения для периферии. Всего существует пять доступных способов. Развернуто с каждыми из них знакомьтесь в другой нашей статье.

Как видите, методов исправления ошибки печати принтера HP существует достаточно большое количество, и каждый из них будет полезен в разных ситуациях. Надеемся, приведенные выше инструкции помогли вам без труда решить возникшую проблему, а продукт компании снова функционирует корректно.

Мы рады, что смогли помочь Вам в решении проблемы.
Отблагодарите автора, поделитесь статьей в социальных сетях.
Опишите, что у вас не получилось. Наши специалисты постараются ответить максимально быстро.
Что вызывает ошибку HP 0x6100004a
Способ 1: сбросить весь механизм печати
На принтерах сброс механизма печати эквивалентен выполнению процедуры включения и выключения питания на компьютерах и игровых консолях. Многие затронутые пользователи подтвердили, что операция была решена после выполнения указанных ниже действий.
Вот краткое пошаговое руководство по сбросу механизма печати:
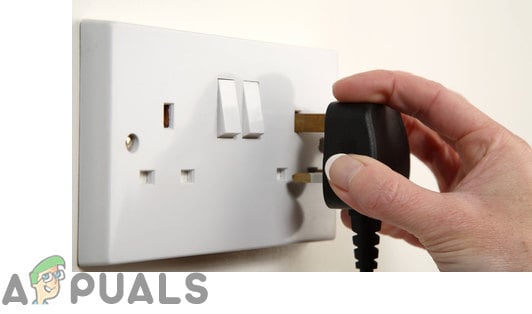
- Включите принтер (если он еще не включен) и дождитесь завершения последовательности запуска.
Примечание. Если вы услышите какой-либо шум, подождите, пока принтер перейдет в режим ожидания и не отключится, прежде чем переходить к следующему шагу. - Отсоедините шнур питания от задней панели принтера (пока он включен, но находится в режиме ожидания). После отключения питания отсоедините шнур питания от сетевой розетки.отсоединение шнура питания вашего принтера
- Подождите 60 секунд или более, прежде чем снова подключить шнур питания к розетке. Затем снова подключите шнур питания к задней панели принтера.
- Включите принтер и подождите, пока он не завершит начальный период прогрева.
- Как только ваш принтер отключится и перейдет в режим ожидания, попробуйте что-нибудь напечатать и посмотрите, решена ли теперь проблема.
В нем все равно отображается ошибка 0x6100004a, когда вы пытаетесь что-то напечатать, перейдите к следующему потенциальному исправлению ниже.
Способ 2: очистка вентиляционных отверстий и контактов картриджа
Важное замечание: Этот метод немного более продвинутый и может привести к повреждению некоторых дополнительных компонентов принтера, если он не будет выполнен должным образом. Если на ваш принтер распространяется гарантия, обратитесь к специалисту, поскольку приведенные ниже действия могут привести к аннулированию гарантии.
Если вы готовы пройти через это потенциальное исправление, вот что вам нужно:
Предпосылки
- Булавка (используется для очистки любых забитых вентиляционных отверстий)
- Безворсовая ткань (используется для общей чистки)
- Сухой ватный тампон (используется для общей уборки)
- Дистиллированная или бутилированная вода. Не используйте водопроводную воду, поскольку она может содержать загрязнения, которые могут повредить печатающую головку.
Вот что нужно сделать, чтобы очистить вентиляционные отверстия и контакты чернильного картриджа:
- Полностью выключите принтер и подождите 60 секунд или более, прежде чем начинать процедуру.
- Посмотрите на область вентиляции каждого картриджа (на верхней части компонента) и посмотрите, не заметили ли вы какие-либо засоренные вентиляционные отверстия.Проверка на наличие забитых вентиляционных отверстий
- Если какие-либо из ваших картриджей имеют засоренные вентиляционные отверстия, используйте штифт, чтобы очистить их как можно больше.
- Затем используйте безворсовую ткань, чтобы стереть скопившиеся чернила и мусор на медном контакте чернильного картриджа.Чистка медного контакта
- Повторите шаги, описанные выше, чтобы очистить каждый из контактов чернильного картриджа.
- Используйте безворсовый тампон, чтобы стереть скопившиеся чернила или мусор на медном контакте печатающей головки.
- Вставьте каждый из картриджей, которые вы только что тщательно очистили, в их слот, затем нажмите на картридж, чтобы он защелкнулся на месте.
Примечание. Очень важно убедиться, что каждый цветной слот на чернильном картридже соответствует цветной точке на каретке. - Закройте крышку доступа к картриджам и снова включите принтер.
- Повторите действие, которое ранее вызывало ошибку 0x6100004a, и посмотрите, решена ли теперь проблема.
Способ 3: обеспечение того, чтобы перевозка не была ограничена
Помните, что это можно проверить, только открыв дверцу доступа к картриджам и проведя некоторые ручные исследования (требуется фонарик или другое осветительное устройство).
Вот что вам нужно сделать:

- Включите принтер и подождите, пока он перейдет в режим ожидания (когда он отключится).
- Откройте дверцу доступа к картриджам (когда принтер включен) и отсоедините шнур питания от задней панели принтера. Затем отсоедините шнур питания от источников питания (скорее всего, от стенной розетки).Открытие дверцы доступа к картриджу
Примечание. Очень важно отсоединить шнур питания, так как вы продолжите касаться механизма подачи бумаги. Это исключает риск поражения электрическим током.
Примечание. Будьте осторожны при удалении застрявшей бумаги. Убедитесь, что вы также проверили ролики и лунки на предмет оторванных частей, которые все еще могут находиться внутри принтера. Если вы оставите какие-либо оставшиеся предметы, может произойти дальнейшее заклинивание.
Если та же проблема сохраняется, перейдите к следующему потенциальному решению ниже.
Способ 4. Обращение в службу поддержки HP
Если ни один из перечисленных методов не позволил вам устранить проблему, вполне вероятно, что вы не сможете решить проблему самостоятельно. В этом случае лучше всего обратиться к техническому специалисту HP (по телефону) и разрешить ему устранить неисправности за вас.
Вот краткое руководство по связи с техническим специалистом HP:
В работе любой оргтехники могут наблюдаться всевозможные неполадки. То же самое относится и к принтерам HP. К счастью, все современные печатающие машины являются компьютеризированными устройствами с собственным программным обеспечением. Именно благодаря этому при возникновении каких-либо неисправностей принтер сразу же «сообщает» это пользователю в виде кода ошибки на экране компьютера и/или на встроенном LCD-дисплее. Рассмотрим наиболее часто встречающиеся ошибки принтеров HP и пути их решения.
Ошибки замятия бумаги
Следующие ошибки возникают при замятии бумаги и/или застревании внутри принтера посторонних предметов.
13.3.хх или CHECK INPUT/OUTPUT DEVICE
Здесь и далее под символами «хх» в коде ошибки следует подразумевать какой-либо набор букв или цифр. Касательно самих ошибок — они означают, что в принтере застряла бумага, т.е. произошло ее замятие. То же самое принтер сообщит в случае механической неисправности ролика подачи бумаги. Если с последним все нормально, то для решения проблемы достаточно извлечь из принтера замятую бумагу. Устранение неисправностей с валиком, возможно, потребует разборки принтера, ремонта или полной замены детали.

13.5.хх
Данная ошибка также сигнализирует о замятии бумаги, а конкретно — в термоблоке принтера. Это одна из важнейших деталей лазерных устройств и МФУ, без которой работа машины не представляется возможной. Здесь также два пути решения проблемы — извлечение застрявшей бумаги либо ремонт/замена термоблока.
13.6.хх
Ошибка возникает по той же причине, что и в предыдущем случае. Разница лишь в том, что ошибка сигнализирует о замятии бумаги не внутри, а на выходе из термоблока. Решение проблемы то же, что и в предыдущем случае.
13.9.хх
Более серьезная ошибка, также связанная с замятием бумаги. Она сигнализирует о наличии неисправности в функционировании валика подачи бумаги и/или термоблока. В данном случае придется проверять работу обеих деталей. Если причина в замятии бумаги, ее достаточно извлечь из принтера. Любые аппаратные/механические неполадки решаются путем разбора, диагностики и ремонта/замены протягивающего ролика и/или термоблока.

13.20.хх (также может выводиться, как 13.A)
Это общая ошибка, возникающая при неисправностях одного или нескольких электронно-механических компонентов принтера, отвечающих за подачу бумаги. Помимо протягивающего ролика и термоблока, причиной ошибки может стать неправильное функционирование датчиков, соленоидов, транспортеров движения и других деталей. В большинстве случаев возникновение данной ошибки сигнализирует о необходимости диагностики и ремонта принтера в целом.
Аппаратно-технические неисправности
Следующие коды ошибок сигнализируют о наличии аппаратно-технических неисправностей принтера.
20 или 21
Одна из этих ошибок возникает при сбое печати, связанном с нехваткой объема встроенной в принтер оперативной памяти (ОЗУ). Обычно такое происходит при переполнении очереди печати, т.е. на принтер поступило слишком большое количество команд на распечатку, но устройство технически не справляется с задачей. Решение — нужно очистить очередь печати на компьютере (или на всех компьютерах, если принтер используется по локальной сети).

Также ошибку может помочь устранить переключение параметра «Page Protect» (в настройках принтера) из положения «On» в «Auto». Некоторые модели принтеров HP поддерживают установку дополнительного объема оперативной памяти. Увеличение ОЗУ в особенности рекомендуется для принтеров, использующихся множеством пользователей по локальной сети.
22 EIO
Данная ошибка возникает только на тех моделях принтеров HP, которые оборудованы модульным интерфейсом MIO или более совершенным — EIO. Данные интерфейсы предназначены для подключения к машине сетевых интерфейсных карт, жестких дисков и т.д. Ошибка 22 EIO может возникнуть при неисправности подключаемого устройства, неправильных настройках либо его занятости протокола MIO другим устройством в сети. Для решения проблемы можно попробовать просто перезагрузить принтер и/или перенастроить параметры локальной сети.
22 PARALLEL I/O, 22 SERIAL I/O
Ошибки возникают только в том случае, если принтер подключен к компьютеру через параллельный порт стандарта IEEE-1284. Неисправность может быть связана со сбоями в работе или несовместимостью установленного драйвера с используемым принтером.
Также ошибка может означать физическое повреждение кабеля или ошибками ввода-вывода информации (поступила нераспознанная команда, компьютер использует неправильный номер порта для связи с принтеров). Решение — переустановка драйвера либо (если не помогает) замена кабеля.

40 BAD SERIAL TRANSSMISION, 40 EIO x BAD TRANSSMISION
Ошибки, возникающие при различных неисправностях сетевой карты принтера. Если проблема не решается путем перезагрузки принтера и/или переустановки его драйвера, остается только заменить сетевую карту.
41.х, 51.х и 52.х
Присутствуют аппаратные неисправности в работе лазер-сканера. Возникновение одной из этих ошибок сигнализирует о необходимости ремонта или замены данной детали либо одного из ее электронных компонентов.
Возникает при неисправностях электронной платы, отвечающей за управление размером бумаги. Ошибка также может быть связана с неправильно заданными параметрами размера бумаги, загруженной в лоток в данный момент. Решение — попробовать задать правильный размер, что можно сделать с LCD-дисплея принтера либо в приложении на компьютере, из которого осуществляется печать. Если не помогает, придется ремонтировать/заменить плату.
Возникновение данной ошибки связано с аппаратными неисправностями термоблока. Самым простым решением является извлечение и установка термоблока на свое место. В остальных случаях данную деталь придется ремонтировать или заменять.

53.хх.хх и 62.х
Ошибки, связанные с работой оперативной памяти принтера. Здесь также можно попробовать извлечь ОЗУ из гнезда и установить заново. Если не помогает, остается заменить неисправный модуль памяти. Какая именно из планок ОЗУ не работает, можно узнать по цифре в коде «62.х», где «х» — номер слота, в который установлен нерабочий модуль.
57.х FAN FAILURE
Присутствуют неисправности в работе встроенных вентиляторов (кулеров) охлаждения принтера, что может приводить к перегреву оборудования. Решение — очистить от пыли и смазать кулеры моторным маслом (если вращаются недостаточно быстро) либо заменить их.
Ошибки, связанные с неполадками в работе механизма поднятия лотка. Возможно, в лотке или самом механизме застрял посторонний предмет. Во всех остальных случаях потребуется ремонт данной детали.
Неисправности главного мотора печатающей машины. Если перезагрузка принтера не помогает, потребуется ремонт или замена мотора.

Ошибка характерна только для моделей принтеров HP, оснащенных дуплексом — устройством, позволяющим печатать одновременно на обеих сторонах листа. Аппаратные неисправности дуплекса также потребует произвести ремонт.
79.хххх
Это общие ошибки, связанные с управлением данными печатающей машины. Неполадки в работе могут быть вызваны неправильным функционированием драйвера принтера. Также ошибки возникают при сбоях в работе модулей памяти, сетевой карты, USB-портов, последовательного порта или других электронных компонентов. Сначала следует переустановить драйвер, заменить используемый USB или последовательный кабель. Если не помогает, придется прибегнуть к помощи специалистов.
8х.хххх
Ошибки, сигнализирующие о неисправности сетевой карты. Также может возникать по причине физического повреждения или наличия замыкания в сетевом кабеле. Первым делом нужно попробовать заменить кабель. Если ошибка повторится, замените сетевую карту.
Читайте также:
- Принтер не выключается кнопкой
- Принтер который печатает людей
- Принтер постоянно берет бумагу
- Из чего состоит принтер xerox
- Что можно сделать на широкоформатном принтере