

![]() Andreyak777 » Чт сен 02, 2021 2:42 pm
Andreyak777 » Чт сен 02, 2021 2:42 pm
То, что другие люди говорят обо мне, никак не характеризует меня. Зато отлично характеризует их.
-

Andreyak777
- Избран тонером
-

![]()
![]() Andreyak777 » Сб сен 04, 2021 9:44 am
Andreyak777 » Сб сен 04, 2021 9:44 am


gridima2007 писал(а):пробовал 2 раза, досыпал, что торчало — эффекта ноль
Ничего не понятно, куда досыпали что торчало?
То, что другие люди говорят обо мне, никак не характеризует меня. Зато отлично характеризует их.
-
Andreyak777
- Избран тонером
-
![]()
![]() Errorhelpme » Вт сен 07, 2021 7:09 am
Errorhelpme » Вт сен 07, 2021 7:09 am
try to double check the toner chip maybe inverted, or try another toner
попробуйте дважды проверить тонер-чип, возможно, перевернут, или попробуйте другой тонер
-

Errorhelpme
- Увидел чернила
-
![]()
![]() Errorhelpme » Ср сен 08, 2021 3:44 pm
Errorhelpme » Ср сен 08, 2021 3:44 pm
gridima2007 писал(а):Чипы менял, ставил другой картридж с рабочего аппарата, мне кажется, что до проверки картриджа не доходит, ошибка появляется раньше
Я exprience C0600 ANd обнаружил, что тонер-чип перевернут, но сфокусируйтесь на этой области в блоке проявителя, соединителе в блоке проявителя и чипе тонера, попробуйте U906 или сбросьте до заводских настроек
i exprience C0600 ANd found out the toner chip is inverted,but in your just focus in that area in the developer unit,connector attacht in developer unit,and toner chip,try U906 or reset to factory setting
-
Errorhelpme
- Увидел чернила
-
![]()
-
-
Kyocera 1035 «бледная» печать
srMax в форуме Принтеры, МФУ, факсы, копиры формата A4
- 2
- 13949
srMax

Пт янв 23, 2015 2:49 pm
-
Kyocera 1035 «бледная» печать
-
-
[SCANNER ERROR] Lamp Error Kyocera FS-1016
мастерчип в форуме Принтеры, МФУ, факсы, копиры формата A4
- 3
- 6645
Усатый Полосатый
Вс окт 28, 2018 11:08 pm
-
[SCANNER ERROR] Lamp Error Kyocera FS-1016
-
-
Kyocera FS-1120d индикатор «Нет бумаги»
vs-dos в форуме Принтеры, МФУ, факсы, копиры формата A4
- 11
- 15142
СТРОНЦИЙ
Вт ноя 02, 2021 2:24 pm
-
Kyocera FS-1120d индикатор «Нет бумаги»
-
-
Kyocera Ecosys M2635dn «поворот» изображения
Искатель в форуме Принтеры, МФУ, факсы, копиры формата A4
- 10
- 6103
MatrixAgent
Ср апр 08, 2020 5:18 am
-
Kyocera Ecosys M2635dn «поворот» изображения
-
-
Стирание вала ведущей шестерни в «печке» Kyocera M2035dn
Грецкий орех в форуме Принтеры, МФУ, факсы, копиры формата A4
- 12
- 3465
СТРОНЦИЙ
Пн дек 13, 2021 3:35 pm
-
Стирание вала ведущей шестерни в «печке» Kyocera M2035dn
Вернуться в Принтеры, МФУ, копиры формата A3
Кто сейчас на форуме
Сейчас этот форум просматривают: нет зарегистрированных пользователей и гости: 31
- Code: 0030
- Description: FAX control PWB system error
Processing with the fax software was disabled due to a software problem. - Causes: FAX control PWB
- Remedy: 1. Turn the main power swtch off and after 5 seconds, re-mount the FAX controller PWB, then turn power on. 2. Reinstall the fax software. 3. Replace the FAX control PWB.
- Code: 0060
- Description: Main/Engine PWB mismatch
Unmatching engine and engine sub boards. Defective engine subboard - Causes: Main/Engine PWB
- Remedy: 1. Turn the main power swtch off and after 5 seconds, then turn power on. 2. Replace the main/engine PWB.
- Code: 0100
- Description: Backup memory device error
- Causes: EEPROM (Main/Engine PWB)
- Remedy: 1. Turn the main power swtch off and after 5 seconds, then turn power on. 2. Check that the EEPROM on the main circuit PWB is peroperly installed on the main circuit PWB and, if not, re-install it. 3. Replace the main/engine PWB.
- Code: 0120
- Description: MAC address data error
For data in which the MAC address is invalid. - Causes: EEPROM (Main/Engine PWB)
- Remedy: 1. Turn the main power swtch off and after 5 seconds, then turn power on. 2. Check the MAC address on the network status page. 3. If it is blank, obtain an EEPROM with its MAC address written from the service support and install. 4. Replace the main/engine PWB.
- Code: 0150
- Description: Backup memory read/write error (main/engine PWB)
No response is issued from the device in reading/writing for 5 ms or more and this problem is repeated 5 times successively. Mismatch of reading data from 2 locations occurs 8 times successively. Mismatch between writing data and reading data occurs 8 times successively. - Causes: EEPROM (Main/Engine PWB)
- Remedy: 1. Turn the main power swtch off and after 5 seconds, then turn power on. 2. Check that the EEPROM is peroperly installed on the main/engine PWB and re-install it. 3. Replace the main/engine PWB. 4. Check the EEPROM and if the data are currupted, contact the service support.
- Code: 0160
- Description: Backup memory data error (main/engine PWB)
Reading data from EEPROM is abnormal. - Causes: EEPROM
- Remedy: 1. Turn the main power swtch off and after 5 seconds, then turn power on. 2. Execute U021 — memory initializing.(see page 1-3-19) 3. If the EEPROM data are currupted, contact the service support.
- Code: 0170
- Description: Billing counting error
The values on the main circuit PWB and on the engine do not match for any of charging counter, life counter, and scanner counter. - Causes: EEPROM. Main/Engine PWB.
- Remedy: EEPROM 1. Check that the EEPROMs installed in the main/engine PWB are correct and, if not, use the correct EEPROM for the model. 2. If the EEPROM data are currupted, contact the service support.
Main/Engine PWB Replace the main/engine PWB.
- Code: 0180
- Description: Machine number mismatch
Machine number of main/ engine does not match. - Causes: Data damage of EEPROM.
- Remedy: 1. Confirm the machine data for the main/ engine units by using U004. 2. If the serial number data of different models is alternately displayed, install the correct EEPROM in the PWB of the wrong serial number data. 3. Contact the Service Support.
- Code: 0190
- Description: Backup memory device error (main/engine PWB)
- Causes: Main/Engine PWB
- Remedy: Replace the main/engine PWB.
- Code: 0630
- Description: DMA error
DMA transmission of image data does not complete within the specified period of time. - Causes: Main/Engine PWB
- Remedy: 1. Confirm that the wiring connector is firmly connected and, if necessary, connect the connector all the way in. 2. If the wiring is disconnected, shorted or grounded, replace the wiring. 3. Replace the main/engine PWB.
- Code: 0800
- Description: Image processing error
JAM010X is detected twice. - Causes: Main/Engine PWB
- Remedy: Replace the main/engine PWB.
- Code: 0840
- Description: Faults of RTC
(“Time for maintenance T” is displayed) [Check at power up] The RTC setting has reverted to a previous state. The machine has not been powered for 5 years (compared to the settings stored periodically in the EEPROM). The RTC setting is older than 00:01 on January 1, 2000. [Checked periodically (in 5- minute interval) after powered up] The RTC setting has reverted to a state older than the last time it was checked. 10 minutes have been passed since the previous check. - Causes: Battery ( main PWB). Main/Engine PWB.
- Remedy: Battery ( main PWB) 1. Make sure that the back-up batteries on the main/engine PWB are not shortcircuited. 2. Reset Maintenance T by executing U906. 3. If the same C call is displayed when power is switched on and off, replace the back up battery. 4. If communication error (due to a noise, etc.) is present with the RTC on the main/engine PWB, check the PWB is properly grounded.
Main/Engine PWB Replace the main/engine PWB.
- Code: 1810
- Description: Paper feeder unit 2 communication error
A communication error from paper feeder is detected 10 times in succession. - Causes: Paper feeder. PF main PWB. Main/Engine PWB.
- Remedy: Paper feeder Check the wiring connection status with the main unit and, if necessary, try connecting it again.
PF main PWB 1. Confirm that the wiring connector is firmly connected and, if necessary, connect the connector all the way in. PF main PWB (YC1) and main/engine PWB (YC18) 2. If the wiring is disconnected, shorted or grounded, replace the wiring. 3. Replace the PFMain/Engine PWB 1. Check the main/engine software and upgrade to the latest, if necessary. 2. Replace the main/engine PWB. main PWB.
- Code: 1820
- Description: Paper feeder unit 3 communication error
A communication error from paper feeder is detected 10 times in succession. - Causes: Paper feeder. PF main PWB. Main/Engine PWB
- Remedy: Paper feeder Check the wiring connection status with paper feeder unit 2 and, if necessary, try connecting it again.
PF main PWB 1. Confirm that the wiring connector is firmly connected and, if necessary, connect the connector all the way in. PF main PWB (YC1) and PF main PWB (YC2). 2. If the wiring is disconnected, shorted or grounded, replace the wiring. 3. Replace the PF main PWB.
Main/Engine PWB 1. Check the main/engine software and upgrade to the latest, if necessary. 2. Replace the main/engine PWB.
- Code: 1830
- Description: Paper feeder unit 4 communication error
A communication error from paper feeder is detected 10 times in succession. - Causes: Paper feeder. PF main PWB. Main/Engine PWB.
- Remedy: Paper feeder Check the wiring connection status with paper feeder unit 3 and, if necessary, try connecting it again.
PF main PWB 1. Confirm that the wiring connector is firmly connected and, if necessary, connect the connector all the way in. PF main PWB (YC1) and PF main PWB (YC2). 2. If the wiring is disconnected, shorted or grounded, replace the wiring. 3. Replace the PF main PWB.
Main/Engine PWB 1. Check the main/engine software and upgrade to the latest, if necessary. 2. Replace the main/engine PWB.
- Code: 1900
- Description: Paper feeder unit 2 EEPROM error
When writing the data, read and write data does not match 4 times in succession. - Causes: PF main PWB (EEPROM)
- Remedy: 1. Confirm that the wiring connector is firmly connected and, if necessary, connect the connector all the way in. 2. Replace the PF main PWB.
- Code: 1910
- Description: Paper feeder unit 3 EEPROM error
When writing the data, read and write data does not match 4 times in succession. - Causes: PF main PWB (EEPROM)
- Remedy: 1. Confirm that the wiring connector is firmly connected and, if necessary, connect the connector all the way in. 2. Replace the PF main PWB.
- Code: 1920
- Description: Paper feeder unit 4 EEPROM error
When writing the data, read and write data does not match 4 times in succession. - Causes: PF main PWB (EEPROM)
- Remedy: 1. Confirm that the wiring connector is firmly connected and, if necessary, connect the connector all the way in. 2. Replace the PF main PWB.
- Code: 2000
- Description: Main motor steady-state error
After main motor is stabilized, the ready signal is not ready for 1 s continuously. - Causes: Main motor. Main/Engine PWB.
- Remedy: Main motor 1. Check the drive gear can rotate or they are not unusually loaded and, if necessary, replace. 2. Confirm that the wiring connector is firmly connected and, if necessary, connect the connector all the way in. main motor and main/engine PWB (YC4) 3. If the wiring is disconnected, shorted or grounded, replace the wiring. 4. Replace the main motor.
Main/Engine PWB 1. Check the main/engine software and upgrade to the latest, if necessary. 2. Replace the main/engine PWB.
- Code: 2010
- Description: Main motor startup error
Main motor is not stabilized within 3 s since the motor is activated. - Causes: Main motor. Main/Engine PWB.
- Remedy: Main motor 1. Confirm that the wiring connector is firmly connected and, if necessary, connect the connector all the way in. main motor and main/engine PWB (YC4) 2. If the wiring is disconnected, shorted or grounded, replace the wiring. 3. Replace the main motor.
Main/Engine PWB 1. Check the main/engine software and upgrade to the latest, if necessary. 2. Replace the main/engine PWB.
- Code: 3100
- Description: Scanner carriage error
The home position is not correct when the power is turned on, at the end of a reading process of the table and document processor. - Causes: Scanner motor. Home position sensor. Main/Engine PWB.
- Remedy: Scanner motor 1. Move the scanner by the hand to check whether it is unusually difficult to move. 2. Check that the scanner driving belt is not disengaged. 3. Confirm that the wiring connector is firmly connected and, if necessary, connect the connector all the way in. Scanner motor and main/engine PWB (YC1) 4. If the wiring is disconnected, shorted or grounded, replace the wiring. 5. Replace the scanner motor.
Home position sensor 1. Check that the sensor is correctly positioned. 2. Confirm that the wiring connector is firmly connected and, if necessary, connect the connector all the way in. Home position sensor and main/engine PWB (YC7) 3. Replace the home position sensor.
Main/Engine PWB Replace the main/engine PWB.
- Code: 3200
- Description: Exposure lamp error
When a lamp is made to turn on one side at a time, the white standard data at the time of an initial is lower than a rated value. - Causes: CIS. Main/Engine PWB.
- Remedy: CIS Reinsert the connector. Also check for continuity within the connector cable. If none, replace the cable. CIS and main/engine PWB (YC2011) Replace the image scanner unit.
Main/Engine PWB Replace the main/engine PWB and check for correct operation.
- Code: 3210
- Description: CIS lamp error
When a lamp is made both to turn on, the white standard data at the time of an initial is lower than a rated value - Causes: CIS. Main/Engine PWB.
- Remedy: CIS 1. Execute U906 Separating Operation Release. 2. Confirm that the wiring connector is firmly connected and, if necessary, connect the connector all the way in. CIS and main/engine PWB (YC2011) 3. If the wiring is disconnected, shorted or grounded, replace the wiring. 4. Replace the CIS and execute U411.
Main/Engine PWB Replace the main/engine PWB and check for correct operation.
- Code: 3300
- Description: Optical system (AGC) error One of the gains is FF or 00 during the CIS lamp AGC is being processed.
- Causes: CIS. Main/Engine PWB.
- Remedy: CIS 1. Execute U906 Separating Operation Release. 2. Confirm that the wiring connector is firmly connected and, if necessary, connect the connector all the way in. CIS and main/engine PWB (YC2011) 3. If the wiring is disconnected, shorted or grounded, replace the wiring. 4. Replace the CIS and execute U411.
Main/Engine PWB Replace the main/engine PWB and check for correct operation.
- Code: 3500
- Description: Communication error between scanner and ASIC An error code is detected.
- Causes: CIS. Main/Engine PWB.
- Remedy: CIS 1. Execute U906 Separating Operation Release. 2. Confirm that the wiring connector is firmly connected and, if necessary, connect the connector all the way in. CIS and main/engine PWB (YC2011) 3. If the wiring is disconnected, shorted or grounded, replace the wiring. 4. Replace the CIS and execute U411.
Main/Engine PWB Replace the main/engine PWB and check for correct operation.
- Code: 3600
- Description: Scanner sequence error
- Causes: Main/Engine PWB.
- Remedy: 1. Execute U021 memory initializing. 2. Replace the main/engine PWB and execute U411.
- Code: 4000
- Description: Polygon motor steady-state error
After Polygon motor is stabilized, the ready signal is at the H level for 1 s continuously. - Causes: Polygon motor (LSU). Main/Engine PWB.
- Remedy: Polygon motor (LSU) 1. Confirm that the wiring connector is firmly connected and, if necessary, connect the connector all the way in. Polygon motor and main/engine PWB (YC10) 2. If the wiring is disconnected, shorted or grounded, replace the wiring. 3. Replace the laser scanner unit.
Main/Engine PWB 1. Check the main/engine software and upgrade to the latest, if necessary. 2. Replace the main/engine PWB.
- Code: 4010
- Description: Polygon motor synchronization error
After polygon motor is driven, the polygon motor speed won’t stabilize within 10 s. - Causes: Polygon motor (LSU). Main/Engine PWB.
- Remedy: Polygon motor (LSU) 1. Confirm that the wiring connector is firmly connected and, if necessary, connect the connector all the way in. Polygon motor and main/engine PWB (YC10) 2. If the wiring is disconnected, shorted or grounded, replace the wiring. 3. Replace the laser scanner unit.
Main/Engine PWB 1. Check the main/engine software and upgrade to the latest, if necessary. 2. Replace the main/engine PWB.
- Code: 4200
- Description: BD steady-state error
The BD signal is not detected. - Causes: APC PWB (LSU). Main/Engine PWB.
- Remedy: APC PWB (LSU) 1. Confirm that the FCC wiring connector is not distorted and connect the FCC wiring all the way in. Laser scanner unit and main/engine PWB (YC2010) 2. If the FCC wiring is disconnected, shorted or grounded, replace the FCC wiring. 3. Replace the laser scanner unit.
Main/Engine PWB 1. Check the main/engine software and upgrade to the latest, if necessary. 2. Replace the main/engine PWB.
- Code: 6000
- Description: Broken fuser heater wire (main)
When the fuser thermistor 1 reaches primary stable temperature after a warm-up start and the fuser thermistor 2 is less than 90 ° C/194 °F. - Causes: Fuser unit. Main/Engine PWB. Power source PWB. Fuser heater.
- Remedy: Fuser unit 1. Check that no paper jam is present. 2. Confirm that the wiring connector is firmly connected and, if necessary, connect the connector all the way in. Fuser unit and mmain/engine PWB (YC14) 3. If the wiring is disconnected, shorted or grounded, replace the wiring. 4. Replace the Fuser unit and execute U167 counter clear. (Deteriorated sensitivity due to the toner adhered to the center thermistor.)
Main/Engine PWB 1. Check the main/engine software and upgrade to the latest, if necessary. 2. Replace the main/engine PWB.
Power source PWB 1. Confirm that the wiring connector is firmly connected and, if necessary, connect the connector all the way in. Power source PWB (YC4) and main/ engine PWB (YC14) 2. Replace the power source PWB.
Fuser heater 1. Replace the Fuser unit and execute U167 counter clear.
- Code: 6020
- Description: Abnormally high fuser thermistor 2 temperature (Center)
Fuser thermistor 2 detects a temperature higher than 210°C/410°F. - Causes: Fuser unit. Main/Engine PWB.
- Remedy: Fuser unit 1. Confirm that the wiring connector is firmly connected and, if necessary, connect the connector all the way in. Fuser unit and main/engine PWB (YC14) 2. If the wiring is disconnected, shorted or grounded, replace the wiring. 3. Replace the Fuser unit.
Main/Engine PWB 1. Check the main/engine software and upgrade to the latest, if necessary. 2. Replace the main/engine PWB.
- Code: 6030
- Description: Broken fuser thermistor 2 wire (Center)
Input from fuser thermistor 2 is 1012 or more (A/D value) continuously for 5 s. Input from fuser thermistor 2 is1012 (A/D value) or more whenthe temperature at the fuser thermistor 1 is 70°C/ 158°F or more. - Causes: Fuser unit. Main/Engine PWB. Fuser thermistor 2. Fuser thermostat (triggered)
- Remedy: Fuser unit 1. Check that no paper jam is present. 2. Confirm that the wiring connector is firmly connected and, if necessary, connect the connector all the way in. Fuser unit and main/engine PWB (YC14) 3. If the wiring is disconnected, shorted or grounded, replace the wiring. 4. Replace the Fuser unit and execute U167 counter clear. (Deteriorated sensitivity due to the toner adhered to the center thermistor.)
Main/Engine PWB 1. Check the main/engine software and upgrade to the latest, if necessary. 2. Replace the main/engine PWB.
Fuser thermistor 2 1. Replace the Fuser unit and execute U167 counter clear.
Fuser thermostat (triggered) 1. Confirm that the wiring connector is firmly connected and, if necessary, connect the connector all the way in. Fuser unit and fuser heater PWB (YC1) 2. If the wiring is disconnected, shorted or grounded, replace the wiring. 3. Replace the Fuser unit and execute U167 counter clear.
- Code: 6200
- Description: Broken fuser heater wire (Sub)
Fuser thermistor 1 does not reach primary stable temperature even after 30 s during warming up. Fuser thermistor 1 detects a temperature lower than 100°C/212°F for 60 s during ready. - Causes: Fuser unit. Main/Engine PWB. Fuser thermistor 1
- Remedy: Fuser unit 1. Confirm that the wiring connector is firmly connected and, if necessary, connect the connector all the way in. Fuser unit and main/engine PWB (YC14) 2. If the wiring is disconnected, shorted or grounded, replace the wiring. 3. Replace the Fuser unit and execute U167 counter clear.
Main/Engine PWB 1. Check the main/engine software and upgrade to the latest, if necessary. 2. Replace the main/engine PWB.
Fuser thermistor 1 1. Replace the Fuser unit and execute U167 counter clear.
- Code: 6220
- Description: Abnormally high fuser thermistor 1 temperature (Edge)
Fuser thermistor 1 detects a temperature higher than 230°C/446°F. - Causes: Fuser unit. Main/Engine PWB.
- Remedy: Fuser unit 1. Confirm that the wiring connector is firmly connected and, if necessary, connect the connector all the way in. Fuser unit and main/engine PWB (YC14) 2. If the wiring is disconnected, shorted or grounded, replace the wiring. 3. Replace the Fuser unit and execute U167 counter clear.
Main/Engine PWB 1. Check the main/engine software and upgrade to the latest, if necessary. 2. Replace the main/engine PWB.
- Code: 6230
- Description: Broken fuser thermistor 1 wire (Edge)
Input from fuser thermistor 1 is 1012 or more (A/D value) continuously for 5 s. Input from fuser thermistor 1 is1012 (A/D value) or more whenthe temperature at the fuser thermistor 2 is 70°C/ 158°F or more. - Causes: Fuser unit. Main/Engine PWB.
- Remedy: Fuser unit 1. Confirm that the wiring connector is firmly connected and, if necessary, connect the connector all the way in. Fuser unit and main/engine PWB (YC14) 2. If the wiring is disconnected, shorted or grounded, replace the wiring. 3. Replace the Fuser unit and execute U167 counter clear.
Main/Engine PWB 1. Check the main/engine software and upgrade to the latest, if necessary. 2. Replace the main/engine PWB.
- Code: 6400
- Description: Zero-cross signal error
While fuser heater ON/OFF control is performed, the zerocross signal is not input within 3 s. - Causes: Fuser unit.
- Remedy: 1. Confirm that the wiring connector is firmly connected and, if necessary, connect the connector all the way in. Power source PWB (CN2) and main/ engine PWB (YC14) 2. If the wiring is disconnected, shorted or grounded, replace the wiring. 3. Replace the power source PWB.
- Code: 7100
- Description: Toner sensor error
Sensor output value of 8 or less. - Causes: Toner sensor. Toner motor. Main/Engine PWB.
- Remedy: Toner sensor 1. Check the toner sensor output by U150. 2. Confirm that the wiring connector is firmly connected and, if necessary, connect the connector all the way in. Toner sensor and main/engine PWB (YC9) 3. If the wiring is disconnected, shorted or grounded, replace the wiring. 4. Check that the gears of the Developer unit are not damaged and the spiral can rotate. 5. Replace the Developer unit.
Toner motor 1. Draw out the toner container and execute U135 to check the toner motor operation. 2. Check the drive gear can rotate or they are not unusually loaded and, if necessary, replace. 3. Confirm that the wiring connector is firmly connected and, if necessary, connect the connector all the way in. Toner motor and main/engine PWB (YC12) 4. If the wiring is disconnected, shorted or grounded, replace the wiring. 5. Replace the Toner motor.
Main/Engine PWB 1. Check the main/engine software and upgrade to the latest, if necessary. 2. Replace the main/engine PWB.
- Code: 7800
- Description: Broken temperature sensor wire
Input from temperature sensor is 0.3 V (A/D value) or less - Causes: Outer temperature sensor. Main/Engine PWB.
- Remedy: Outer temperature sensor 1. Confirm that the wiring connector is firmly connected and, if necessary, connect the connector all the way in. Temperature sensor and main/engine PWB (YC6) 2. If the wiring is disconnected, shorted or grounded, replace the wiring. 3. Replace the temperature sensor.
Main/Engine PWB 1. Check the main/engine software and upgrade to the latest, if necessary. 2. Replace the main/engine PWB.
- Code: 7810
- Description: Short-circuited temperature sensor wire
Input from temperature sensor is 0.3 V (A/D value) or more - Causes: Outer temperature sensor. Main/Engine PWB.
- Remedy: Outer temperature sensor 1. Confirm that the wiring connector is firmly connected and, if necessary, connect the connector all the way in. Temperature sensor and main/engine PWB (YC6) 2. If the wiring is disconnected, shorted or grounded, replace the wiring. 3. Replace the temperature sensor.
Main/Engine PWB 1. Check the main/engine software and upgrade to the latest, if necessary. 2. Replace the main/engine PWB.
- Code: 7900
- Description: Drum EEPROM error
No response is issued from the device in reading/writing for 5 ms or more and this problem is repeated five times successively. - Causes: DR PWB. Main/Engine PWB.
- Remedy: DR PWB 1. Confirm that the wiring connector is firmly connected and, if necessary, connect the connector all the way in. DR PWB and main/engine PWB (YC9) 2. If the wiring is disconnected, shorted or grounded, replace the wiring. 3. Replace the Drum unit.
Main/Engine PWB 1. Check the main/engine software and upgrade to the latest, if necessary. 2. Replace the main/engine PWB.
- Code: 9000
- Description: Document processor communication error
A communication error from document processor is detected 10 times in succession. - Causes: DP main PWB.
- Remedy: 1. Check that the versions of the main unit firmware and the DP firmware are identical. 2. Confirm that the wiring connector is firmly connected and, if necessary, connect the connector all the way in. DP main PWB(YC1) and main/engine PWB (YC18) 3. If the wiring is disconnected, shorted or grounded, replace the wiring. 4. Replace the DP main PWB
- Code: 9060
- Description: DP EEPROM error
Mismatch of reading data from two locations occurs 3 times successively. Mismatch between writing data and reading data occurs 3 times successively. - Causes: DP main PWB. Device damage of EEPROM.
- Remedy: 1. Execute U906 Separating Operation Release. 2. Confirm that the EEPROM has been properly installed. 3. Replace the DP main PWB
Device damage of EEPROM Contact the Service Support.
- Code: F000
- Description: Communication error between Main/Engine PWB and Operation PWB
- Causes: Main/Engine PWB. Operation PWB.
- Remedy: Main/Engine PWB 1. Turn the main power swtch off and after 5 seconds, then turn power on. 2. Check that the wirings and connetors between the main/engine PWB and the operation PWB are normal. Main/engine PWB (YC2010) and operation PWB (YC1) 3. Check that the DIMM memories in the main/engine PWB are well conducted and, if not, replace. 4. Execute U021initialize memory. 5. Replace the main/engine PWB.
Operation PWB Replace the operation PWB.
- Code: F020
- Description: Main/Engine PWB RAM check sum error
- Causes: Main memory (RAM)
- Remedy: Turn the main power switch off/on to restart the machine. If the error is not resolved, replace main/engine PWB.
- Code: F040
- Description: Communication error between Main/Engine PWB and Print engine
- Causes: Main/Engine PWB
- Remedy: 1. Turn the main power swtch off and after 5 seconds, then turn power on. 2. Repair or replace the wire from the main/ engine PWB, that may be grounded. (Check short-circuit between 5V and 3.3V.) 3. Check the main/engine software and upgrade to the latest, if necessary. 4. If not corrected, replace the main/engine PWB.
- Code: F050
- Description: Print engine ROM checksum error
- Causes: Main/Engine PWB
- Remedy: 1. Turn the main power swtch off and after 5 seconds, then turn power on. 2. Confirm that the EEPROM has been properly installed. 3. Check the main/engine software and upgrade to the latest, if necessary. 4. If not corrected, Replace the main/ engine PWB.
Ошибки печки:
С6000 — неисправность нагревателя
С6020 — аномально высокая температура термистора
С6050 — аномально низкая температура термистора
С6400 — нулевой сигнал ошибки
Если вы столкнулись с одной из вышеперечисленной ошибкой, то сбросьте ее при помощи Режима обслуживания, используя сервисный код 163.
1. Войдите в Режим обслуживания (для этого нажмите кнопки «10871087«).
2. Введите код 163 (сброс ошибок печки).
3. Нажмите кнопку Start.
Японский производитель оргтехники Kyocera выпускает одни из самых качественных печатающих устройств на рынке, которые, в первую очередь, пользуются высоким спросом у бизнеса. А это уже говорит о многом!
На заметку! В отличие от частных покупателей, сильно подверженных рекламе и маркетинговым уловкам, большинство предпринимателей предпочитают вкладывать средства рационально.
Тем не менее, даже самая качественная оргтехника может давать сбои. Особенно, если за ней не следить!
Поэтому сегодня мы рассмотрим наиболее распространенные коды ошибок у популярных принтеров Kyocera FS-1020MFP, FS-1025MFP, FS-1030MFP, FS-1120MFP, FS-1125MFP, FS-1220MFP и прочих моделей, чтобы разобраться, какие неполадки можно устранить своими руками, а в каких случаях необходимо воспользоваться помощью специалистов.
- Сброс ошибок у принтеров Kyocera своими руками
- Устранение ошибок у принтеров Kyocera в сервисном центре
Под сбросом ошибок у принтеров Kyocera нужно понимать комплекс мероприятий, которые потенциально может осуществить опытный пользователь, чтобы восстановить работоспособность печатающих устройств без обращения в сервисный центр.
|
Ошибка № |
Причина |
Решение проблемы |
|
E-0001 |
В принтере установлен совместимый картридж или чип расходника был поврежден. | Проблема решается несколькими способами:
1. установка оригинального картриджа; 2. замена поврежденного чипа; 3. прошивка принтера – затем в печатающее устройство можно будет установить любой картридж неограниченное количество раз; 4. сброс ошибки – зажмите на несколько секунд кнопки «Режим» и «Сброс». |
|
E-0002 |
Регион используемого картриджа не соответствует характеристикам принтера. | Проблема решается несколькими способами:
1. установка соответствующего региону принтера картриджа; 2. замена чипа; 3. прошивка принтера. |
|
E-0003 |
Память печатающего устройства заполнена. | Распечатайте уже отсканированные документы или сбросьте операцию соответствующей кнопкой. |
|
E-0007 |
В картридже закончился тонер. | Замените картридж на новый оригинальный, совместимый или заправьте расходник. |
|
E-0008 |
Одна из крышек принтера не закрыта. | Захлопните заднюю и переднюю крышки принтера, ощутив характерный щелчок. |
|
E-0009 |
Лоток с отпечатками переполнен. | Извлеките распечатанные листы с бумагой, а затем возобновите печать кнопкой «Старт». |
|
E-0012 |
Память принтера заполнена. | Измените разрешение печати в меньшую сторону – до 600 dpi. |
|
E-0014 |
Установлена бумага такого формата, который принтер не поддерживает. | Замените бумагу листами совместимого формата.
Иногда функционал принтера может быть ограничен на софтверном уровне. Чтобы расширить диапазон форматов, мы рекомендуем обновить ПО печатающего устройства. |
|
E-0015 |
1. У принтера отсутствует питание.
2. Сетевой кабель не подключен. 3. На персональном компьютере отсутствует драйвер. |
Проверьте целостность сетевого кабеля.
Включите принтер. При необходимости установите драйвер. |
|
E-0018 |
Выбранный файл отсутствует в очереди на печать. | Сбросьте операцию, нажав на кнопку «Сброс». Затем выберите новый файл и продолжите печать. |
|
E-0019 |
Формат печати не поддерживается принтером. | Сбросьте операцию, нажав на кнопку «Сброс». |
|
J-0511 |
Бумагу зажевало. | Аккуратно извлеките остатки бумаги из корпуса принтера. |
|
PF |
Отсутствует бумага во входном лотке. | Установите бумагу во входной лоток и возобновите печать, нажав на кнопку «Старт». |
Устранение ошибок у принтеров Kyocera в сервисном центре
| Ошибка № |
Возможная причина |
|
0030 |
Неисправна PWB-плата. |
|
0100 |
Неисправна Flash-память или плата PWB. |
|
0120 |
Неисправна Flash-память. |
|
0190 |
Неисправна Flash-память или плата PWB. |
|
0630 |
Неисправна PWB-плата. |
|
2000 |
1. Неисправна PWB-плата;
2. неисправен соединительный кабель или нарушена целостность соединения контактов; 3. неисправен привод или его отдельные узлы. |
|
3100 |
1. Неисправен соединительный кабель или нарушена целостность соединения контактов;
2. неисправен датчик положения; 3. неисправен привод сканера; 4. неисправна PWB-плата. |
|
3300 |
1. Неисправен соединительный кабель или нарушена целостность соединения контактов;
2. неисправен датчик CIS; 3. неисправна PWB-плата. |
|
3500 |
Неисправна PWB-плата. |
|
4000 |
1. Неисправен соединительный кабель или нарушена целостность соединения контактов;
2. неисправен привод; 3. неисправна PWB-плата. |
|
4200 |
1. Неисправен соединительный кабель или нарушена целостность соединения контактов;
2. неисправна PWB-плата и отдельные компоненты. |
|
6000 |
1. Неисправен соединительный кабель или нарушена целостность соединения контактов;
2. неисправен термостат; 3. неисправен нагреватель фьюзера; 4. неисправна PWB-плата и отдельные компоненты. |
|
6020 |
1. Неисправна PWB-плата и отдельные компоненты;
2. выявлен дефект у термистора. |
|
6030 |
1. Неисправен соединительный кабель или нарушена целостность соединения контактов;
2. выявлен дефект у термистора; 3. неисправен термостат; 4. неисправна PWB-плата и отдельные компоненты. |
|
6400 |
1. Неисправен соединительный кабель или нарушена целостность соединения контактов;
2. неисправна PWB-плата и отдельные компоненты. |
|
F000 |
Неисправна PWB-плата и отдельные компоненты. |
|
F020 |
Неисправна PWB-плата. |
|
F040 |
Неисправна PWB-плата. |
|
F05D |
1. Неисправно программное обеспечение привода;
2. неисправна PWB-плата и отдельные компоненты. |
Попытались самостоятельно устранить ошибку на принтере Kyocera, но проблемы с печатью остались нерешенными? Сервисный центр МосТонер – круглосуточный бесплатный выезд мастера в пределах МКАД. Вы платите только за результат!
Японская компания Kyocera производит высококачественные лазерные принтеры и МФУ для офисной печати. Их продукция одна из самых востребованных на сегодняшний день. Ведь печатающие устройства Kyocera характеризуются высокой надежностью, износостойкостью и большим сроком эксплуатации. Однако даже их изделия не являются вечными. Со временем принтеры Kyocera начинают сбоить.
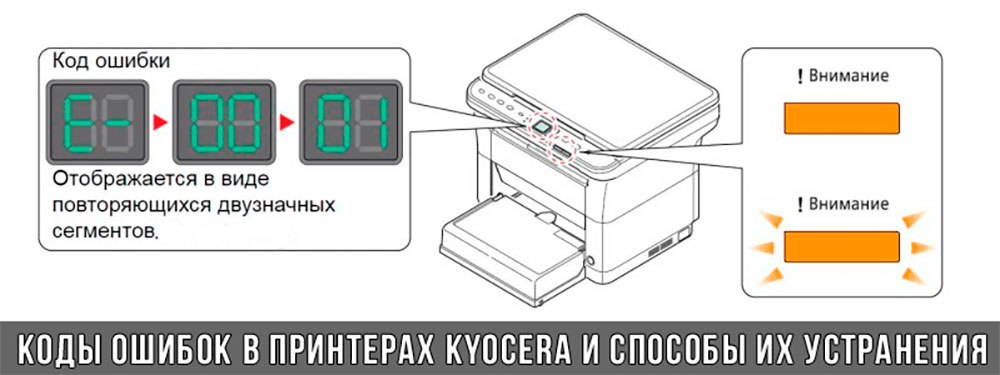
К счастью, оргтехника Kyocera оснащена системой самодиагностики (так же, как и струйные принтеры Canon). Поэтому, в случае возникновения проблемы, устройство самостоятельно выявит уязвимое место и сообщит Вам об этом миганием соответствующего индикатора на панели управления либо кодом ошибки, выведенным на дисплей принтера.
Если Вы не являетесь мастером по обслуживанию принтеров и МФУ Kyocera, то, чтобы понять, о чем сообщает печатающее устройство, Вам потребуется расшифровать указанный им код. Для этого мы добавили в статью таблицу кодов ошибок лазерных принтеров Kyocera серии FS и не только.
Коды ошибок принтеров и МФУ Kyocera, которые можно исправить самостоятельно
|
Код ошибки |
Значение ошибки |
Решение проблемы |
|
E-0001 (E1) |
Поврежден чип картриджа либо установлен неоригинальный картридж. |
Замените установленный картридж оригинальной версией изделия. Если хотите сэкономить, тогда купите и установите новый чип на картридж или перепрошейте принтер Kyocera. Однако предварительно не помешает попробовать сбросить ошибку соответствующей комбинацией клавиш (как это сделать, читайте в статье «Сброс ошибки установки неоригинального картриджа в принтерах Kyocera»). |
|
E-0002 (E2) |
Регион использования картриджа и принтера не совпадают. |
Замените чип или прошейте принтер Kyocera. |
|
E-0003 (E3) |
Заполнена память принтера или МФУ Kyocera. |
Отпечатайте ранее отсканированные листы или очистите очередь печати нажатием кнопки Стоп/Сброс (ранее отсканированные листы также удалятся из памяти принтера, даже если они еще не были распечатаны). |
|
E-0007 (E7) |
Тонер-картридж Kyocera израсходовал ресурс красящего вещества. |
Замените или заправьте картридж Kyocera (если используете совместимый или перезаправленный расходник, то после установки его в принтер не забудьте сбросить ошибку зажатием на 3-5 секунды кнопок [Ок] и [Сброс/Стоп]). |
|
E-0008 (E8) |
Открыта крышка принтера либо не работает датчик закрытия крышек устройства. |
Откройте и еще раз закройте переднюю и заднюю крышку принтера. Во время закрытия Вы должны услышать характерный щелчок. Если не помогло, то причина в неисправности датчика. |
|
E-0009 (E9) |
Лоток приема бумаги полон. |
Уберите все отпечатанные листы бумаги из выходящего лотка. Чтобы возобновить печать, нажмите кнопку [Старт]. |
|
E-0012 (E12) |
Ошибка памяти принтера Kyocera. |
Попробуйте уменьшить разрешение печати. Скорее всего, формат создаваемого отпечатка не соответствует возможностям принтера. |
|
E-0014 (E14) |
Установлен неверный формат бумаги (неподдерживаемый принтером Kyocera). |
Поменяйте бумагу на поддерживаемую принтером либо смените ее формат в настройках печати. Попробуйте обновить программное обеспечение. Возможно, это расширит поддерживаемые принтером Kyocera форматы. |
|
E-0015 (E15) |
Устройство не подключено к электрической сети либо на компьютере нет (не работает) драйвера принтера Kyocera. |
Проверьте подключение печатающего аппарата к электрической сети, а также целостность кабеля. Если ошибка не исчезает, скачайте драйвер принтера Kyocera и установите его на компьютер. |
|
E-0017 (E17) |
Ошибка передачи данных. |
Проверьте подключение принтера к компьютеру. Кабель не должен быть длиннее 5 метров, а также обязан поддерживать стандарт USB 2.0. Кроме того, переустановите драйвер принтера и утилиту Kyocera Client Tool. |
|
E-0018 (E18) |
Очередь печати заполнена. |
Очистите очередь печати нажатием кнопки [Сброс] либо через драйвер принтера. |
|
E-0019 (E19) |
Неверный формат печати. |
Отмените печать нажатием кнопки [Стоп/Сброс]. Выберите в настройках принтера соответствующий режим печати, а также установите в лоток поддерживаемый принтером формат бумаги. |
|
J-0000 (jam0000) |
Замятие бумаги за задней крышкой. |
Откройте крышку и извлеките бумагу. Проверьте надежность крепления бумаги в лотке, а также принтер на наличие посторонних предметов. Еще причина может быть в пружине выходного флажка. Если она растянулась, то может плохо работать фиксатор. Также проблема может быть из-за печки, сделайте ее ревизию, переборку и смазку. |
|
J-0501 (jam0501) |
Бумага застряла в принтере Kyocera |
Извлеките замятую бумагу. Проверьте надежность установки бумаги во входной лоток. Проверьте целостность роликов протяжки бумаги, а также принтер на наличие посторонних предметов. Если не помогло, стоит внимательно осмотреть ребра на направляющей пластине. На них могут образоваться сколы, трещины и заусенцы. Их можно слегка подчистить наждачной бумагой (нулевкой). |
|
J-0511 (jam0511) |
Принтер Kyocera замял бумагу. |
Извлеките замятую бумагу и повторите печать. Если проблема не исчезла, несите принтер в сервис. Скорее всего, изношен ролик протяжки бумаги. |
|
C7990 |
Бункер драм-картриджа (блока фотобарабана) заполнен отработанным тонером либо неисправен счетчик отработки красящего вещества. Еще проблема может быть в главной плате PWB. |
Осуществите чистку драм-картриджа (блока фотобарабана). Если проблема в датчике или плате, то нужно отнести принтер в СЦ на диагностику. |
|
F248 |
Ошибка обработки отпечатываемого материала. |
Перезагрузите принтер. Уберите неподдерживаемые спецсимволы из отпечатка. Обновите ПО принтера Kyocera. Смените режим работы принтера с PDL на GDI (Пуск -> Принтеры -> Свойства -> Параметры устройства). |
|
PF |
Отсутствует бумага в лотке подачи. |
Загрузите листы бумаги во входной лоток. Если принтер по-прежнему не печатает, значит нужно искать проблему в чем-то другом. |
|
1101 |
Ошибка сканирования через сеть из-за неправильного имени SMTP сервера. |
Пропишите DNS-адреса помимо прочих настроек печати по сети. |
|
1102 |
Некорректная настройка сканера для работы через сеть |
Зайдите в Web-панель управления принтером (нужно в адресную строку браузера ввести iP принтера Kyocera). Далее в зависимости от модели введите логин и пароль (Admin/Admin или просто admin00 без логина). Далее следуйте инструкции:
Логин и пароль нужны обязательно, если их нет, то следует создать. |
|
2101 |
Ошибка передачи данных при сканировании через сеть. |
Правильно настройте параметры (как для ошибки 1102), только предварительно отключите на ПК антивирус и брандмауэр. |
Если Вы испытали все способы, но не смогли убрать ошибку, то следует нести печатающее устройство в сервисный центр. Кроме того, есть ряд ошибок (высвечиваемых на дисплее принтера), которые нельзя устранить в домашних условиях. Соответствующие коды ошибок принтеров Kyocera представляем в очередной таблице.
Коды ошибок принтеров и МФУ Kyocera, которые нужно устранять в сервисном центре
|
Код ошибки |
Значение ошибки |
Решение проблемы |
|
0030 |
Неисправность платы управления факсом принтера. |
Замена платы. |
|
0100 |
Неисправность платы управления или флеш-памяти принтера. |
Замена платы. |
|
0120 |
Ошибка чтения mac-адреса из-за неисправности флеш-памяти принтера. |
Замена платы. |
|
0190 |
Неисправность платы управления или флеш-памяти принтера. |
Замена платы. |
|
0630 |
Неисправность платы управления принтера. |
Замена платы. |
|
1020 |
Неисправность мотора, привода или отсутствие контакта. |
Разборка принтера и замена изношенных частей. Проверка надежности подключений, замена разорванных (прогоревших) кабелей. Ремонт или замена привода мотора. |
|
1040 |
Неисправность мотора, привода или отсутствие контакта. |
Разборка принтера и замена изношенных частей. Проверка надежности подключений, замена разорванных (прогоревших) кабелей. Ремонт или замена привода мотора. |
|
2000 |
Неисправность главной платы управления, соединительного кабеля или привода принтера. |
Проверить ремни, шестерни и ролики привода. Смазать или заменить, если есть дефекты. Заменить привод или главную плату. |
|
3100 (C3100) |
Неисправность главной платы, привода сканера, датчика положения или нарушение целостности соединений. |
Проверить наличие разрывов и отсутствия контакта. Смазать или заменить изношенные элементы привода. Заменить привод, главную плату, датчик или соединительный кабель. Если Вам повезло, то возможно забыли отключить фиксатор блока сканера. |
|
3101 |
Сетевой кабель не подсоединен, или нарушена работа концентратора. Еще может быть из-за наличия вирусов в системе или неправильно заданным параметрам сервера SMTP. |
Проверить соединения, правильно настроить параметры сети. |
|
3300 |
Неисправность главной платы, датчика CIS или соединительного кабеля. |
Проверить контакты, заменить плату или датчик. |
|
3500 |
Неисправность главной платы или нарушение соединения контактов. |
Проверить контакты, заменить плату. |
|
4000 (C4000) |
Неисправность главной платы, привода сканера или нарушение соединений. Однако чаще всего ошибка лазера. |
Проверить контакты, заменить плату или привод блока сканера. Почистить лазер, смазать ось полигон-мотора, либо полностью заменить блок лазера. |
|
4200 |
Неисправность главной платы, блока сканера или датчика BD. |
Отключить питание принтера на 30 минут. Если не помогло, то следует заменить привод сканера или главную плату принтера. |
|
6000 (С6000) |
Неисправность главной платы, термостата, печки или нарушение соединения контактов. |
Проверить и поправить контакты. Заменить фьюзер. Ремонт или замена печки, термодатчика, термопредохранителя и т.д. |
|
6020 |
Сгорание термистора или главной платы. |
Замена термистора или главной платы. |
|
6030 |
Неисправность главной платы, термостата или термистора. Возможно, причина в отсутствии контакта. |
Проверить соединения. Заменить плату, термостат или термистор. |
|
6400 |
Неисправность главной платы, отсутствие питания или контакта. |
Заменить плату или источник питания. |
|
F000 |
Неисправность главной платы или отсутствие контакта. |
Проверить соединение ремня безопасности. Заменить ремень или плату управления. |
|
F020 |
Неисправность элементов памяти принтера. |
Перезагрузить принтер. Если ошибка не устранилась – заменить плату управления. |
|
F040 |
Неисправность главной платы принтера. |
Перезагрузить принтер. Если ошибка не устранилась – заменить плату управления. |
|
F05D |
Неисправность главной платы. Сбой программного оборудования привода. Проблемы с прошивкой принтера Kyocera. |
Перезагрузить принтер. Если ошибка не устранилась – заменить плату управления. Перепрошить принтер Kyocera. |
|
F245 F246 F247 F375 |
Принтер Kyocera заблокирован из-за проблемы, вызванной отказом источника питания. |
Нужно перепрошить принтер специальной сервисной микропрограммой. |
Обратите внимание: Если у печатающего устройства нет дисплея, то определить проблему можно по светодиодным индикаторам, встроенным в панель управления принтером. Например, у Kyocera Ecosys P2135D нужно сосчитать количество миганий индикаторов красного цвета и таким образом определить число, указывающее на ту или иную ошибку. В свою очередь, у модели Kyocera FS-1040 все зависит от темпа мигания светодиода с надписью «Внимание!» («Attention!»):
- Мигает медленно – указывает на отсутствие бумаги в лотке или тонера в картридже.
- Мигает быстро – оповещает о проблеме с памятью устройства, переполненном лотке или замятии бумаги, а также об использовании неоригинальных расходных материалов.
- Горит постоянно – говорит о проблемах с картриджем или фотобарабаном либо указывает на открытые крышки принтера.

Чтобы потребитель мог наверняка определить проблему, рекомендуем использовать утилиту Kyocera Client Tool, которая идет в комплекте с драйверами принтера.
Ваше Имя:
Ваш вопрос:
Внимание: HTML не поддерживается! Используйте обычный текст.
Оценка:
Плохо
Хорошо
Введите код, указанный на картинке:
