
Обработка исключений
В JavaScript есть класс Error, который можно использовать для исключений. Вы выбрасываете ошибку с ключевым словом throw. Вы можете отловить её с помощью блоков try / catch, например:
|
Подтипы ошибок
Помимо встроенного класса Error, существует несколько дополнительных встроенных классов ошибок, которые наследуются от Error, которые может генерировать среда выполнения JavaScript:
RangeError
Создается экземпляр ошибки, которая возникает, когда числовая переменная или параметр выходит за пределы допустимого диапазона.
|
ReferenceError
Создается экземпляр ошибки, которая возникает при разыменовании недействительной ссылки. Например:
|
SyntaxError
Создается экземпляр ошибки, возникающей при синтаксическом анализе кода, который не является допустимым в JavaScript.
|
TypeError
Создается экземпляр ошибки, которая возникает, когда переменная или параметр имеет недопустимый тип.
|
URIError
Создается экземпляр ошибки, которая возникает, когда в encodeURI() или decodeURI() передаются недопустимые параметры.
|
Всегда используйте Error
Начинающие разработчики JavaScript иногда просто бросают необработанные строки, например.
|
Не делайте так. Основное преимущество объектов Error состоит в том, что автоматически отслеживается где они были созданы и произошли с помощью свойства stack.
Необработанные строки приводят к очень болезненной отладке и затрудняют анализ ошибок из логов.
Вам не нужно выбрасывать ошибку
Это нормально передавать объект Error. Это общепринятый код в Node.js колбэк стиле, который принимает колбэк первым параметром как объект ошибки.
|
Исключительные случаи
Исключения должны быть исключительными — это частая поговорка в компьютерных науках. Это одинаково справедливо и для JavaScript (и для TypeScript) по нескольким причинам.
Неясно откуда брошено исключение
Рассмотрим следующий фрагмент кода:
|
Следующий разработчик не знает, какая функция может вызвать ошибку. Человек, просматривающий код, не может знать об этом, не прочитав код для task1 / task2 и других функций, которые они могут вызвать внутри себя и т.д.
Делает поэтапную обработку сложной
Вы можете попытаться сделать обработку поэтапной с помощью явного отлова вокруг каждого места, которое может бросить ошибку:
|
Но теперь, если вам нужно передать что-то из первой задачи во вторую, код становится грязным: (обратите внимание на мутацию foo, требующую let + явную необходимость описывать ее, потому что это не может быть логически выведено от возврата runTask1):
1 2 3 4 5 6 7 8 9 10 11 12 |
|
Не очень хорошо отражено в системе типов
Рассмотрим функцию:
|
Использование Error для таких случаев — плохая идея, так как ошибка не отражена в определении типа для проверки функции (value:number) => void. Вместо этого лучший способ создать метод проверки:
|
И теперь это отражено в системе типов.
Если вы не хотите обрабатывать ошибку очень общим (простым / универсальным и т.д.) способом, не бросайте ошибку.
Обработке ошибок в Type/JavaScript обычно не уделяется должного внимания. Между тем, для долговечности любого проекта очень важно выявлять и регистрировать ошибки.

Начав чаще программировать на TypeScript, я понял, что слишком мало занимаюсь обработкой ошибок. Часто сталкивался с такой проблемой:
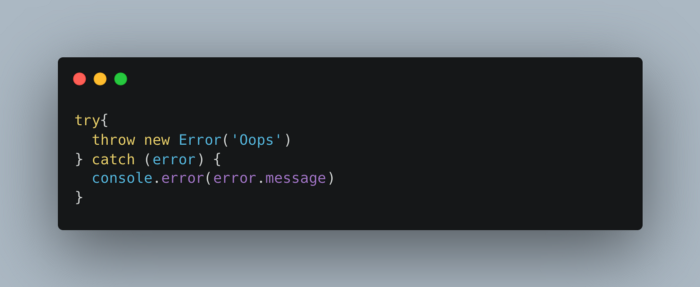
Поскольку error имеет тип unknown, нельзя выполнить какие-либо действия с error, если не привести его к новому типу или не сузить тип. Правильное решение — сузить тип. Посмотрим, как это сделать, и выясним, зачем это нужно.
В JavaScript практически все можно обработать оператором throw:
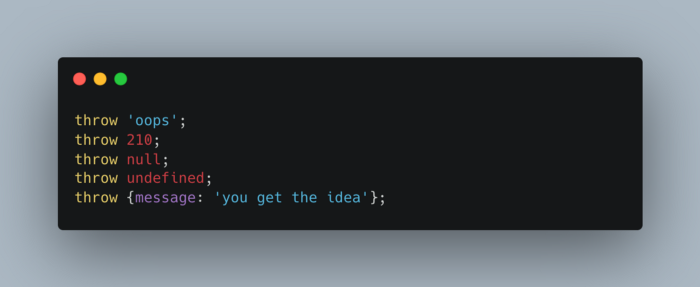
Таким образом, перехватываемая ошибка (error) действительно является неопределенной (unknown).
Тем не менее есть способы чистой обработки ошибок в TypeScript. За долгие годы работы я создал шаблон, который предпочитаю использовать для этих целей.
Основные типы ошибок в JavaScript
Среди множества ошибок в JavaScript наиболее распространенными являются следующие.
ReferenceError— код ссылается на несуществующую переменную.TypeError— значение не соответствует ожидаемому типу.SyntaxError— синтаксически неверный код.
Генерация ошибок с помощью оператора throw
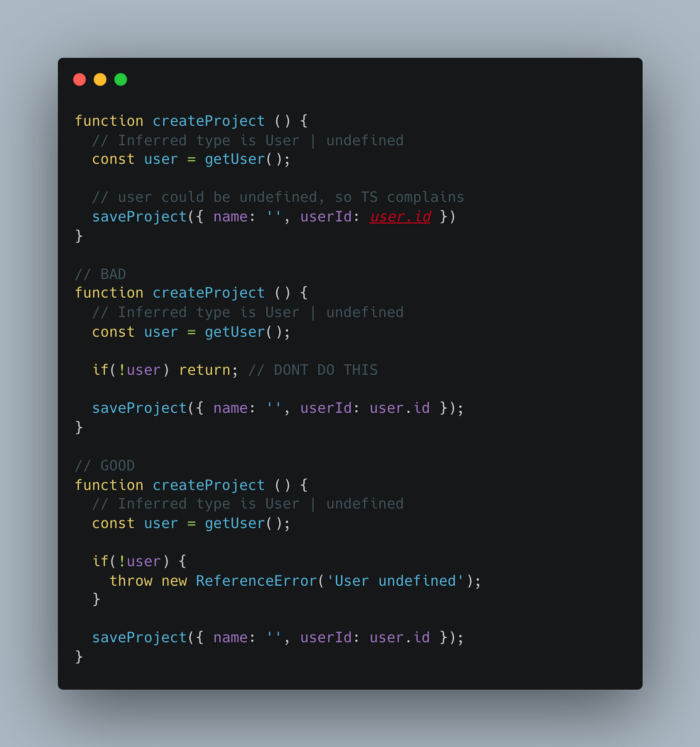
Бывают случаи, когда ошибку нужно сгенерировать вручную. Например, когда код зависит от значения, возвращаемого при вызове функции, но есть вероятность того, что значение будет undefined, или TypeScript будет считать его таковым. В данном примере генерация ошибки — лучшее решение для сужения возвращаемого user.
Перехват ошибок с помощью оператора catch
Сгенерированная ошибка всплывает в стеке вызовов до тех пор, пока не будет перехвачена в конструкции try/catch. Как только код, выполняемый внутри блока try, генерирует ошибку, она будет “поймана” в блоке catch. Ошибка может исходить от функции, вложенной внутрь функции, и будет всплывать до тех пор, пока не будет перехвачена.
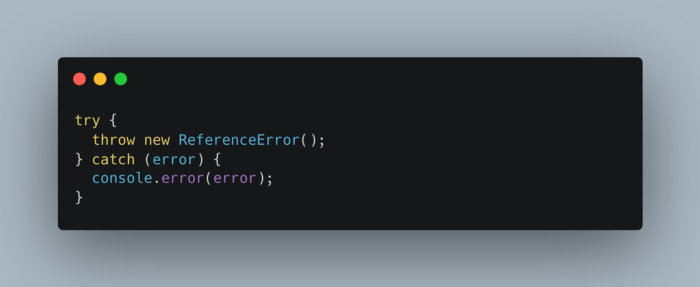
Сужение типа ошибки
После перехвата сгенерированной ошибки полезно проверить ее тип. Это позволяет сузить тип от unknown до определенного типа, с которым можно взаимодействовать. Выполним это с помощью instanceof.
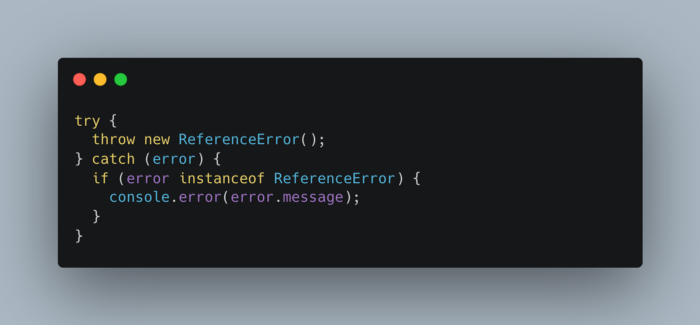
Шаблон проектирования
В своем последнем проекте я сгруппировал код по доменам в каталогах с названием Features. Суть заключается в том, что каталог Feature содержит код для конкретного домена. Он может включать в себя связанные компоненты, хуки, типы, ошибки и многое другое.
В этой статье нас интересуют ошибки. Каждый каталог Feature содержит файл errors.ts, в котором я определяю пользовательский класс ошибок для соответствующего домена.
Создание пользовательского типа ошибки
В файле errors.ts я экспортирую class. Я поддерживаю тип union для потенциальных имен, что позволяет использовать автодополнение ввода и увеличивает степень безопасности типов. Класс расширяет объект Error, что позволяет добавлять отслеживание стека (для большинства JS-сред выполнения).
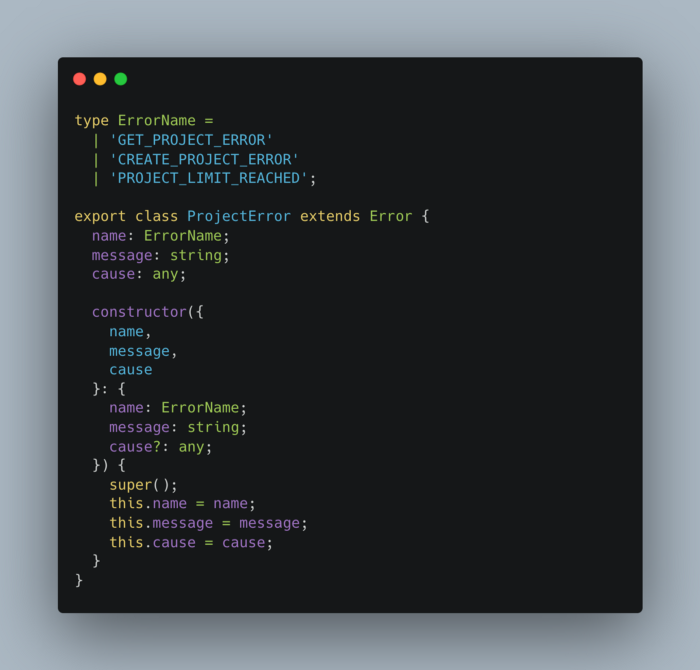
Генерирование пользовательской ошибки
При инстанцировании новой ошибки значение имени, поддерживаемое системой автодополнения ввода, должно быть одним из имен, определенных в типе union.
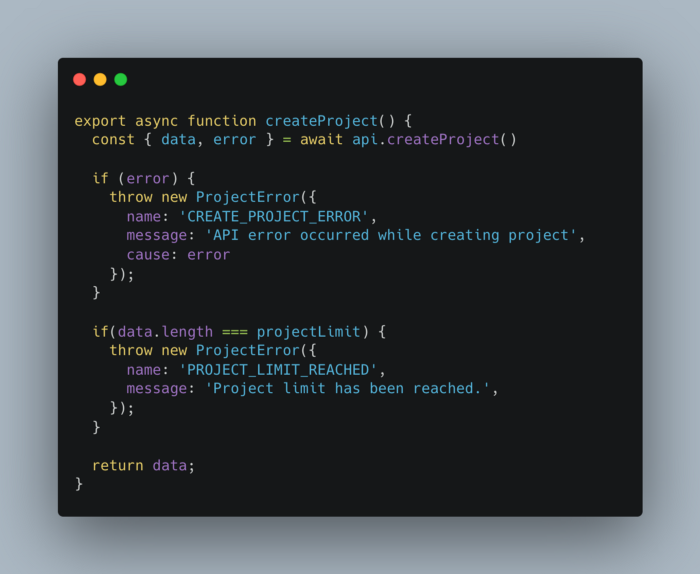
Перехват пользовательской ошибки
Тип перехваченной ошибки можно сузить с помощью instanceof. После сужения error.name дает возможность автодополнения ввода. В этот момент можно выполнить логические действия, основанные на имени сгенерированной ошибки.
В данном примере PROJECT_LIMIT_REACHED — это ошибка, и ее нужно показать пользователю, предоставив сообщение, которое должно быть отображено специально для него.
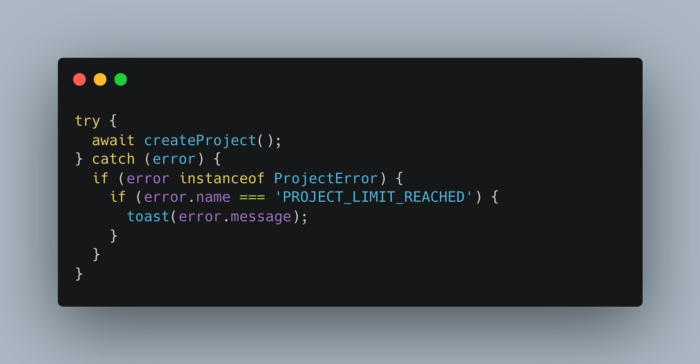
Создание многократно используемой базы ошибок
При наличии большого количества файлов errors.ts стоит убедиться, что код соответствует основному принципу разработки Don’t Repeat Yourself (“не повторяйся”). Единственный динамический код в классе — это тип имен union. Поэтому я создаю класс ErrorBase, который принимает generic, используемый в качестве типа имени.
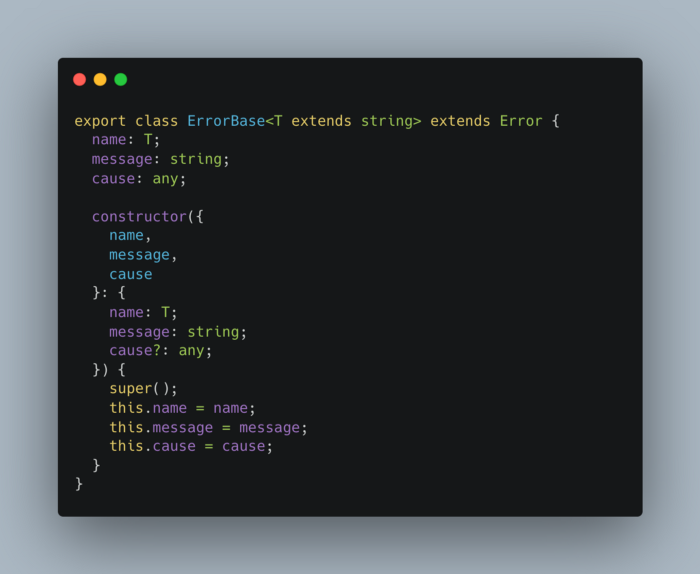
Теперь, создав новый пользовательский класс ошибок, я могу расширить эту базу, задав ей тип доступных имен union.
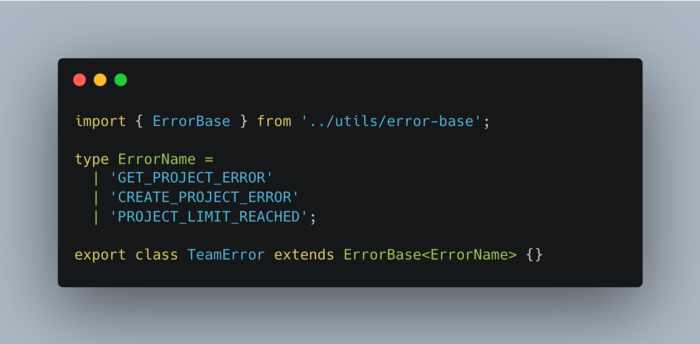
Заключение
Благодаря этому шаблону проектирования мой код стало намного проще поддерживать. Но не стоит забывать, что обработка ошибок — это только часть хорошо поддерживаемого приложения. Не менее важным шагом является логирование ошибок.
Читайте также:
- Почему лучше использовать const, а не let в TypeScript
- 7 правил ESLint, рекомендуемых для проектов TypeScript/React
- TypeScript: продвинутые типы и их скрытые возможности
Читайте нас в Telegram, VK и Дзен
Перевод статьи Kolby Sisk: Handling errors like a pro in TypeScript
In TypeScript, just like in JavaScript, the try catch statement is used to handle errors in your code. It consists of three statements:
- The try statement that defines the code to try (or run).
- The catch statement that defines the code that handles the errors.
- The optional finally statement that defines the code that runs at the end either way.
Here is an example of the try catch finally statements in action.
typescripttry {
    functionThatThrowsError();
} catch (e: any){
    console.log(e);
} finally {
    console.log('finally');
}
In this article, I will go over, in detail, about how does the try catch statement work, answer common questions, as well provide TypeScript specific examples.
Let’s get to it 😎.
Page content
- The definition
- How to catch a specific error?
- How to use try catch with async/await?
- What are some best practices?
- Final thoughts
The definition
A try catch statement handles errors in a specific code block.
It consists of two mandatory statements, try and catch, and it follows this flow.
- The code inside the try statement runs.
- If the try statement throws a runtime error, the code block inside the catch statement executes.
Here is the basic syntax for a try catch statement.
typescripttry {
    // code to try
} catch {
    // code that handles the error
}
As you can see, the catch parameter is optional.
This syntax, called optional catch binding, may require a polyfill for older browsers.
Alternatively, you can set up a catch parameter, if you need one.
typescripttry {
    // code to try
} catch (e: any) {
    // code that handles the error
    console.log(e.name);
    console.log(e.message);
}
In TypeScript, a catch parameter can only be of type any or unknown.
An Error object has two properties that you can use (message and name).
There are two important things to know about the try catch statement:
- It only works for runtime errors, this means that it will not work for syntax errors.
- It only works for synchronous code.
You can put almost any code statements that you want inside the try block… For loop, switch statement, while, etc…
The finally statement
The finally statement ALWAYS runs regardless after a try catch statement.
The code inside the finally statement will even run if the catch statement throws an error or returns.
typescripttry {
    // code to try
} catch (e: any) {
    // code that handles the error
} finally {
    // code that will run regardless
}
The throw statement
The throw statement allows the developer to create custom errors that you can throw in your code.
Here is an example of this.
typescripttry {
    throw Error('This is an error');
} catch (e: any) {
    console.log('error');
    console.log(e.message);
} finally {
    console.log('finally');
}

// outputs: 'error'
// outputs: 'This is an error'
// outputs: 'finally'
How to catch a specific error?
You can catch a specific error inside a catch statement by using the instanceof operator.
typescripttry {
    // Code
} catch (e: any) {
    if (e instanceof YourException){
        // code that runs for this exception.
    } else if (e instanceof YourException2){
        // code that runs for this exception.
    }
}
As you can see, we are executing different parts of the code based on the error that we get.
How to use try catch with async/await?
The try catch will catch all errors inside an async function. We just need to be sure to await the function.
Here is an example of an async function inside a try catch statement.
typescripttry {
    await createUser({
        name: 'Tim Mousk'
    });
} catch (e: any) {
    // handles the error
    console.log(e);
}
Alternatively, you can use the promise catch built-in method.
typescriptawait createUser({
    name: 'Tim Mousk'
}).catch((e: any) => {
    // handles the error
    console.log(e);
});
What are some best practices?
- Throw your own custom errors, this will help you with development and debugging.
- For large applications, you need to implement remote exception logging with window.onerror. This will help you debug your application.
- Don’t use browser non-standard methods.
Final thoughts
As you can see, understanding the try catch statement is no rocket science.
It is actually quite easy to master.
You have three statements, try, catch, and finally, that do exactly the action in their name. The finally statement is optional. Also, you can throw an Error, with the throw statement.
That’s it… That’s the big picture.
When it comes to, the try catch statement, the only difference between JavaScript and TypeScript is that with TypeScript you can specify the type of the catch clause parameter.
I hope you enjoyed reading through this article, please share it with your fellow developers.
Don’t hesitate to ask questions, I always respond.

written by:
Hello! I am Tim Mouskhelichvili, a Freelance Developer & Consultant from Montreal, Canada.
I specialize in React, Node.js & TypeScript application development.
If you need help on a project, please reach out, and let’s work together.
Overview
TypeScript is described by Microsoft as a superset of JavaScript. What do I mean when I say this?
Every valid JavaScript code is likewise a valid TypeScript code. TypeScript can accomplish more than its predecessor, but it cannot do less. Otherwise, project migration would be far more complex, and developer acceptance would be significantly lower.
Scope
- Introduction to Try Catch Blocks in Typescript and their Syntax
- Then we will learn about the Need to try/catch blocks
- And our main focus will be on how to catch a specific error?
- Lastly, we will see How to use try catch with async/await?
Introduction
Many JavaScript topics are covered by TypeScript. Also, the dubious ones. Some error-handling scenarios are rather intriguing, but this article will help you navigate through the jungle of typescript to try to catch!
As a result, they also took the terrible ones. Such as exception handling. When broken down, the error handling is quite similar to that of C#.
The throw keyword is used to raise an exception. And when you correctly guess this one, you will also correctly predict the next : try and catch are used to manage them. As a result, whether the exception is a default or a user-defined one is not important.
There is no need for a catch here because try-finally is sufficient. Finally, it ensures that any unnecessary memory allocations are erased. However, this is not a new phenomenon. It has been in existence for many years.
The Try Catch Blocks in Typescript allows you to manage any or all of the mistakes that may occur in your application. These mistakes are sometimes referred to as exceptions.
A try-catch statement has a try block containing statements that may throw an exception. Then you write a catch block that contains the statements that are executed when any statement in the try block throws an exception.
If an exception is thrown within a try block, the catch block will capture it. Otherwise, the exception is forwarded to the function that is called it. This exception sending continues until the exception is caught or the application terminates with a runtime error.
Syntax
Following is the general syntax for Try Catch Blocks in Typescript :
Let’s look at the images below to show how many Try Catch Blocks in Typescript may be made, as well as the better version instead of too many Try Catch Blocks in Typescript.
Example — 1 :
In this example, we will use numerous Try Catch Blocks in Typescript to capture various errors from separate functions that each generate a distinct error, and then we will attempt to print those error messages one after the other.
Output :
In the above example, the insertion of several Try Catch Blocks in Typescript makes the code appear larger and reduces readability to some extent, which no user wants.
In another example, we will try to grasp the alternative approach to capture many functions’ thrown errors without using multiple Try Catch Blocks in Typescript, such as examining the alternative way out to decrease the overhead of several Try Catch Blocks in Typescript.
We’ll use the callback function notion here (when a function is passed inside of another function as an argument, which is further executed after the completion of the first function is the main function itself). We will use a callback function to capture the errors thrown by each method inside the try block, which will be declared inside a Wrapper Function (also known as a helper function) that will catch all errors thrown by all functions one after the other.
Example — 2 :
In this example, we will utilize the callback function in conjunction with Try Catch Blocks in Typescript to handle the thrown exception.
Output :
The Definition
The keywords ‘try’ and ‘catch’ indicate the management of exceptions caused by data or code problems during program execution. A try block is a section of code where exceptions occur. Exceptions from try blocks are caught and handled by a catch block.
Try to describe a set of particular statements that may result in an exception. A catch block captures a certain sort of exception when it will occur. If an exception is not handled by try/catch blocks, it escalates across the call stack until it is caught or the compiler prints an error message.
The try-catch statement combines the try-block with the catch-block or finally-block or both. The try-block will be run first, followed by the catch-block if an exception is thrown. Before ending the control flow of the entire code, the last block is always executed.
Now let’s see the need for typescript try catch.
The Need of Try Catch Blocks in Typescript
The following can be some of the reasons behind the existence of Try Catch Blocks in typescript.
- To put it simply, try/catch blocks are required to catch all failures/ errors returned by various methods.
- Catching those issues enhances our code’s efficiency and, as a result, readability.
- To capture numerous failures from several functions one after the other, multiple try/catch blocks are necessary.
The Try Catch is the best way to handle errors nowadays because The try…catch statement consists of a try block and either a catch, a finally, or both blocks. The try block code is evaluated first, and if it throws an exception, the catch block code is executed. Before the control flow exits the entire construct, the code in the finally block is always executed. For a better understanding see the following syntax :
Syntax
- try_Statements :
The statements that will be carried out. - catch_Statements :
If an exception is thrown in the try-block, this statement gets executed. - exception_Variable :
An optional identification for the captured exception in the catch block. If the catch block does not use the exception’s value, omit the exception_Variable and its parentheses, as catch… - finally_Statements :
Statements performed before the control flow leaves the try…catch…finally construct. These statements are executed whether an exception was thrown or caught.
The try phrase is always preceded by a try block. Then there must be a catch block or a finally block. It is also possible to have both a catch and then a block. This provides us with three different ways to express the try statement :
- try…catch
- try…finally
- try…catch…finally
In contrast to other constructions like if and for, the try, catch, and finally blocks must be blocks rather than single words.
Now let’s see Finally statement in typescript and try to catch it.
The Finally Statement
The finally block contains statements that will be executed after the try and catch blocks, but before the statements that follow the try…catch…finally block. Control flow will always enter the finally block, where it can go one of two ways :
- Immediately before the try block, regular execution is completed (no exceptions are thrown).
- Immediately before the catch block completes regular execution.
- The try or catch block is run immediately before a control-flow statement (return, throw, break, or continue).
Though an exception is thrown from the try block, even if there is no catch block to handle it, the finally block still executes, and the exception is fired immediately after the finally block completes.
The finally-block is demonstrated in the following example. The code opens a file and then runs statements that use it; the finally-block ensures that the file is always closed after use, even if an exception is thrown.
Control flow statements in the finally block (return, throw, break, continue) will ‘mask’ any completion value of the try or catch blocks. In this example, the try block attempts to return 1, but before doing so, the control flow is passed to the finally block, which returns the finally block’s return value instead.
Output :
Control flow statements in the finally block are generally not a good idea. Use it only for the cleanup code.
We just saw finally statement noe let’s see throw the statement in typescript and try catch
The Throw Statement
The typescript type system is useful in most situations, however, it cannot be used when dealing with exceptions.
As an example :
The issue here is twofold (without looking at the code) :
- There is no way to determine if this function will throw an error when used.
- It is unclear what type(s) of errors will occur.
- In many cases, this isn’t an issue, but knowing if a function/method may throw an exception can be quite beneficial in a variety of situations, especially when working with multiple libraries.
The type system can be used for exception management by providing (optional) verified exceptions.
I understand that checked exceptions are not universally accepted, but by making it optional (and perhaps inferred? more later), it just offers the ability to add more information about the code that might benefit developers, tools, and documentation.
It will also enable more effective use of meaningful custom mistakes in large, complex applications. Because all javascript runtime faults are of the type Error (or extending types like TypeError), the real type for a function is always type | Error.
The syntax is simple, a function definition can conclude with a throws clause followed by a type :
The syntax for catching exceptions is the same, with the addition of the ability to define the type(s) of error :
Examples :
It’s evident here that the function can throw an error and that the error will be a string, so when this method is called, the developer (and the compiler/IDE) is aware of it and can handle it better.
So :
It compiles without problems, however
Compilation fails because a number is not a string.
You did great work so far now let’s begin with catching errors in typescript try catch
How to Catch a Specific Error ?
No matter how good we are at programming, our scripts may occasionally include mistakes. They can arise as a result of our faults, unanticipated user input, an incorrect server response, or any number of other factors.
In most cases, a script ‘dies’ (immediately stops) when an error occurs, reporting it to the console.
However, there is a grammar construct try…catch that allows us to ‘catch’ failures so that the script may do something more logical instead of dying.
Working :
- The code in try… is the first run.
- If there were no errors, catch (err) is ignored: the execution proceeds to the conclusion of try and skips catch.
- If an error occurs, the try execution is terminated, and control is transferred to the beginning of the catch (err). The err variable (we can call it whatever we want) will hold an error object with information about what happened.
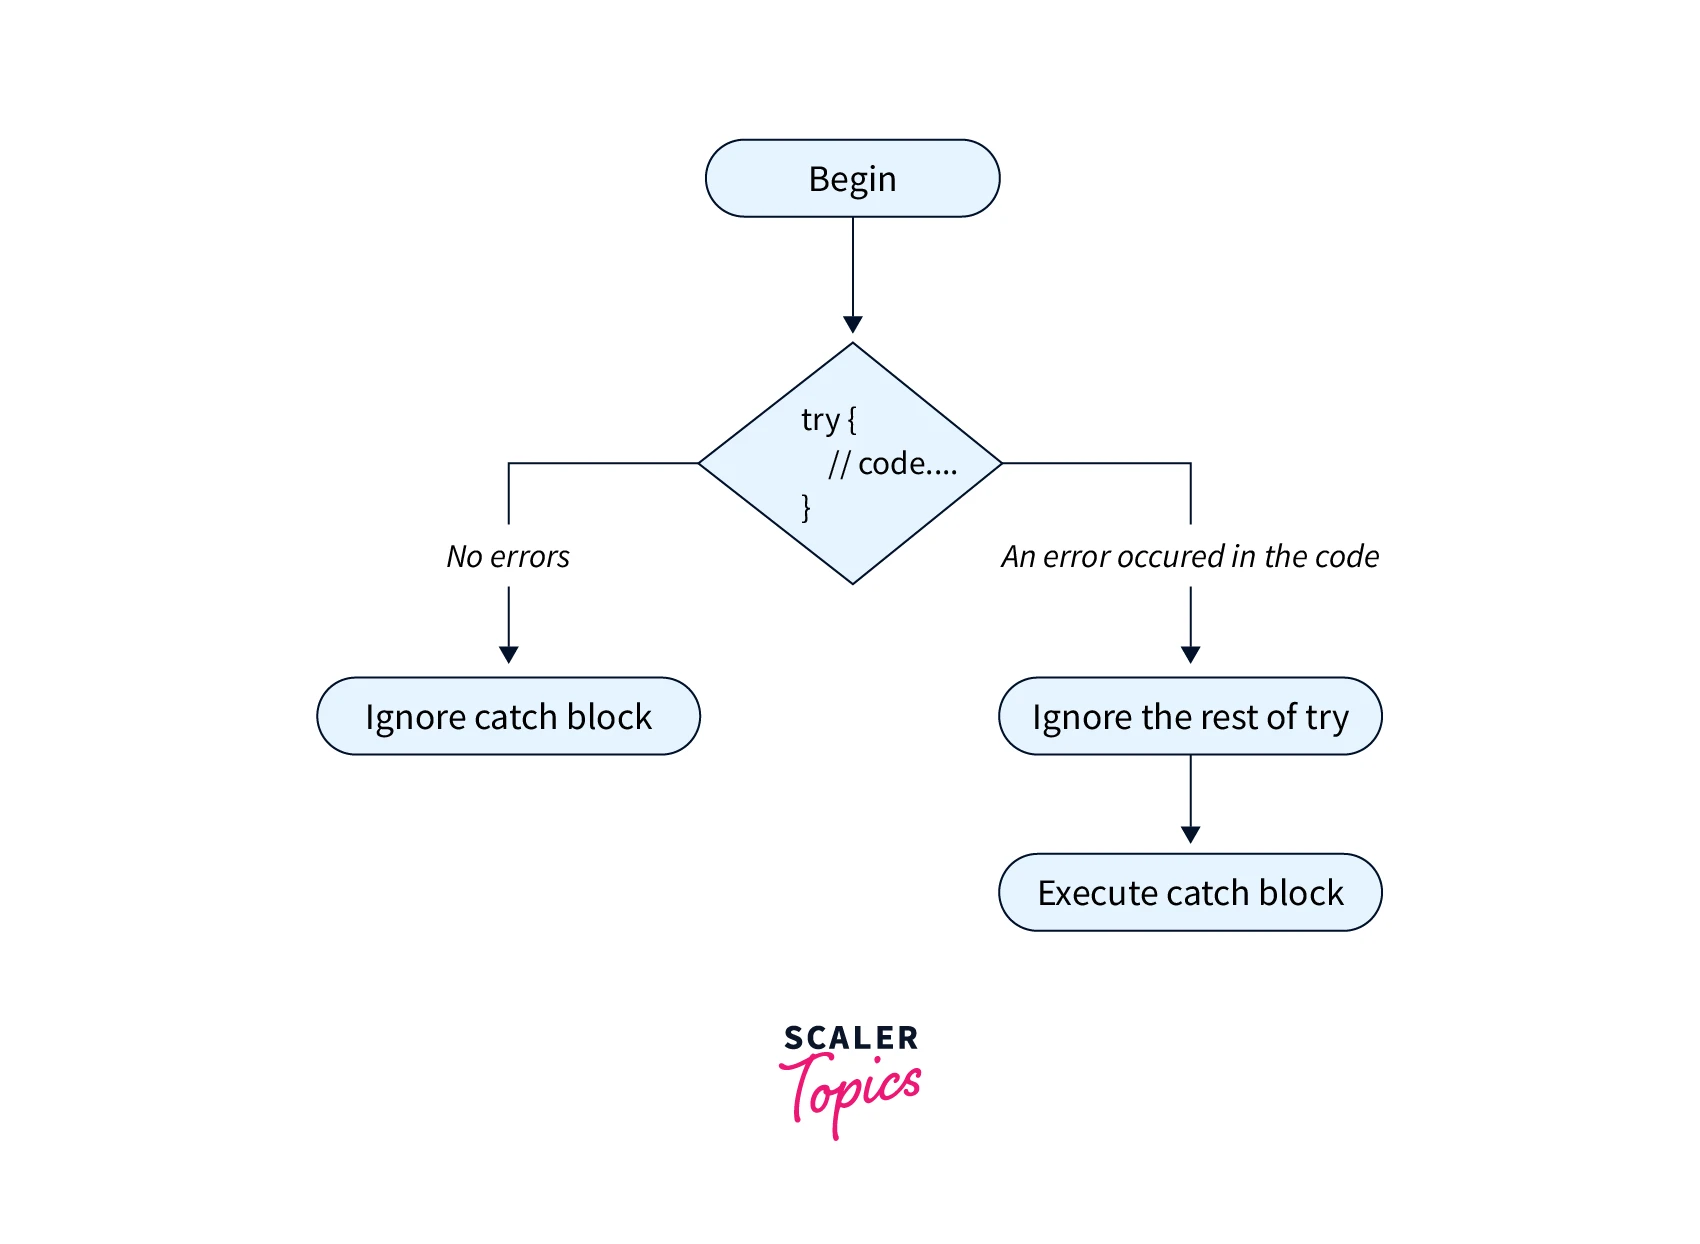
So, an error inside the try{…} block does not terminate the script; we may address it in the catch.
Some points to keep in mind :
-
try…catch is mainly useful for runtime errors.
The code must be runnable for try…catch to work. To put it another way, it should be valid JavaScript.It will not operate if the code is syntactically incorrect, such as having mismatched curly braces :
The JavaScript engine examines the code before running it. Parse-time errors are unrecoverable mistakes that occur during the reading process (from inside that code). This is due to the engine’s inability to comprehend the code.
As a result, try…catch can only handle mistakes in valid code. Such mistakes are sometimes known as ‘runtime errors’ or ‘exceptions’.
-
try…catch works instantaneously.
If an exception occurs in ‘scheduled’ code, such as setTimeout, try…catch will not catch it :This is because the function is called after the engine has exited the try…catch construct.
To catch an exception within a scheduled function, try…catch must be present :
How to Use Try Catch with Async/Await ?
Consider the following thought experiment : a method to instruct the JavaScript runtime to halt code execution on the await keyword when used on a promise and continue only once (and if) the promise returned by the function is settled :
When the promise settles, execution proceeds,
- if the promise was completed, await returns of the value.
- if the promise was not completed, an error is thrown synchronously that we may catch.
This miraculously (and unexpectedly) makes asynchronous programming as simple as synchronous programming. This thinking experiment requires three items :
- Function execution can be paused.
- The ability to insert a value inside the function.
- The ability to throw an exception within a function.
This is precisely what generators enabled us to achieve! The thought experiment is real, as is the TypeScript / JavaScript async/await implementation.
Generated JavaScript
You don’t have to comprehend this, but if you’ve read up on generators, it’s very straightforward. The function foo is easily encapsulated as follows :
where ReturnPromise simply calls the generator function to obtain the generator and then uses the generator. If the value is a promise, next() will then+catch the promise and, depending on the result, will call generator.next(result) or generator.throw(error). That’s all!
Async Await Support in typescript
TypeScript has supported Async — Await since version 1.7. Asynchronous functions are prefixed with the async keyword, await suspends execution until an asynchronous function return promise is fulfilled and unwraps the value delivered by the Promise. Only target es6 transpiling directly to ES6 generators was supported.
TypeScript 2.1 introduced the feature to the ES3 and ES5 run-times, so you can use it regardless of the context you’re in. It’s worth noting that we can utilize async / await with TypeScript 2.1, and that many browsers are supported, having globally introduced a Promise polyfill.
Let’s look at this example and this code to see how TypeScript async / await syntax works :
Output :
Conclusion
- Most of the time, the unexpected can happen, and TypeScript does an excellent job of requiring you to deal with those unusual instances… And you’ll probably discover that they aren’t as unlikely as you believe.
- Handling errors in Javascript and Typescript is simple and prevents your application from crashing.
- When utilizing the finally block, the specific handling of returning results in the try and catch blocks are useful to know, but it should not be misused to avoid writing your code in an anti-pattern approach.
- If possible, avoid using toss.
- Your API’s users are not required to catch (the compiler does not enforce it). This implies you’ll ultimately encounter a runtime error… It’s only a matter of time.
- Throw compels you to keep documents that will soon become stale.
- The try…catch construct helps handle runtime issues.
- Because there may be no catch section or finally, simpler structures such as try…catch and try…finally are also acceptable.
- Even if try…catch is not available, most environments enable us to configure a ‘global’ error handler to capture failures that ‘fall out’. That’s a window in-browser. onerror.
Время на прочтение
9 мин
Количество просмотров 8.9K
Заключительная часть статей, посвященных тому, как можно использовать принципы чистого кода в TypeScript(ps. Все эти принципы относятся не только к языку TypeScript).

Тестирование
Тестирование важнее деплоя. Если у вас нет тестов или их мало, то каждый раз при выкладке кода на боевые сервера у вас не будет уверенности, что ничего не сломается. Решение о достаточном количестве тестов остается на совести вашей команды, но 100% покрытие тестами всех выражений и ветвлений обеспечивает высокое доверие к вашему коду и спокойствие всех разработчиков. Из этого следует, что в дополнение к отличному фреймворку для тестирования, необходимо также использовать хороший инструмент покрытия.
Нет никакого оправдания, чтобы не писать тесты. Есть много хороших фреймворков для тестирования на JS с поддержкой типов для TypeScript, так что вы найдите тот который понравится вашей команде. Когда вы найдете тот, который работает для вашей команды, тогда стремитесь всегда писать тесты для каждой новой фичи/модуля, которую вы пишете. Если вы предпочитаете метод тест-ориентированной разработки (TDD), это замечательно, но главное — просто убедиться, что вы достигли своих целей покрытия, прежде чем запускать какую-либо функцию или реорганизовать существующую.
Три закона TDD
- Новый рабочий код пишется только после того, как будет написан модульный тест, который не проходит.
- Вы пишете ровно такой объем кода модульного теста, какой необходим для того, чтобы этот тест не проходил (если код теста не компилируется, считается, что он не проходит).
- Вы пишете ровно такой объем рабочего кода, какой необходим для прохождения модульного теста, который в данный момент не проходит.
Правила F.I.R.S.T.
Чистые тесты должны следовать правилам:
- Быстрота(Fast) Тесты должны выполняться быстро. Все мы знаем, что разработчики люди, а люди ленивы, поскольку эти выражения являются “транзитивными”, то можно сделать вывод, что люди тоже ленивы. А ленивый человек не захочет запускать тесты при каждом изменении кода, если они будут долго выполняться.
- Независимость(Independent) Тесты не должны зависеть друг от друга. Они должны обеспечивать одинаковые выходные данные независимо от того, выполняются ли они независимо или все вместе в любом порядке.
- Повторяемость(Repeatable) Тесты должны выполняться в любой среде, и не должно быть никаких оправданий тому, почему они провалились.
- Очевидность(Self-Validating) Тест должен отвечать либо Passed, либо Failed. Вам не нужно сравнивать файлы логов, для чтобы ответить, что тест пройден.
- Своевременность(Timely) Юнит тесты должны быть написаны перед производственным кодом. Если вы пишете тесты после производственного кода, то вам может показаться, что писать тесты слишком сложно.
Один кейс на тест
Тесты также должны соответствовать Принципу единой ответственности(SPP). Делайте только одно утверждение за единицу теста.(ps. не пренебрегайте этим правилом)
import { assert } from 'chai';

describe('AwesomeDate', () => {
  it('handles date boundaries', () => {
    let date: AwesomeDate;

    date = new AwesomeDate('1/1/2015');
    assert.equal('1/31/2015', date.addDays(30));

    date = new AwesomeDate('2/1/2016');
    assert.equal('2/29/2016', date.addDays(28));

    date = new AwesomeDate('2/1/2015');
    assert.equal('3/1/2015', date.addDays(28));
  });
});
Хорошо:
import { assert } from 'chai';

describe('AwesomeDate', () => {
  it('handles 30-day months', () => {
    const date = new AwesomeDate('1/1/2015');
    assert.equal('1/31/2015', date.addDays(30));
  });

  it('handles leap year', () => {
    const date = new AwesomeDate('2/1/2016');
    assert.equal('2/29/2016', date.addDays(28));
  });

  it('handles non-leap year', () => {
    const date = new AwesomeDate('2/1/2015');
    assert.equal('3/1/2015', date.addDays(28));
  });
});
Асинхронность
Используйте promises а не callbacks
Callback-функции ухудшают читаемость и приводят к чрезмерному количеству вложенности (ад обратных вызовов(callback hell)). Существуют утилиты, которые преобразуют существующие функции, используя стиль callback-ов, в версию, которая возвращает промисы (для Node.js смотрите util.promisify, для общего назначения смотрите pify, es6-promisify)
Плохо:
import { get } from 'request';
import { writeFile } from 'fs';

function downloadPage(url: string, saveTo: string, callback: (error: Error, content?: string) => void) {
  get(url, (error, response) => {
    if (error) {
      callback(error);
    } else {
      writeFile(saveTo, response.body, (error) => {
        if (error) {
          callback(error);
        } else {
          callback(null, response.body);
        }
      });
    }
  });
}

downloadPage('https://en.wikipedia.org/wiki/Robert_Cecil_Martin', 'article.html', (error, content) => {
  if (error) {
    console.error(error);
  } else {
    console.log(content);
  }
});
Хорошо:
import { get } from 'request';
import { writeFile } from 'fs';
import { promisify } from 'util';

const write = promisify(writeFile);

function downloadPage(url: string, saveTo: string): Promise<string> {
  return get(url)
    .then(response => write(saveTo, response));
}

downloadPage('https://en.wikipedia.org/wiki/Robert_Cecil_Martin', 'article.html')
  .then(content => console.log(content))
  .catch(error => console.error(error));
Промисы поддерживают несколько вспомогательных методов, которые помогают сделать код более понятным:
Promise.all особенно полезен, когда есть необходимость запускать задачи параллельно. Promise.race облегчает реализацию таких вещей, как тайм-ауты для промисов.
Обработка ошибок
Бросать ошибки — хорошее решение! Это означает, что во время выполнения вы будете знать, если что-то пошло не так, вы сможете остановить выполнение вашего приложения убив процесс (в Node) в нужный момент и увидеть место ошибки с помощью стек трейса в консоли.
Всегда используйте ошибки для отклонений(reject)
JavaScript и TypeScript позволяют вам делать throw любым объектом. Промис также может быть отклонен с любым объектом причины. Рекомендуется использовать синтаксис throw с типом Error. Это потому что ваша ошибка может быть поймана в более высоком уровне кода с синтаксисом catch. Было бы очень странно поймать там строковое сообщение и сделать отладку более болезненной. По той же причине вы должны отклонять промисы с типами Error.
Плохо:
function calculateTotal(items: Item[]): number {
  throw 'Not implemented.';
}

function get(): Promise<Item[]> {
  return Promise.reject('Not implemented.');
}
Хорошо:
function calculateTotal(items: Item[]): number {
  throw new Error('Not implemented.');
}

function get(): Promise<Item[]> {
  return Promise.reject(new Error('Not implemented.'));
}

// or equivalent to:

async function get(): Promise<Item[]> {
  throw new Error('Not implemented.');
}
Преимущество использования типов Error заключается в том, что они поддерживается синтаксисом try/catch/finally и неявно всеми ошибками и имеют свойство stack, которое является очень мощным для отладки. Есть и другие альтернативы: не использовать синтаксис throw и вместо этого всегда возвращать пользовательские объекты ошибок. TypeScript делает это еще проще.
Рассмотрим следующий пример:
type Result<R> = { isError: false, value: R };
type Failure<E> = { isError: true, error: E };
type Failable<R, E> = Result<R> | Failure<E>;

function calculateTotal(items: Item[]): Failable<number, 'empty'> {
  if (items.length === 0) {
    return { isError: true, error: 'empty' };
  }

  // ...
  return { isError: false, value: 42 };
}
Для подробного объяснения этой идеи обратитесь к оригинальному посту.
Не игнорируйте отловленные ошибки
Игнорирование пойманной ошибки не дает вам возможности исправить или каким-либо образом отреагировать на ее появление. Логирование ошибок в консоль (console.log) не намного лучше, так как зачастую оно может потеряться в море консольных записей. Оборачивание куска кода в try/catch означает, что вы предполагаете возможность появления ошибки и имеете на этот случай четкий план.
Плохо:
try {
  functionThatMightThrow();
} catch (error) {
  console.log(error);
}

// or even worse

try {
  functionThatMightThrow();
} catch (error) {
  // ignore error
}
Хорошо:
import { logger } from './logging'

try {
  functionThatMightThrow();
} catch (error) {
  logger.log(error);
}
Не игнорируйте ошибки, возникшие в промисах
Вы не должны игнорировать ошибки в промисах по той же причине, что и в try/catch.
Плохо:
getUser()
  .then((user: User) => {
    return sendEmail(user.email, 'Welcome!');
  })
  .catch((error) => {
    console.log(error);
  });
Хорошо:
import { logger } from './logging'

getUser()
  .then((user: User) => {
    return sendEmail(user.email, 'Welcome!');
  })
  .catch((error) => {
    logger.log(error);
  });

// or using the async/await syntax:

try {
  const user = await getUser();
  await sendEmail(user.email, 'Welcome!');
} catch (error) {
  logger.log(error);
}
Форматирование
Форматирование носит субъективный характер. Как и во многом собранном здесь, в вопросе форматирования нет жестких правил, которым вы обязаны следовать. Главное — НЕ СПОРИТЬ по поводу форматирования. Есть множество инструментов для автоматизации этого. Используйте один! Это трата времени и денег когда инженеры спорят о форматировании. Общее правило, которому стоит следовать соблюдайте правила форматирования принятые в команде
Для TypeScript есть мощный инструмент под названием TSLint. Это статический анализ инструмент, который может помочь вам значительно улучшить читаемость и поддерживаемость вашего кода. Но лучще используйте ESLint, так как TSLint больше не поддерживается.
Есть готовые к использованию конфигурации TSLint и ESLint, на которые вы можете ссылаться в своих проектах:
-
TSLint Config Standard — стандартный набор правил
-
TSLint Config Airbnb — правила от Airbnb
-
TSLint Clean Code — Правила TSLint которые вдохновлены Clean Code: A Handbook of Agile Software Craftsmanship
-
TSLint react — правила, связанные с React & JSX
-
TSLint + Prettier — правила линта для Prettier средство форматирования кода
-
ESLint rules for TSLint — ESLint правила для TypeScript
-
Immutable — правила отключения мутации в TypeScript
Обратитесь также к этому великому TypeScript StyleGuide and Coding Conventions источнику.
Используйте один вариант именования
Использование заглавных букв говорит вам о ваших переменных, функциях и др… Эти правила субъективны, поэтому ваша команда может выбирать все, что они хотят. Дело в том, что независимо от того, что вы все выберите, просто будьте последовательны.
Плохо:
const DAYS_IN_WEEK = 7;
const daysInMonth = 30;

const songs = ['Back In Black', 'Stairway to Heaven', 'Hey Jude'];
const Artists = ['ACDC', 'Led Zeppelin', 'The Beatles'];

function eraseDatabase() {}
function restore_database() {}

type animal = { /* ... */ }
type Container = { /* ... */ }
Хорошо:
const DAYS_IN_WEEK = 7;
const DAYS_IN_MONTH = 30;

const SONGS = ['Back In Black', 'Stairway to Heaven', 'Hey Jude'];
const ARTISTS = ['ACDC', 'Led Zeppelin', 'The Beatles'];

function eraseDatabase() {}
function restoreDatabase() {}

type Animal = { /* ... */ }
type Container = { /* ... */ }
Предпочитайте использовать PascalCase для имен классов, интерфейсов, типов и пространств имен. Предпочитайте использовать camelCase для переменных, функций и членов класса.
Организация импортов
С помощью простых и понятных операторов импорта вы можете быстро увидеть зависимости текущего кода.
Убедитесь, что вы используете следующие хорошие практики для операторов import:
- Операторы импорта должны быть в алфавитном порядке и сгруппированы.
- Неиспользованный импорт должен быть удален.
- Именованные импорты должны быть в алфавитном порядке (т.е.
import {A, B, C} from 'foo';) - Источники импорта должны быть в алфавитном порядке в группах, т.е.:
import * as foo from 'a'; import * as bar from 'b'; - Группы импорта обозначены пустыми строками.
- Группы должны соблюдать следующий порядок:
- Полифилы (т.е.
import 'reflect-metadata';) - Модули сборки Node (т.е.
import fs from 'fs';) - Внешние модули (т.е.
import { query } from 'itiriri';) - Внутренние модули (т.е.
import { UserService } from 'src/services/userService';) - Модули из родительского каталога (т.е.
import foo from '../foo'; import qux from '../../foo/qux';) - Модули из того же или родственного каталога (т.е.
import bar from './bar'; import baz from './bar/baz';)
- Полифилы (т.е.
Плохо:
import { TypeDefinition } from '../types/typeDefinition';
import { AttributeTypes } from '../model/attribute';
import { ApiCredentials, Adapters } from './common/api/authorization';
import fs from 'fs';
import { ConfigPlugin } from './plugins/config/configPlugin';
import { BindingScopeEnum, Container } from 'inversify';
import 'reflect-metadata';
Хорошо:
import 'reflect-metadata';

import fs from 'fs';
import { BindingScopeEnum, Container } from 'inversify';

import { AttributeTypes } from '../model/attribute';
import { TypeDefinition } from '../types/typeDefinition';

import { ApiCredentials, Adapters } from './common/api/authorization';
import { ConfigPlugin } from './plugins/config/configPlugin';
Используйте typescript алиасы
Создайте более симпатичный импорт, определив пути и свойства baseUrl в разделе compilerOptions в tsconfig.json
Это позволит избежать длинных относительных путей при импорте.
Плохо:
import { UserService } from '../../../services/UserService';Хорошо:
import { UserService } from '@services/UserService';// tsconfig.json
...
"compilerOptions": {
...
"baseUrl": "src",
"paths": {
"@services": ["services/*"]
}
...
}
...P.S.
Первая часть
Вторая часть
Полный перевод