
Наш адрес: г. Москва, ул. Полярная, д. 31, стр. 1. Телефон: +7 495 649 16 77 (Skype, ICQ). Режим работы: понедельник — пятница с 9:00 до 18:00; суббота и воскресенье — выходной. Доставка по России, Белоруссии, Украине, Казахстану: Москва, Подольск, Сергиев Посад, Истра, Рязань, Курск, Липецк, Тула, Иваново, Воронеж, Ярославль, Тверь, Смоленск, Калуга, Белгород, Орел,
Тамбов, Кострома, Брянск, Красноярск, Норильск, Кемерово, Новокузнецк, Новосибирск, Омск, Барнаул, Иркутск, Братск, Бийск, Улан-Удэ, Томск, Абакан, Чита, Горно-Алтайск, Кызыл, Санкт-Петербург,
СПб, Выборг, Вологда, Череповец, Мурманск, Сыктывкар, Ухта, Архангельск, Северодвинск, Великий Новгород, Петрозаводск, Гомель, Гродно, Витебск, Могилев, Брест, Минск, Алма-Ата, Астана,
Ереван, Киев, Днепропетровск, Львов, Ташкент, Могилев, Псков, Калининград, Нарьян-Мар, Уфа, Стерлитамак, Самара, Тольятти, Сызрань, Нижний Новгород, Арзамас, Саратов, Энгельс, Пермь,
Ижевск, Казань, Набережные Челны, Бугульма, Пенза, Оренбург, Орск, Чебоксары, Новочебоксарск, Ульяновск, Киров, Йошкар-Ола, Саранск, Екатеринбург, Верхняя Пышма, Серов, Челябинск,
Магнитогорск, Снежинск, Тюмень, Курган, Нижневартовск, Сургут, Надым, Ростов-на-Дону, Волгодонск, Таганрог, Волгоград, Волжский, Краснодар, Армавир, Астрахань, Майкоп, Владивосток,
Уссурийск, Хабаровск, Комсомольск-на-Амуре, Советская Гавань, Южно-Сахалинск, Благовещенск, Петропавловск-Камчатский, Мирный, Ставрополь, Минеральные Воды, Махачкала, Нальчик, Алушта, Армянск, Джанкой, Евпатория, Керчь, Севастополь, Симферополь, Судак, Крым, Феодосия, Ялта. Сайт отвечает на вопросы: Как отремонтировать, настроить, установить оборудование? Где скачать документацию (инструкцию, мануал)? Где посмотреть партномер? Где купить запчасти (запасные
части, зип), комплектующие, аксессуары и термоэтикетка, чековая лента для весов, термопринтеров штрих-кода, чековых принтеров? Обслуживание весов, кассовых аппаратов, термопринтеров,
терминалов сбора данных, сканеров штрих-кода: каким образом возможно своими силами? Вас интересует наличие, цена, купить запчасти за наличный и безналичный расчет? — сделайте запрос
нашим менеджерам. Официальный сайт компании Zipstore.ru.

Устранение неполадок
Сообщения об ошибках на ЖК-дисплее
110
13290L-154 Вер. A
S4M Руководство пользователя
09.06.2009
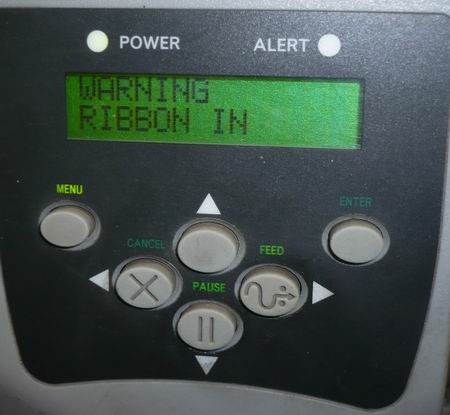
Индикатор RIBBON
(ЛЕНТА) горит; индикатор
ERROR (ОШИБКА)
мигает. Индикатор
предупреждения ALERT
мигает.
Лента установлена, однако
принтер настроен на режим
прямой термопечати.
Лента не требуется при
использовании носителя для прямой
термопечати. Если используется
носитель для прямой термопечати,
извлеките ленту. Это сообщение об
ошибке не повлияет на печать.
Если используется носитель для
термопереноса, для которого
требуется лента, настройте принтер
для работы в режиме термопереноса.
См. раздел
Настройка
использования ленты на стр. 91
Принтер останавливает
работу; индикатор
предупреждения ALERT
мигает.
Носитель не загружен или
загружен неправильно.
Загрузите носитель правильно.
Неправильно выровнен датчик
носителя.
Проверьте расположение датчика
носителя.
принтер настроен на
несплошной носитель, однако
загружен сплошной носитель.
Загрузите носитель подходящего
типа или настройте принтер на
текущий тип носителя и выполните
калибровку.
Принтер останавливает
работу; индикатор
предупреждения ALERT
мигает.
Печатающая головка закрыта не
полностью.
Полностью закройте печатающую
головку.
Датчик открытия головки
работает неправильно.
Обратитесь к специалисту по
обслуживанию.
Индикатор ERROR
(ОШИБКА) мигает.
В печатающей головке
неисправен термистор.
Обратитесь к специалисту по
обслуживанию.
Таблица 17 • Сообщения об ошибках на ЖК-дисплее (продолжение)
ЖК-дисплей/
состояние принтера
Возможная причина
Рекомендуемое решение
WARNING
(
ПРЕДУПРЕЖДЕНИЕ
)
RIBBON IN (
ЛЕНТА
ВСТАВЛЕНА
)
ALERT
(
ОПОВЕЩЕНИЕ
)
PAPER OUT (
НЕТ
БУМАГИ
)
ALERT
(
ОПОВЕЩЕНИЕ
)
HEAD OPEN
(
ГОЛОВКА
ОТКРЫТА
)
THERMISTOR
(
ТЕРМИСТОР
)
FAULT
(
НЕИСПРАВЕН
)
|
|||
| Strogg
14.10.09 — 05:33 |
Всем доброго времени суток. Кто-нибудь имел дело с этой адской машиной? Поставил драйвера, все встало нормально. Формат бумаги не нашел в предложенных — завел новый(А5). Печатаю прямым термопереносом (с риббоном). Сформировал печатную форму в восьмерке, жму на предварительный просмотр — порчему-то настройки страницы сбиваются. Ставит на самый первый размер этикетки. Жму на настройки принтера — выставляю опции размера бумаги, прямой термоперенос, контрастность, выбираю «брать настройки драйвера», «обрезать после печати каждой этикетки». Жму ок — печатает нормально, обрезает. Как только опять жму на предварительный просмотр — сбрасывает, зараза все настройки: (стоит не обрезать этикетку, способ печати термотрансфер, формат бумаги опять же первый по списку, но не мой). Я уже такие же настройки выставил на принтере — один фиг не хочет запомниать все настройки. Еще высвечивается предупреждение: «Warning, ribbon in printer idle» и моргает лампочка ошибки(хотя принтер готов к работе). Камрады, если кто сталкивался — расскажите плиз, как его победить? Мануал прочел, (поэтому принтер настроил, так что там ниче нового уже не будет…) Спасибо. |
||
| Garykom
1 — 14.10.09 — 09:32 |
(0) Ну совет тока один, печатай не через драйвер а через ZPL (зебра программ лангэйдж) У всех зебр что видел проблема с работой через дрова принтера. |
||
| пента
2 — 14.10.09 — 09:53 |
(0) настройку производить через Пуск => Настройка => Принтеры и факсы |
||
| Strogg
3 — 14.10.09 — 10:25 |
Спасибо огромное всем — победил. :). В общем надо было(для тех, у кого могут быть траблы): 1) Скачать с инета ZDesignerZM600(скачал с сайта производителя) 2) в конфигураторе, в макете настроить именно на данный формат. 3) В настройках принтера поставить во вкладке «Прочее» флажок на «Брать только установки драйвера». 4) Ну и, естесственно, кодом убрал все поля и колонтитулы(для нашей этикетки это надо) |
||
|
Strogg 4 — 14.10.09 — 10:25 |
+ пропала мигающая ошибка «Warning, ribbon in printer idle» — по всей видимости принтер фигово работает со своими установками(не установками драйвера)… |
| |
|
AdBlock убивает бесплатный контент. 1Сергей |
ВНИМАНИЕ! Если вы потеряли окно ввода сообщения, нажмите Ctrl-F5 или Ctrl-R или кнопку «Обновить» в браузере.
Ветка сдана в архив. Добавление сообщений невозможно.
Но вы можете создать новую ветку и вам обязательно ответят!
Каждый час на Волшебном форуме бывает более 2000 человек.
Содержание
- Warning ribbon in ошибка на принтере zebra
- Инструкция по эксплуатации Zebra S4M
- Страница 110
- Zebra S4M — Warning RIBBON IN
- Video: Loading Ribbon and Resolving Ribbon Issues on ZT400
- Issue / Question
- Applicable To
- Resolution / Answer
- Helpful Details
- How it works
- Video: Loading Ribbon and Resolving Ribbon Issues on ZT400
- Issue / Question
- Applicable To
- Resolution / Answer
- Helpful Details
- How it works
КОНФЕРЕНЦИЯ СТАРТКОПИ
Принтеры, копировальные аппараты, МФУ, факсы и другая офисная техника:
вопросы ремонта, обслуживания, заправки, выбора
При включении выдает ошибку Ribbon in printer idle (по-русски лента в принтере стоит (простаивает)). Лента вставлена, и, при включении, протягивается до разделительной полоски между отдельными этикетками. В чем может быть причина?
Визуально лента двигается нормально, равномерно?
Какие варианты для начала:
1. отрегулировать давление печатающей головки — поставить давление на минимум, проверить равномерность.
2. в мануалах пишут, что можно уменьшить значение тёмности. хз, не проверял.
3. сделать калибровку ленты и носителя.
Кажется, я запутался в терминологии. Под лентой я имел ввиду полосу-подложку, на которой наклеены липучки — этикетки, и предназначенную для direct thermal печати. А это есть носитель. А вот ribbon, видимо, есть лента для thermal transfer печати. Этот самый ribbon в принтере не установлен, т.к. используется direct thermal метод печати, и он же выставлен в настройках принтера. Непонятно, зачем в таком режиме принтер контролирует ribbon.
Прошу сильно не пинать, это практически первый раз я столкнулся с принтером для термопечати.
(2)Тогда нужно начать с того, что откалибровать аппарат для печати на этикетках без риббона.
Поищите мануал в сети, юзер-мануала будет достаточно. Там подробно сказано как калибровать и какие настройки выставить.
То ли глюк в прошивке V53.16.3Z, то ли даже не знаю что.
В принтере нет ribbon (ленты), но когда в меню установил неподходящий метод печати THERMAL-TRANSFER, пропала ошибка Ribbon in printer idle. В другом экземпляре такого же принтера с прошивкой V53.15.8Z установлен метод печати DIRECT-TERMAL, как и должно быть.
Вот так с разными установками они работают оба одинаково.
чуднО..
Попробуйте написать(или позвонить) в техподдержку Zebra, чтобы они выслали самую свежую прошивку.
Источник
Инструкция по эксплуатации Zebra S4M
Страница 110
Устранение неполадок
Сообщения об ошибках на ЖК-дисплее
13290L-154 Вер. A
S4M Руководство пользователя
Индикатор RIBBON
(ЛЕНТА) горит; индикатор
ERROR (ОШИБКА)
мигает. Индикатор
предупреждения ALERT
мигает.
Лента установлена, однако
принтер настроен на режим
прямой термопечати.
Лента не требуется при
использовании носителя для прямой
термопечати. Если используется
носитель для прямой термопечати,
извлеките ленту. Это сообщение об
ошибке не повлияет на печать.
Если используется носитель для
термопереноса, для которого
требуется лента, настройте принтер
для работы в режиме термопереноса.
См. раздел
Принтер останавливает
работу; индикатор
предупреждения ALERT
мигает.
Носитель не загружен или
загружен неправильно.
Загрузите носитель правильно.
Неправильно выровнен датчик
носителя.
Проверьте расположение датчика
носителя.
принтер настроен на
несплошной носитель, однако
загружен сплошной носитель.
Загрузите носитель подходящего
типа или настройте принтер на
текущий тип носителя и выполните
калибровку.
Принтер останавливает
работу; индикатор
предупреждения ALERT
мигает.
Печатающая головка закрыта не
полностью.
Полностью закройте печатающую
головку.
Датчик открытия головки
работает неправильно.
Обратитесь к специалисту по
обслуживанию.
Индикатор ERROR
(ОШИБКА) мигает.
В печатающей головке
неисправен термистор.
Обратитесь к специалисту по
обслуживанию.
Таблица 17 • Сообщения об ошибках на ЖК-дисплее (продолжение)
Источник
Zebra S4M — Warning RIBBON IN
Принтер этикеток Zebra S4m, Warning RIBBON IN
Введение. Простенькая ошибка помноженная на плохую память получаем +30 минут к наипростейшему ремонту. Постараемся исправить эту ошибку, что бы впредь не терять время на листание документации и ненужной регулировки датчиков.
Неисправность со слов заказчика. Принтер Zebra S4M выдает на дисплей предупреждение «Warning RIBBON IN».
Первичная диагностика. Подобная ошибка/предупреждение после выхода второй этикетки. Память подсказывает что ошибка настолько примитивная, что ее устранить дело 1 минуты, вот только как, память почему то не подсказывала. Поэтому начинаем с простых действий – чистим все датчики и смотри профили датчиков, профиль датчика риббона в полном порядке, хотя датчик этикетки шалит, принтер явно не видит этикетку.
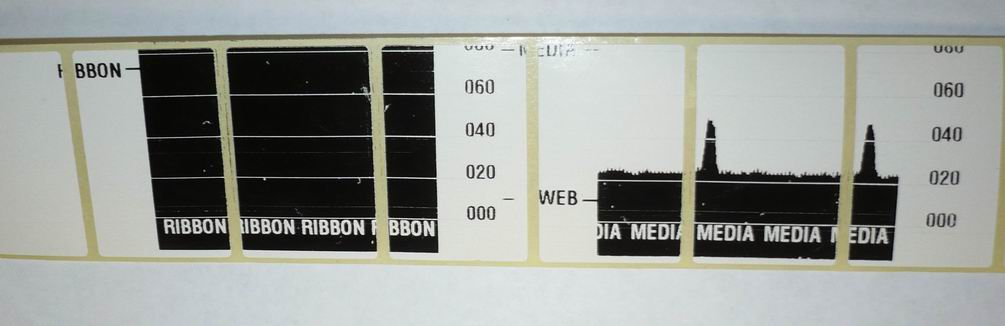
Датчик Ribbon в полном порядке (слева), а вот датчик этикетки не радует (справа).
Делаем калибровку, хотя и ищем ошибку датчика Ribbon. Из за риббона профиль датчика этикетки напрягает глаз и создается впечатление датчик калибровали без риббона.
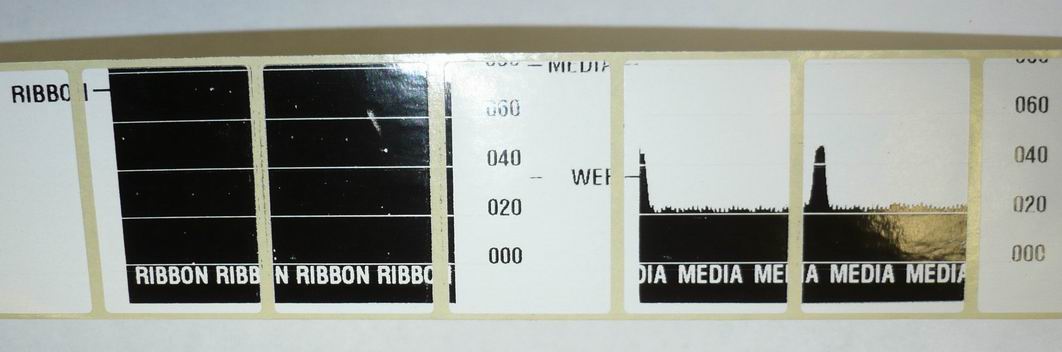
Датчик Ribbon (слева) и датчик этикетки (справа) после калибровки.
Калибровка и чистка датчиков проблему не устранила, хотя и не помешала.
Ремонт. Так как память подсказывает, что ошибка устраняется просто, поэтому забираемся в меню и смотрим, что там не так. В третьем setup (пароль 1234) натыкаемся на такую надпись Ribbon NO, и сразу вспоминаем Warning RIBBON IN говорит нам о сработке датчика риббона (тот который на риперном диске), но при этом работа риббоном в настройках принтера не выставлена.
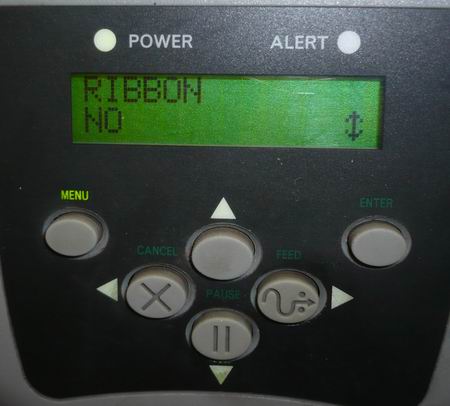
Вот такая настройка принтера при использовании термотрансферной ленты вызовет ошибку Warning RIBBON IN (надо выставлять Ribbon YES).
Заключение. Рассматриваемая «поломка» была не единственной в этом принтере была еще куча рукотворных ошибок из области – а что будет если покрутить эту фиговину, но рассматривать мы их не будем, так как они устраняются на автомате любым линейщиком по принтерам. Для любителей докопаться до истины руководство по эксплуатации.
Источник
Video: Loading Ribbon and Resolving Ribbon Issues on ZT400
Article ID: 02967455
Issue / Question
This solution discusses resolving symptoms related to the following:
• Ribbon In error
• Ribbon Out error
• Not detecting a ribbon out condition
• Ribbon wrinkle causing random diagonal lines in print
• Ribbon stalling or sticking
• Ribbon breaking or tearing
Applicable To
ZT400 Printers experiencing ribbon related problems or errors.
Resolution / Answer
The printer can be used for a wide variety of printing applications. Printing can be done with and without ribbon and for each method, the printer (and driver/software) must be properly configured. The most common term used when the ribbon is required is ”Thermal Transfer” while “Direct Thermal” refers to applications that do not use ribbon. For non-ribbon applications, a heat sensitive label must be used referred to as Direct Thermal labels.
The ribbon used in the printer consists of a wax or resin-based ink on a plastic film called the carrier that is rolled onto a cardboard core. The width of the roll varies based on the width of the labels and should always be slightly wider. This provides protection for the printhead to prevent wear. On Zebra printers the ink is on the outside of the ribbon roll (see note) and this is the surface that should be facing the labels so ink transfer is accomplished.
NOTE There is a reverse-wound spindle available for the ZT410 P/N 79830M. Contact your Zebra Reseller for details.
Common Issues and Resolutions:

| Problem | Resolution |
| Ribbon Out Error
|
|
| Ribbon In Error Ribbon Not Expected The Supplies Light is Flashing Yellow
|
|
|
|
| Not detecting a ribbon out condition |
|
| Ribbon Breaking or Tearing |
|
| Ribbon Stalling |
|


Helpful Details
| Click here to view video -> | Printer Media and Ribbon Loading Video |
Load the ribbon following the diagram that is printed on the inside wall of the supplies compartment. This will ensure the ribbon sensor detects the presence of ribbon correctly. Improper loading can cause false ribbon out errors and also lead to wrinkling.
Ribbon Spindle Replacement Instructions Read More>>
How it works
Ribbon Mechanics
There are two spindles, Ribbon Supply and Ribbon Take-up, that guide the ribbon during printing. The actual movement of the ribbon is controlled by the printhead pressure at the print line. Back tension is applied from the Ribbon Supply spindle to help prevent wrinkle and take up slack during back feed operation. Printhead pressure moves the ribbon keeping it synchronized with the labels and the Ribbon Take-up spindle removes the ribbon from the labels and rewinds the spent ribbon.
Ribbon Detection
The printer uses a combination of an optical sensor and reflector plate (the silver plate under the print mech you load the labels under) to detect the ribbon as it blocks the ribbon sensor light path. The ribbon sensor is used in Thermal Transfer applications to detect the state of the ribbon and will provide a Ribbon Out condition when the ribbon reaches the end of the roll or is not installed. A clear ribbon trailer allows the light to reach the reflector plate or the ribbon has a reflective chrome trailer that acts as a light reflector for the ribbon sensor. For Direct Thermal applications (where the ribbon is not required) the sensor will warn if the ribbon is detected by displaying a Ribbon In a warning on the LCD Display (or yellow flashing supplies light ZT220). To avoid ribbon errors, proper loading, and configuration of the printer and driver/software are required.
Источник
Video: Loading Ribbon and Resolving Ribbon Issues on ZT400
Article ID: 02967455
Issue / Question
This solution discusses resolving symptoms related to the following:
• Ribbon In error
• Ribbon Out error
• Not detecting a ribbon out condition
• Ribbon wrinkle causing random diagonal lines in print
• Ribbon stalling or sticking
• Ribbon breaking or tearing
Applicable To
ZT400 Printers experiencing ribbon related problems or errors.
Resolution / Answer
The printer can be used for a wide variety of printing applications. Printing can be done with and without ribbon and for each method, the printer (and driver/software) must be properly configured. The most common term used when the ribbon is required is ”Thermal Transfer” while “Direct Thermal” refers to applications that do not use ribbon. For non-ribbon applications, a heat sensitive label must be used referred to as Direct Thermal labels.
The ribbon used in the printer consists of a wax or resin-based ink on a plastic film called the carrier that is rolled onto a cardboard core. The width of the roll varies based on the width of the labels and should always be slightly wider. This provides protection for the printhead to prevent wear. On Zebra printers the ink is on the outside of the ribbon roll (see note) and this is the surface that should be facing the labels so ink transfer is accomplished.
NOTE There is a reverse-wound spindle available for the ZT410 P/N 79830M. Contact your Zebra Reseller for details.
Common Issues and Resolutions:
| Problem | Resolution |
| Ribbon Out Error
|
|
| Ribbon In Error Ribbon Not Expected The Supplies Light is Flashing Yellow
|
|
|
|
| Not detecting a ribbon out condition |
|
| Ribbon Breaking or Tearing |
|
| Ribbon Stalling |
|
Helpful Details
| Click here to view video -> | Printer Media and Ribbon Loading Video |
Load the ribbon following the diagram that is printed on the inside wall of the supplies compartment. This will ensure the ribbon sensor detects the presence of ribbon correctly. Improper loading can cause false ribbon out errors and also lead to wrinkling.
Ribbon Spindle Replacement Instructions Read More>>
How it works
Ribbon Mechanics
There are two spindles, Ribbon Supply and Ribbon Take-up, that guide the ribbon during printing. The actual movement of the ribbon is controlled by the printhead pressure at the print line. Back tension is applied from the Ribbon Supply spindle to help prevent wrinkle and take up slack during back feed operation. Printhead pressure moves the ribbon keeping it synchronized with the labels and the Ribbon Take-up spindle removes the ribbon from the labels and rewinds the spent ribbon.
Ribbon Detection
The printer uses a combination of an optical sensor and reflector plate (the silver plate under the print mech you load the labels under) to detect the ribbon as it blocks the ribbon sensor light path. The ribbon sensor is used in Thermal Transfer applications to detect the state of the ribbon and will provide a Ribbon Out condition when the ribbon reaches the end of the roll or is not installed. A clear ribbon trailer allows the light to reach the reflector plate or the ribbon has a reflective chrome trailer that acts as a light reflector for the ribbon sensor. For Direct Thermal applications (where the ribbon is not required) the sensor will warn if the ribbon is detected by displaying a Ribbon In a warning on the LCD Display (or yellow flashing supplies light ZT220). To avoid ribbon errors, proper loading, and configuration of the printer and driver/software are required.
Источник
![]()
Possible Cause: Ribbon is loaded, but the printer is set for thermal mode.
Solution:
1.Ribbon is not required with direct thermal media. If you are using direct thermal media. If you are using direct thermal media, remove ribbon unless you are using it to protect the printhead. This error message will not affect printing.
2.If you are using thermal transfer media, which is requires ribbon, set the printer for Thermal Transfer Mode.

Zebra S4M

– Compatible printer model: Zebra S4M
– Error code list of Zebra S4M model and steps to troubleshooting:
- Code: 01
- Display: ALERT RIBBON OUT
- Description: The printer stops and the ALERT light flashes.
- Causes: In thermal transfer mode, ribbon is not loaded or incorrectly loaded. In thermal transfer mode, the ribbon sensor is not detecting ribbon that is loaded incorrectly. In thermal transfer mode, media is blocking the ribbon sensor. In thermal transfer mode, the printer did not detect the ribbon even though it is loaded correctly. If you are using direct thermal media, the printer is waiting for ribbon to be loaded because it is incorrectly set for thermal transfer mode.
- Troubleshooting Guides: Load ribbon correctly. 1. Load ribbon correctly. 2. Calibrate the sensors.1. Load media correctly. 2. Calibrate the sensors. 1. Print a sensor profile.See Print Sensor Profile on page 66. The ribbon out threshold (marked by the word RIBBON) is likely too high, above the black area that indicates where the ribbon is detected. 2. Calibrate the sensors or load printer defaults. See Calibrate Media and Ribbon Sensors on page 67 or Load Factory Defaults on page 64. Set the printer for Direct Thermal mode. See Set Ribbon Use on page 65.
- Code: 02
- Display: WARNING RIBBON IN
- Description: The ALERT light flashes.
- Causes: Ribbon is loaded, but the printer is set for direct thermal mode.
- Troubleshooting Guides: Ribbon is not required with direct thermal media. If you are using direct thermal media, remove ribbon unless you are using it to protect the printhead. This error message will not affect printing. If you are using thermal transfer media, which requires ribbon, set the printer for Thermal Transfer mode. See Set Ribbon Use on page 65.
- Code: 03
- Display: ALERT PAPER OUT
- Description: The printer stops and the ALERT light flashes.
- Causes: Media is not loaded or is loaded incorrectly. Misaligned media sensor. The printer is set for noncontinuous media, but continuous media is loaded.
- Troubleshooting Guides: Load media correctly. Check position of the media sensor. Install proper media type, or reset printer for current media type and perform calibration.
- Code: 04
- Display: ALERT HEAD OPEN
- Description: The printer stops and the ALERT light flashes.
- Causes: The printhead is not fully closed. The head open sensor is not working properly.
- Troubleshooting Guides: Close printhead completely. Replace the sensor.
- Code: 05
- Display: WARNING HEAD TOO HOT
- Description: The printer stops and the ALERT light flashes.
- Causes: The printhead is over temperature.
- Troubleshooting Guides: Allow the printer to cool. Printing automatically resumes when the printhead elements cool to an acceptable operating temperature.
- Code: 06
- Display: WARNING HEAD COLD
- Description: The printer stops and the ALERT light flashes.
- Causes: The printhead is under temperature. The printhead data cable is not properly connected.
- Troubleshooting Guides: Continue printing while the printhead reaches the correct operating temperature. If the error remains, the environment may be too cold for proper printing. Relocate the printer to a warmer area. Caution • Turn off (O) the printer before performing this procedure. Failure to do so can damage the printhead. 1. Turn Off (O) the printer. 2. Disconnect and reconnect the data cable to the printhead. 3. Ensure that the cable connector is fully inserted into the printhead connector. 4. Turn on (I) the printer.

- Code: 07
- Display: HEAD ELE. BAD
- Description: The printer stops.
- Causes: The printhead is not installed. The printhead data cable is not connected. The printhead is bad.
- Troubleshooting Guides: Caution • Turn off (O) the printer before performing this procedure. Failure to do so can damage the printhead. 1. Turn Off (O) the printer. 2. Disconnect and reconnect the data cable to the printhead. 3. Ensure that the cable connector is fully inserted into the printhead connector. 4. Turn on (I) the printer. 5. If the problem persists, replace the printhead.
- Code: 08
- Display: OUT OF MEMORY CREATING BITMAP
- Description:
- Causes: Creating Bitmap The bitmap size (label length/width) does not fit in available memory.
- Troubleshooting Guides: You may do any of the following: • Press PAUSE. Send a -HM ZPL command to the printer to display the amount of free memory. Then redesign the graphic/format to fit available memory, or remove items from memory to create more space. • Press PAUSE to skip the formatting step in process and proceed to the next step. With the printer paused, press CANCEL. The printer skips the current label formatting process and goes to the next label. • Turn the printer Off (O) and then On (I) to clear the printer’s memory.
- Code: 09
- Display: OUT OF MEMORY STORING BITMAP
- Description:
- Causes: Storing Bitmap Not enough memory is available to store the bitmap created.
- Troubleshooting Guides: You may do any of the following: • Press PAUSE. Send a -HM ZPL command to the printer to display the amount of free memory. Then redesign the graphic/format to fit available memory, or remove items from memory to create more space. • Press PAUSE to skip the formatting step in process and proceed to the next step. With the printer paused, press CANCEL. The printer skips the current label formatting process and goes to the next label. • Turn the printer Off (O) and then On (I) to clear the printer’s memory.
- Code: 10
- Display: OUT OF MEMORY BUILDING FORMAT
- Description:
- Causes: Building Format Label is too complex.
- Troubleshooting Guides: You may do any of the following: • Press PAUSE. Send a -HM ZPL command to the printer to display the amount of free memory. Then redesign the graphic/format to fit available memory, or remove items from memory to create more space. • Press PAUSE to skip the formatting step in process and proceed to the next step. With the printer paused, press CANCEL. The printer skips the current label formatting process and goes to the next label. • Turn the printer Off (O) and then On (I) to clear the printer’s memory.
- Code: 11
- Display: OUT OF MEMORY STORING FORMAT
- Description:
- Causes: Storing Format Format is too large to fit in available memory.
- Troubleshooting Guides: You may do any of the following: • Press PAUSE. Send a -HM ZPL command to the printer to display the amount of free memory. Then redesign the graphic/format to fit available memory, or remove items from memory to create more space. • Press PAUSE to skip the formatting step in process and proceed to the next step. With the printer paused, press CANCEL. The printer skips the current label formatting process and goes to the next label. • Turn the printer Off (O) and then On (I) to clear the printer’s memory.
- Code: 12
- Display: OUT OF MEMORY STORING GRAPHIC
- Description:
- Causes: Storing Graphic The graphic image is too large to fit in available memory.
- Troubleshooting Guides: You may do any of the following: • Press PAUSE. Send a -HM ZPL command to the printer to display the amount of free memory. Then redesign the graphic/format to fit available memory, or remove items from memory to create more space. • Press PAUSE to skip the formatting step in process and proceed to the next step. With the printer paused, press CANCEL. The printer skips the current label formatting process and goes to the next label. • Turn the printer Off (O) and then On (I) to clear the printer’s memory.
- Code: 13
- Display: OUT OF MEMORY STORING FONT
- Description:
- Causes: Storing Font Not enough memory available to store the font.
- Troubleshooting Guides: You may do any of the following: • Press PAUSE. Send a -HM ZPL command to the printer to display the amount of free memory. Then redesign the graphic/format to fit available memory, or remove items from memory to create more space. • Press PAUSE to skip the formatting step in process and proceed to the next step. With the printer paused, press CANCEL. The printer skips the current label formatting process and goes to the next label. • Turn the printer Off (O) and then On (I) to clear the printer’s memory.
- Code: 14
- Display:
- Description: General print quality issues
- Causes: The printer is set at the incorrect print speed. You are using an incorrect combination of labels and ribbon for your application. The printer is set at an incorrect darkness level. The printhead is dirty.
- Troubleshooting Guides: For optimal print quality, set the print speed to the lowest possible setting for your application via control panel, the driver, or the software. See Adjust Print Speed on page 57. You may wish to perform the FEED Self Test on page 100. 1. Switch to a different type of media or ribbon to try to find a compatible combination. 2. If necessary, consult your authorized Zebra reseller or distributor for information and advice. For optimal print quality, set the darkness to the lowest possible setting for your application via the control panel, the driver, or the software. See Adjust Print Darkness on page 54. You may wish to perform the FEED Self Test on page 100 to determine the ideal darkness setting. Clean the printhead according to the instructions in Clean the Printhead and Platen Roller
- Code: 15
- Display:
- Description: Wrinkled ribbon
- Causes: Ribbon fed through the machine incorrectly. Incorrect burn temperature. Incorrect or uneven pressure. Media not feeding properly; walking from side to side.
- Troubleshooting Guides: Set the darkness to the lowest possible setting for good print quality. See Adjust Print Darkness on page 54. Set the pressure to the minimum needed for good print quality. See Adjust Printhead Pressure on page 44. Make sure that media is snug by adjusting the media guide, or call a service technician.
- Code: 16
- Display:
- Description: Long tracks of missing print on several labels
- Causes: Print element damaged. Wrinkled ribbon.
- Troubleshooting Guides: Replace the printhead. See wrinkled ribbon causes and solutions in this table.
- Code: 17
- Display:
- Description: Fine, angular gray lines on blank labels
- Causes: Wrinkled ribbon.
- Troubleshooting Guides: See wrinkled ribbon causes and solutions in this table.
- Code: 18
- Display:
- Description: Printing too light or too dark over the entire label
- Causes: Media or ribbon is not designed for high-speed operation. You are using an incorrect combination of labels and ribbon for your application. You are using ribbon with direct thermal media. Incorrect or uneven printhead pressure.
- Troubleshooting Guides: Replace supplies with those recommended for high-speed operation. 1. Switch to a different type of media or ribbon to try to find a compatible combination. 2. If necessary, consult your authorized Zebra reseller or distributor for information and advice. Direct thermal media does not require ribbon. To check if you are using direct thermal media, perform the label scratch test in When to Use Ribbon on page 20. If you are using ribbon intentionally with direct thermal media, increase the darkness level, but note that high darkness levels may decrease printhead life. You may wish to perform the FEED Self Test on page 100 to determine the ideal darkness setting. Set the pressure to the minimum needed. See Adjust Printhead Pressure on page 44.
– Zebra S4M printer Error Codes
- Code: 19
- Display:
- Description: Smudge marks on labels
- Causes: Media or ribbon is not designed for high-speed operation.
- Troubleshooting Guides: Replace supplies with those recommended for high-speed operation.
- Code: 20
- Display:
- Description: Misregistration/skips labels
- Causes: The printer is not calibrated. Improper label format.
- Troubleshooting Guides: Recalibrate the printer. Use correct label format.
- Code: 21
- Display:
- Description: Misregistration and misprint of one to three labels
- Causes: The platen roller is dirty. Media does not meet specifications.
- Troubleshooting Guides: See Clean the Printhead and Platen Roller on page 113. Use media that meets specifications.
- Code: 22
- Display:
- Description: Vertical drift in top-of-form position
- Causes: Normal tolerances of mechanical parts and printer modes. Note • A vertical drift of ± 4 to 6 dot rows (approximately 0.5 mm) is within normal tolerances. The printer is out of calibration. The platen roller is dirty.
- Troubleshooting Guides: 1. Calibrate the printer. 2. Adjust the label top position setting. See Adjust Label Top Position on page 55. Recalibrate the printer. See Clean the Printhead and Platen Roller on page 113.
- Code: 23
- Display:
- Description: Vertical image or label drift
- Causes: The printer is using noncontinuous labels but is configured in continuous mode. Improperly calibrated media sensor. The platen roller is dirty. Improper printhead pressure settings (toggles). Improperly loaded ribbon or media. Incompatible media.
- Troubleshooting Guides: Configure the printer for non-continuous and run calibration routine, if necessary. See Calibrate Media and Ribbon Sensors on page 67. Clean the platen roller. See Clean the Printhead and Platen Roller on page 113. Adjust the printhead pressure to ensure proper functionality. Verify that the printer is loaded properly. Ensure that the interlabel gaps or notches are 2 to 4 mm and consistently placed. Media must not exceed minimum specifications for mode of operation.
- Code: 24
- Display:
- Description: The bar code printed on a label does not scan.
- Causes: The bar code is not within specifications because the print is too light or too dark. Not enough blank space around the bar code.
- Troubleshooting Guides: Perform the FEED Self Test on page 100. Adjust the darkness or print speed settings as necessary. Leave at least 1/8 in. (3.2 mm) between the bar code and other printed areas on the label and between the bar code and the edge of the label.
- Code: 25
- Display:
- Description: Loss of printing registration on labels. Excessive vertical drift in top-of-form registration.
- Causes: Improperly positioned media guides. Media type set incorrectly. Incorrect sensor being used for the media type. Dirty platen roller.
- Troubleshooting Guides: Ensure that the media guides are properly positioned. Set the printer for the correct media type (gap/notch, continuous, or mark). See Set Media Type on page 56. Manually select the correct sensor to use. See Select the Media Sensor on page 56. Clean the platen roller according to the instructions in Clean the Printhead and Platen Roller on page 113.
- Code: 26
- Display:
- Description: Auto Calibrate failed.
- Causes: Improperly loaded media or ribbon. The sensors could not detect the media or ribbon. Sensors dirty or media improperly positioned for the sensors to detect.
- Troubleshooting Guides: Ensure that media and ribbon are loaded correctly. Manually calibrate the printer (see Calibrate Media and Ribbon Sensors on page 67). Ensure that the sensors are clean and that media is positioned properly.
- Code: 27
- Display:
- Description: A label format was sent to the printer but was not recognized.
- Causes: The communication parameters are incorrect.
- Troubleshooting Guides: Check the printer driver or software communications settings (if applicable). Make sure you are using the correct communication cable. See Data Cable Requirements on page 17 for the requirements. If a driver is used, check the driver communication settings for your connection.
- Code: 28
- Display:
- Description: A label format was sent to the printer. Several labels print, then the printer skips, misplaces, misses, or distorts the image on the label.
- Causes: The serial communication settings are incorrect.
- Troubleshooting Guides: Ensure that the flow control settings match. Check the communication cable length. See Data Cable Requirements on page 17 for requirements. Check the printer driver or software communications settings (if applicable).
- Code: 29
- Display:
- Description: A label format was sent to the printer but was not recognized. No printing occurs.
- Causes: The prefix and delimiter characters set in the printer do not match the ones in the label format. Incorrect data is being sent to the printer.
- Troubleshooting Guides: Verify the prefix and delimiter characters. See Set Command Character on page 62 and Set Delimiter Character on page 63 for the requirements. Ensure that the label format being used matches the operating language of the printer. See Printer Language Modes on page 8. Check the communication settings on the computer. Ensure that they match the printer settings. If the problem continues, check the label format.
- Code: 30
- Display:
- Description: Broken or melted ribbon
- Causes: Darkness setting too high.
- Troubleshooting Guides: 1. Reduce the darkness setting. 2. Clean the printhead thoroughly.
– Zebra S4M troubleshooting solutions to fix error codes
- Code: 31
- Display:
- Description: The printer does not detect when the ribbon runs out. When the RIBBON parameter is set to AUTO, the printer remains in direct thermal mode (shown on the printer configuration label), even though ribbon is loaded correctly in the printer.
- Causes: The ribbon-out threshold is set too high to detect the ribbon. On a sensor profile, the ribbon-out threshold (circled in Figure 27) appears above the black bars that indicate the ribbon. This happens if you calibrate the printer without ribbon and later insert ribbon without recalibrating the printer or loading printer defaults.
- Troubleshooting Guides: 1. Print a sensor profile (see Print Sensor Profile on page 66), and note the location of the ribbon-out threshold (circled in Figure 27). 2. Calibrate the printer, this time using ribbon, or load printer defaults. See Calibrate Media and Ribbon Sensors on page 67 or Load Factory Defaults on page 64. Important • Loading defaults resets all printer parameters back to factory defaults. 3. Print another sensor profile, and compare it to the first one. 4. If the ribbon-out threshold is still too high, you may manually change the value. See Adjust Ribbon-Out Threshold on page 71.
- Code: 32
- Display:
- Description: The printer indicates that ribbon is out, even though ribbon is loaded correctly.
- Causes: The printer was not calibrated for the label and ribbon being used.
- Troubleshooting Guides: Perform the calibration procedure in Calibrate Media and Ribbon Sensors on page 67.
- Code: 33
- Display:
- Description: The LCD displays a language that I cannot read
- Causes: The language parameter was changed through the control panel or a firmware command.
- Troubleshooting Guides: Perform the procedure in Select a Display Language on page 53.
- Code: 34
- Display:
- Description: The LCD is missing characters or parts of characters
- Causes: The LCD may need replacing.
- Troubleshooting Guides: Run the Power-On Self Test on page 97 and check that the LCD display shows all characters. If not, replace the LCD.
- Code: 35
- Display:
- Description: Changes in parameter settings did not take effect
- Causes: Parameters are set incorrectly. A command turned off the ability to change the parameter. A command changed the parameter back to the previous setting. If the problem continues, there may be a problem with the main logic board.
- Troubleshooting Guides: 1. Set parameters and save permanently. 2. Turn the printer power Off (O) and then On (I). Refer to the Programming Guide for the printer language being used. Refer to the Programming Guide for the printer language being used. Replace the main logic board.
- Code: 36
- Display:
- Description: The printer fails to calibrate or detect the top of the label.
- Causes: The printer was not calibrated for the label being used. The printer is configured for continuous media. The driver or software configuration is not set correctly.
- Troubleshooting Guides: Perform the calibration procedure in Calibrate Media and Ribbon Sensors on page 67. Set the media type to noncontinuous media. See Set Media Type on page 56. Driver or software settings produce commands that can overwrite the printer configuration. Check the driver or software media-related setting.
- Code: 37
- Display:
- Description: Non-continuous labels are being treated as continuous labels.
- Causes: The printer is configured for continuous media. The printer was not calibrated for the media being used.
- Troubleshooting Guides: Set the media type to noncontinuous media. See Set Media Type on page 56. Perform the calibration procedure in Calibrate Media and Ribbon Sensors on page 67.
- Code: 38
- Display:
- Description: All lights are on, but nothing displays on the LCD, and the printer locks up.
- Causes: Internal electronic or firmware failure.
- Troubleshooting Guides: Turn the printer power Off (O) and then On (I). If the printer locks up again, replace the main logic board.
- Code: 39
- Display:
- Description: The printer locks up while running the Power-On Self Test.
- Causes: Main logic board failure.
- Troubleshooting Guides: Replace the main logic board.
Contact us to get support with Zebra S4M Error case
Mobile/ Whatsapp: (+0084)915 589 236
Telegram: https://t.me/nguyendangmien
Skype: nguyendangmien
Facebook: https://www.facebook.com/nguyendangmien
Устранение неполадок
Сообщения об ошибках на ЖК-дисплее
110
13290L-154 Вер. A
S4M Руководство пользователя
09.06.2009
Индикатор RIBBON
(ЛЕНТА) горит; индикатор
ERROR (ОШИБКА)
мигает. Индикатор
предупреждения ALERT
мигает.
Лента установлена, однако
принтер настроен на режим
прямой термопечати.
Лента не требуется при
использовании носителя для прямой
термопечати. Если используется
носитель для прямой термопечати,
извлеките ленту. Это сообщение об
ошибке не повлияет на печать.
Если используется носитель для
термопереноса, для которого
требуется лента, настройте принтер
для работы в режиме термопереноса.
См. раздел
Настройка
использования ленты на стр. 91
Принтер останавливает
работу; индикатор
предупреждения ALERT
мигает.
Носитель не загружен или
загружен неправильно.
Загрузите носитель правильно.
Неправильно выровнен датчик
носителя.
Проверьте расположение датчика
носителя.
принтер настроен на
несплошной носитель, однако
загружен сплошной носитель.
Загрузите носитель подходящего
типа или настройте принтер на
текущий тип носителя и выполните
калибровку.
Принтер останавливает
работу; индикатор
предупреждения ALERT
мигает.
Печатающая головка закрыта не
полностью.
Полностью закройте печатающую
головку.
Датчик открытия головки
работает неправильно.
Обратитесь к специалисту по
обслуживанию.
Индикатор ERROR
(ОШИБКА) мигает.
В печатающей головке
неисправен термистор.
Обратитесь к специалисту по
обслуживанию.
Таблица 17 • Сообщения об ошибках на ЖК-дисплее (продолжение)
ЖК-дисплей/
состояние принтера
Возможная причина
Рекомендуемое решение
WARNING
(
ПРЕДУПРЕЖДЕНИЕ
)
RIBBON IN (
ЛЕНТА
ВСТАВЛЕНА
)
ALERT
(
ОПОВЕЩЕНИЕ
)
PAPER OUT (
НЕТ
БУМАГИ
)
ALERT
(
ОПОВЕЩЕНИЕ
)
HEAD OPEN
(
ГОЛОВКА
ОТКРЫТА
)
THERMISTOR
(
ТЕРМИСТОР
)
FAULT
(
НЕИСПРАВЕН
)