
Если вы не можете установить программное обеспечение и каждый раз получаете сообщение об ошибке, этот пост поможет вам решить эту проблему. Полное сообщение об ошибке выглядит как ShellExecuteEx Failed; код ошибки 8235. С сервера был возвращен переход ». или Системный администратор установил политики, предотвращающие эту установку. Обычно это происходит, когда вы или система изменили что-то, что ограничивает установку программного обеспечения.
Вот несколько вещей, которые вы можете попробовать. Но сначала создайте точку восстановления системы. Им потребуется разрешение администратора, чтобы попробовать эти методы.
- Отключить UAC с подписанной опцией
- Установить с правами администратора
- Временно отключить UAC
- Установить / удалить средство устранения неполадок
Если ничего не работает или не помогает, вы можете вернуться к созданной точке восстановления системы, чтобы отменить изменения.
1]Отключить UAC с подписью.
- Тип
gpedit.mscв командной строке (Win + R), а затем нажмите клавишу Enter, чтобы открыть редактор групповой политики. - Перейдите к следующей настройке
Computer Configuration > Windows Settings > Security Settings > Local Policies > Securityвариант. - Здесь отключите Контроль учетных записей пользователей: повышайте уровень только исполняемых файлов, которые подписаны и проверены. параметр.
Этот параметр политики обеспечивает выполнение проверок подписи инфраструктуры открытого ключа (PKI) для любых интерактивных приложений, запрашивающих повышение привилегий. Администраторы предприятия могут контролировать, какие приложения разрешено запускать, добавляя сертификаты в хранилище сертификатов Trusted Publishers на локальных компьютерах.
2]Установить с правами администратора
Щелкните установщик правой кнопкой мыши и выберите запуск с правами администратора. Поскольку большинству установщиков необходимо добавлять файлы в системные каталоги, им требуется разрешение администратора. Поэтому, если система не спрашивает вас о разрешении администратора, этот метод поможет вам с установкой.
3]Временно отключить UAC
Windows предлагает настройки, позволяющие изменять уровень UAC или контроля доступа пользователей. Это защищенный метод, при котором никакое программное обеспечение не может быть установлено без разрешения пользователя, но временное отключение может помочь.
- Введите UAC в поле поиска, а затем нажмите Изменить параметры управления учетными записями пользователей.
- Опустите вертикальный ползунок, чтобы изменить настройки.
- Попробуйте установить его еще раз.
Обратите внимание, что это повлияет на ваши настройки безопасности, поэтому обязательно верните его к настройкам по умолчанию, когда установка будет завершена.
4]Используйте средство устранения неполадок при установке / удалении
Вы можете загрузить официальное средство устранения неполадок при установке / удалении от Microsoft. Он спросит, есть ли у вас проблемы с установкой или удалением. Вы можете выбрать дополнительные параметры для автоматического применения исправления или, если вы хотите узнать о нем больше, пусть мастер предложит вам об этом. Это может исправить следующее
- Поврежденные ключи реестра в 64-битных операционных системах и контролировать данные обновления.
- Запретить установку, полное удаление или обновление новых программ.
- Запретить вам удалить программу через «Установка и удаление программ».
Я надеюсь, что этот пост помог вам решить проблему ShellExecuteEx Failed; код ошибки 8235.
Download PC Repair Tool to quickly find & fix Windows errors automatically
If you cannot install software and receive an error message every time you do that, this post will help you resolve that. The full error message goes as ShellExecuteEx Failed; code error 8235. A referral was returned from the server.” or The System Administrator has set policies to prevent this installation. It usually happens when you or the system has changed something that restricts software installation.
Here are a few things you could try. But first, create a system restore point. They will need admin permission to try these methods.
- Disable UAC with Signed option
- Install with Admin permissions
- Temporarily disable UAC
- Install/Uninstall Troubleshooter
If nothing works or helps, you may go back to the created system restore point to reverse the changes.
1] Disable UAC with Signed option
- Type
gpedit.mscin the Run prompt (Win +R), and then press the Enter key to open Group Policy Editor - Navigate to the following setting
Computer Configuration > Windows Settings > Security Settings > Local Policies > Securityoption. - Here disable User Account Control: Only elevate executables that are signed and validated setting.

This policy setting enforces public key infrastructure (PKI) signature checks for any interactive applications that request elevation of privilege. Enterprise administrators can control which applications are allowed to run by adding certificates to the Trusted Publishers certificate store on local computers.
2] Install with Admin permissions
Please right-click on the installer, and choose to run it with admin permission. Since most of the installers need to add files to system directories, they need admin permission. So if the system doesn’t ask you about the admin permission, this method will help you with the installation.
3] Temporarily disable UAC

Windows offers settings that allow you to change the level of UAC or User Access Control. It’s a safeguarded method that no software can install without user permission, but temporarily disabling might help.
- Type UAC in the search box, and then click on the Change User Account Control Settings
- Lower the vertical slider to change the settings.
- Try installing it again.
Do note that it will impact your security settings, so make sure to switch it back to default settings when the installation is complete.
4] Use Install/Uninstall Troubleshooter
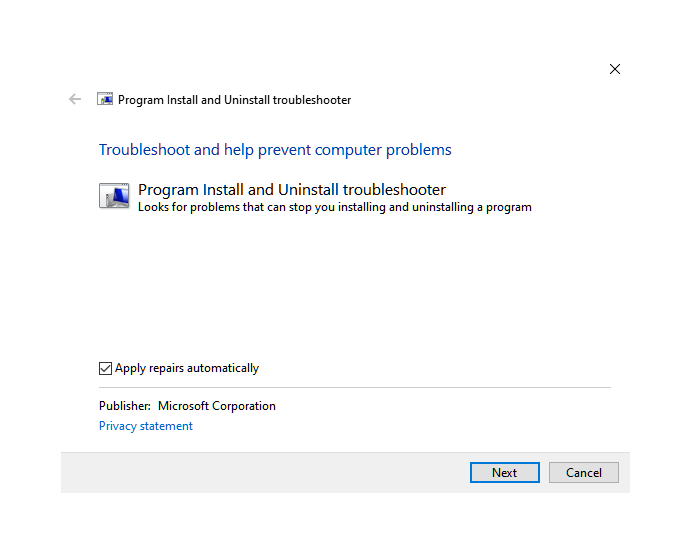
You can download the official Install/Uninstall Troubleshooter from Microsoft. It will ask if you have issues installing or uninstalling. You can choose advanced settings to apply the fix automatically, or if you wish to know more about it, let the wizard prompt you about it. It can fix the following
- Corrupt registry keys on 64-bit operating systems and that control the update data.
- Prevent new programs from being installed, completely uninstalled, or updated
- Block you from uninstalling a program through Add or Remove Programs.
I hope this post helped you resolve ShellExecuteEx Failed; code error 8235.

Ashish holds a Bachelor’s in Computer Engineering and is a veteran Windows and Xbox user. He has work experience as a Database and Microsoft.NET Developer. He has been a Microsoft MVP (2008-2010) and excels in writing tutorials to improve the day-to-day experience with your devices.
При попытке установить программу на вашем компьютере с Windows, Если вы видите “ShellExecuteEx failed” в сопровождении различных кодов, то этот пост поможет вам.
Сопутствующие коды ошибок могут быть: 2, 5, 67, 255, 1155, 1460, 8235, 2147221003, и т.д. Эта ошибка обычно возникает, если установщик требует прав администратора, файл установки был поврежден или существует конфликт приложений.
ShellExecuteEx — это функция ОС, которая выполняет операцию над указанным файлом. Если операция завершится неудачно, вы получите эту ошибку.
- Запустите исполняемый файл от имени администратора
- Повторно загрузите или переустановите программу
- Запустить Средство Проверки Системных Файлов
- Сброс звуков по умолчанию.
Давайте подробно рассмотрим эти методы.
Попробуйте запустить приложение от имени администратора
Запуск приложений с правами администратора. Даже если приложение не удается запустить, попробуйте переустановить приложение с правами администратора. Просто щелкните правой кнопкой мыши на файле установщика и нажмите кнопку Запуск от имени администратора.

Загрузите установщик еще раз, а затем установите повторно
Иногда, когда вы загружаете любое приложение для установки, вы возможно столкнулись с ситуацией, когда программа установки не будет работать и приложение не будет установлено. Это может произойти из-за поврежденного или файла установщика.
Попробуйте загрузить то же самое с официального сайта приложения или любого доверенного источника. Также можно отключить антивирус на время установки и далее добавить приложение в исключения антивируса ( Внимание!!, вы должны быть уверены, что в этом файле нет вирусов или он из надежного источника)
Здесь вы можете приобрести ключ лицензии Windows 10 Pro 2020. Вы сразу же получаете ваш собственный уникальный ключ активации. После ввода лицензионного ключа вы начинаете использовать лицензионную операционную систему без ограничений, а также получать последующие пакеты обновлений, выпускаемые Microsoft.
Запустите сканирование SFC
Запуск сканирования SFC делается для замены потенциально поврежденных системных файлов. Таким образом, если ошибка возникает из-за поврежденного системного файла, то следующие шаги должны помочь вам исправить ошибку.
SFC scan не только находит проблемный системный файл, но и исправляет его.
Нажмите Клавишу Win + X . Откроется меню быстрого доступа.
Нажмите на Windows PowerShell (администратор) . Если вместо PowerShell отображается Командная строка, выберите пункт Командная строка (администратор) .

Выполните команду: sfc /scannow
Подождите несколько секунд, так как требуется время для завершения сканирования.
Если проблема в этом, то ошибка должна быть решена.

Но если есть действительно большая проблема, то вы можете столкнуться с сообщением, говорящим: «Windows Resource Protection нашел поврежденные файлы, но не смог исправить».
Вам просто нужно перезагрузить машину в безопасном режиме и снова запустить вышеуказанную команду.
Сброс системных звуков по умолчанию
Вы можете подумать, что как сброс системного звука по умолчанию может решить системную ошибку, такую как “ShellExecuteEx”? Но некоторые пользователи сообщили, как этот шаг решил их проблему.
Откройте диалоговое окно Выполнить, нажав клавишу Win + R.
И введите mmsys.cpl нажмите Enter.
Нажмите на вкладку Звуки. Выберите «По умолчанию» в звуковой схеме.
Нажмите на кнопку Применить, а затем на кнопку ОК.

Contents
- What Does the “ShellExecuteEx Failed; Code Error 8235. A Referral Was Returned from the Server” Error Mean?
- How to Resolve the ShellExecuteEx Failed Error
- Use Administrator Permissions
- Grant the Program Admin Privileges
- Adjust UAC Settings
- Log In to the Hidden Administrator Account and Install the Program
- The steps below will show you how to do that:
- Make the File’s Signature a Trusted One
- Uninstall Problematic Windows Updates
- Make Changes to the System Registry
- Now, follow these steps to apply the changes:
- Restore Your System
- The following steps will guide you:
- Conclusion
![[FIXED] “ShellExecuteEx Failed; code 8235” in Windows 10](https://www.auslogics.com/en/articles/wp-content/uploads/2020/12/fix-shellexecuteex-failed-code-8235.jpg)
The “ShellExecuteEx Failed; code 8235” error usually comes with the “A referral was returned from the server” message. You may encounter this error when you try to install a program or open an application.
What Does the “ShellExecuteEx Failed; Code Error 8235. A Referral Was Returned from the Server” Error Mean?
This error message is an indication that some security policies are preventing you from performing a certain action. The policies might be some default restrictions or some adjustments made via an update, for example. The problem may also reside with the program or setup that you’re working with.
In this article, you’ll learn how to fix the ShellExecuteEx Failed error.
How to Resolve the ShellExecuteEx Failed Error
To get rid of the problem, you’ll have to make sure the file or program you’re working with isn’t denied access because it doesn’t have the required privileges. In this article, you’ll find out how to relax certain restrictions and remove roadblocks that shouldn’t be there.
Follow the solutions below one after the other and in the order that we have arranged them.
Use Administrator Permissions
If you’re experiencing the error whenever you want to install a program, right-click on the installer and select Run as Administrator. Click on the Yes option once the User Account Control dialog window pops up.
The installer might require permission to write files to some protected system directories. Make sure you’re logged into an administrator account before you perform this operation. Also, it’s important that you verify the legitimacy of the installer you’re about to run, as granting a malicious program admin access can wreak havoc that your PC might not recover from.
Grant the Program Admin Privileges
If the error keeps showing up whenever you try to launch a program, then grant it admin privileges. Windows might be blocking the application from accessing certain system files that it needs to run properly.
You can either right-click on the program and select Run as Administrator any time you want to open it or make changes to its properties. These steps will show you how to prompt Windows to run the program as an administrator whenever you launch it:
- Launch a File Explorer window and navigate to the installation folder of the program.
- Locate its executable file, right-click on it, and then click on Properties.
- If you have a desktop shortcut to the exe file, right-click it and click on Properties.
- If there is no desktop shortcut to the file and you don’t know how to locate it, follow these steps:
- Open the Start menu and search for the program.
- Once it appears in the results list, right-click it, hover your mouse pointer over More, and then select Open File Location.
- You’ll be taken to a folder where you’ll see the program’s Start menu shortcut.
- Right-click on the shortcut and select Open File Location.
- The program’s installation folder will now appear.
- You can now right-click on its executable file and select Properties.
- After the Properties window opens, go to the Compatibility tab.
- Click on the “Change settings for all users” button.
- On the next dialog window, check the box for “Run this program as an administrator”, and then click on the OK button.
- You can now run the program and check whether the error message appears again.
Adjust UAC Settings
The error message could be popping up because your current UAC policy is too stringent. The highest security policy prompts Windows to scrutinize and block operations that you might consider basic.
While it’s important that you maintain a reasonable level of security for your system, you can relax some tough measures to prevent issues like this from needlessly occurring. The following steps will show you how to lower your UAC policy:
- Right-click the Start button and select Run or press the Windows and R keys together to launch the Run dialog box.
- After Run opens, type “Control Panel” (don’t add the quotes) into the text field, and then click on the OK button.
- Once the Control Panel window opens, click on User Accounts.
- Click on User Accounts again on the next page.
- Next, click on “Change User Account Control settings”.
- Now, on User Account Control’s Settings window, drag the slider down a step or two from Always Notify towards Never Notify. The box to the right will describe the security level for you.
- Click on the OK button, and then go back to check whether the problem persists.
Log In to the Hidden Administrator Account and Install the Program
If you’re experiencing the issue with a single executable file, then you can resolve it by signing in to the hidden admin account, which has higher privileges. You’ll have to activate the account via the Command Prompt utility. We recommend that you open Command Prompt from the Windows Recovery Environment.
The steps below will show you how to do that:
- Press and hold your power button to force your PC to shut down.
- Turn on the computer and force it to shut down again after the logo of your system’s manufacturer shows up.
- Repeat Step 2 twice and you’ll see the “Please wait” message.
- On the Automatic Repair screen, click on the Advanced Options button.
- On the Choose an Option screen, click on Troubleshoot.
- Now, click on Advanced Options under Troubleshoot, and then click on Command Prompt.
- Once the Command Prompt loads, type in the following and hit Enter:
Net user administrator /active:yes
- Restart your PC, log in to the admin account, and then try performing the operation.
Make the File’s Signature a Trusted One
You can let Windows know that the executable file that you want to run or install is legitimate by adding its signature as a trusted signature. While this process is a bit complicated, some users have confirmed that it worked for them. So, carefully follow these steps to apply the fix:
- Launch a File Explorer window and navigate to the installation folder of the program.
- Locate its executable file, right-click on it, and then click on Properties.
- If you have a desktop shortcut to the exe file, right-click it and click on Properties.
- If there is no such shortcut and you don’t know how to locate the file, follow these steps:
- Open the Start menu and search for the program.
- Once it shows up in the results list, right-click it, hover your mouse pointer over More, and then select Open File Location.
- You’ll be taken to a folder where you’ll see the program’s Start menu shortcut.
- Right-click on the shortcut and select Open File Location.
- The program’s installation folder will now appear.
- You can now right-click on its executable file and select Properties.
- After the Properties window opens, go to the Digital Signatures tab.
- Click on the signature under Signature List, then click on Details.
- Under Signer Information, click on View Certificate.
- On the next page, click on Install Certificate, and then click on Next.
- Once you get to the Certificate Import wizard, select “Place all certificates in the following store”, and then click on the Browse button. Write down the name of this certificate, as you’ll need it in the next step.
- Now, choose the Trusted Root Certification Authorities option, and then click OK.
- Click Next.
- Click Finish.
- You can now run the program and check whether the error persists.
You can take things further so that Windows won’t flag the program in the future. Follow these steps:
- Open the Run dialog box by right-clicking the Start button and selecting Run from the Power User menu.
- Once Run opens, type “mmc” (no quotes) into the text field, and then click on OK.
- Click on Yes in the User Account Control dialog that pops up.
- After the Microsoft Management Console opens, click on File in the top-left corner of the window.
- Select “Add/remove snap-ins” once the context menu drops down.
- Once the “Add or remove snap-ins” window opens, navigate to the left pane and click on Certificates under Available Snap-Ins.
- Click on the Add button, and then click on OK.
- Now, on the main MMC interface, right-click on Certificates and click on Find Certificates.
- Enter the name of the certificate you wrote down earlier and click on the Find Now button.
- When you see the certificate, right-click it, and then select Properties.
- Switch to the General tab and select “Enable only the following purposes”.
- Uncheck every other box save the one for “Code Signing”.
- That should do it! You can now check whether the error persists.
Uninstall Problematic Windows Updates
If you started seeing the problem after updating your system, try uninstalling the update. Microsoft updates may even cause conflicts that prompt the company to undo them. While issues like these are hardly widespread, they happen in unique situations.
If you don’t know how to uninstall an update, follow these steps:
- Right-click on the Start button and select Settings.
- After the Settings application opens, click on Update & Security.
- Once the Update & Security interface opens, switch to the Windows Update page and click on View Update History.
- Take note of the KB number of the last update you installed before the problem started showing up.
- Now, go to the top of the window and click on Uninstall Updates.
- You’ll be taken to the Control Panel’s Programs and Features window. Locate the KB, click on it, and then click on Uninstall.
- Follow the subsequent instructions until the process is complete.
- Restart your system and check whether the error shows up again.
Make Changes to the System Registry
You can use this workaround to instruct Windows to allow certain executable files that aren’t signed and validated.
However, before you start, make sure you back up the system registry so that you can recover it if anything goes wrong. So, follow these steps:
- Press the Windows and R keyboard buttons together to open the Run dialog window.
- After Run opens, type “regedit” (no quotes), and then hit the Enter key.
- Click on Yes in the User Account Control dialog window.
- Once the Registry Editor opens, click on File, then select Export from the menu.
- Select the folder where you’d like to save the file, enter the name of the file, select All under Export Range, and then click on Save.
- Whenever you want to recover your registry to undo the changes you made, open the Registry Editor, click on File, and then select Import. Navigate to the folder where you saved the backup file and double-click it.
Now, follow these steps to apply the changes:
- Go to the left pane of the Registry Editor and expand the HKEY_LOCAL_MACHINE folder.
- Expand SOFTWARE.
- Under SOFTWARE, navigate to Microsoft and expand it.
- Next, expand Windows, and then look for the CurrentVersion folder and open it.
- Head to Policies, and then single-click on System.
- Head to the right side of the window and double-click on ValidateAdminSignatures.
- Now, set Value data to 0.
- Restart your system and check whether the problem is resolved.
You can also apply the same setting using the Group Policy Editor if you use Windows 10 Pro or Enterprise. Follow these steps:
- Press the Windows and R keyboard buttons together to open the Run dialog window.
- After Run opens, type “gpedit.msc” (no quotes), and then hit the Enter key.
- After the Group Policy Editor opens, go to the left pane and expand Windows Settings under Computer Configuration.
- After that, head to Security Settings and expand it.
- Expand Local Policies.
- Go to Security Options and click on it.
- Navigate to the middle pane, scroll down to “User Account Control: Only elevate executables that are signed and validated” and double-click it.
- On the next dialog window, select Disabled, and then click OK.
- The problem should now be resolved.
Restore Your System
If you were able to run the program in the past without seeing the error, then it’s possible that some changes made to your system might be the cause of the issue. These changes could be installing or uninstalling drivers and third-party programs. To resolve the issue, take your system back to an earlier date when everything worked fine.
The following steps will guide you:
- Right-click on the Start button or press the Windows and E keyboard buttons together to open the File Explorer window.
- After File Explorer opens, go to the left pane, right-click on This PC, and then click on Properties.
- After the System window opens, go to the left pane and click on System Protection.
Note: In new Windows 10 builds, you’ll be taken to the Settings application’s About page. Go to the right pane and click on System Protection.
- Click on System Restore once you see the System Protection tab of the System Properties dialog.
- Click on Next once the first page of the wizard opens.
- Now, select a restore point and click on Next.
- Click Finish and allow the tool to do the job.
- Run the program or installer and check whether the “A referral was returned from the server” error shows up again.
Conclusion
If you have any questions about the “ShellExecuteEx Failed; error code 8235” problem or can’t resolve the issue, leave a comment below.
You can always keep your system running smoothly by installing Auslogics BoostSpeed, which will eliminate bad registry keys and harmful junk files.
Do you like this post? 🙂
Please rate and share it and subscribe to our newsletter!
5 votes,
average: 5.00 out of
5
Loading…
Одобрено: ASR Pro
Повысьте производительность вашего компьютера с помощью этой простой загрузки. г.
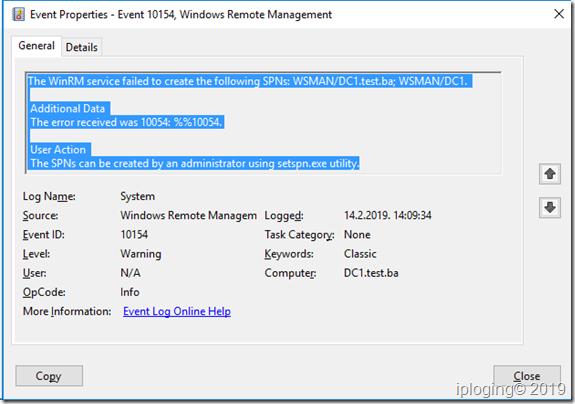
За последние несколько дней некоторые из наших читателей столкнулись с хорошо известным кодом ошибки с идентификатором события 10154, ошибка 8235. Эта проблема вызвана множеством объяснений. Сейчас мы их обсудим.
На каждом приводе вашего автомобиля напряжение должно быть 6В. Если оба диска могут быть доступны
Замените невращающийся вентилятор. Однако, если ток привода возможен
Тогда в цепях, таких как задняя панель ASU, всегда нет неисправного диска. Заменить
Поэтому обычно два других вентилятора (вентиляторы 2 и 3) не будут видны,
Вы будете использовать компьютер вентилятора постоянного тока и напряжение обратной связи для проверки вентилятора
Внимательно проверьте обратную связь вентилятора на CN2301/контактах 3 и 7 платы ASU.
ПРИМЕЧАНИЕ. Пройдите новый соответствующий курс Блок-схемы Drive for или Feedback
Подтверждает наличие некоторого управляющего напряжения вентилятора, управляющего регулирующими цепями
Плата ASU работает нормально и показывает, что вентилятор способен принимать
Существующие отзывы подтверждают, что вентилятор работает. Комментарии к
Напряжение вентилятора составляет 0,05 В, когда вентилятор может нормально вращаться (нормальная работа).
Когда вентилятор не вращается, напряжение обратной связи намного выше, чем 1 В.
Замените силатор соответствующего веса, если обратный ток больше 1 В.
Когда обратная связь по мощности находится на правильном уровне и вентиляторы вращаются,
Именно. В этом споре проблема обычно в микропроцессоре DE.
Ошибка драйвера лампы (5 раз) (источник питания лампы)
Данная ошибка указывает на перегорание высоковольтного (лампового) выхода 12 кВ
напряжение зажигания) зависит от платы управления лампой. Требуемое время
Цель исправления этой ошибки – успешно изолировать один из четырех доменов.
Когда каждая из наших ламп полностью открыта, большая часть вспышки может двигаться 5 раз. Поэтому
Самым главным компонентом, который устраняет все подозрения в сборке, является лампа.
Визуально проверьте заданный искровой промежуток на драйвере лампы на фоне подсветки платы
при первом включении телевизора. При нормальной работе зазор страсти
мигает примерно через 5 секунд после нажатия кнопки влияния и зеленого светодиода
начинает мигать. Он должен загореться один раз, и лампа может нормально загореться.
Если искровой разрядник fl быстрое начало мигает три раза с 20-секундной паузой
Между этим, в настоящее время считыватель ламп работает нормально, а затем это
АИмя пользователя: Flakybake
Идентификатор сообщения:
1
Подписано: 04 августа
Каждый из наших KF-60WE610 был у меня дома около месяца, и около месяца назад у меня начались проблемы при использовании лампы, которая не обязательно включалась при включении определенного телевизора. Он всегда загорался постепенно после неоднократных попыток включения, что не давало лампе погаснуть (верно?). Это беспокойство особенно усилилось за последний месяц. Может ли кто-нибудь показать некоторым людям об этом и, возможно, предложить, что я могу сделать с этой проблемой?
Спасибо,
flakybake
АИмя пользователя: Vindsl
Номер должности:
48
Зарегистрирован: 04 июля
Высоко
Да, это известная проблема с Sony GW, выпущенными в тот драгоценный момент. Если вы позволите ситуации развиваться, она действительно выключит вашу лампу.
Посмотрю, смогу ли я найти вам ссылку…
Windsl
СообщениеИмя пользователя: Номер:
49
Зарегистрирован: 04 июля
Опубликовано в
Вот партнеры, которые помогут вам начать работу…
https://www.ecoustics.com/electronics/forum/home-video/10707.html
https. . //www.ecoustics.com/electronics/forum/home-video/5944.html
Лично я с этой дисфункцией ни разу не сталкивался – постучим по дереву – а по прямо по тексту, как прочитал , это может быть вызвано разными причинами.
Одна проблема заключается в том, что каркас светильника полностью свободен. Ремонт без проблем. Все, что вам нужно сделать, это снять всю лампу и даже поставить ее обратно, так что практически гарантированно все будет водой. Я думаю, они нашли проблему на заводе, что лампа некоторое время не прижималась к клетке. Они делают неприятности так быстро, как только могут, знаете ли, живя в Мексике. Обычно после определенного количества циклов лампа нагревается, чтобы установить соединение. Насколько я понимаю, в основном это закончилось в конце 2003-начале 2004 года.
Одобрено: ASR Pro
ASR Pro — самый популярный и эффективный в мире инструмент для ремонта ПК. Миллионы людей доверяют ему обеспечение быстрой, бесперебойной и безошибочной работы своих систем. Благодаря простому пользовательскому интерфейсу и мощному механизму сканирования ASR Pro быстро находит и устраняет широкий спектр проблем Windows — от нестабильности системы и проблем с безопасностью до проблем с управлением памятью и производительностью.

Другие проблемы более серьезные. Sony выпустила беспристрастное для устройства. По моим подсчетам, им придется снять около 9 различных деталей — доски и т. д.
В любом случае, удачи! Надеюсь, это поможет…
АИмя пользователя: Flakybake
Идентификатор сообщения:
2
Подписано: 04 августа
Опубликовано
Спасибо VinDSL, самое необходимое. Я понятия не имел, что проблема была ужасно распространенной. Думаю позвонить в Самсунг!
Повысьте производительность вашего компьютера с помощью этой простой загрузки. г.
![]()
![]()
![]()
![]()
![]()
![]()
![]()
![]()
![]() г.
г.