
Содержание
- ADB: невозможно подключиться к 192.168.1.10:5555
- 13 ответов
- Adb tcpip 5555 error no devices emulators found
- How To Install and Setup ADB Tools on Linux
- What are ADB and Fastboot?
- Install ADB on Linux Systems
- Debian/ Ubuntu-based distributions
- RHEL/ CentOS/ Fedora
- How to Enable USB Debugging
- Starting ADB Server on Linux
- Optional: Connecting to USB Debugging Wirelessly.
- Using ADB on Linux
- Transferring Files with ADB
- Installing and Uninstalling Applications
- View Logs
- Access the Phone Screen on the PC
- Using the ADB Shell
- Conclusion
ADB: невозможно подключиться к 192.168.1.10:5555
Я не могу использовать adb connect для подключения через Wi-Fi к моему устройству (nexus 5, android 6), но поскольку я разрабатываю плагин Cordova с использованием USB OTG, мне действительно нужно подключиться через Wi-Fi.
Я пытался adb kill-server , и все решения, предоставленные на SO, и никто не работает на меня . Раньше он работал нормально (например, Android 5).
13 ответов
У меня была такая же проблема с момента обновления до Android 6. Заметил, что почему-то девайс играет «трудно достать» при попытке связаться с ним по WIFI.
Попробуйте следующие шаги:
Убедитесь, что Aggressive Wi-Fi to Cellular handover в разделе «Сеть» в параметрах разработчика устройства отключен.
Непрерывно пингуйте с вашего компьютера на устройство, чтобы убедиться, что оно не находится в режиме ожидания сети ping -t 192.168.1.10 (windows cmd), разблокируйте устройство и даже попробуйте перейти на какой-нибудь веб-сайт, просто чтобы отключить его от сети.
Если ping не работает, выключите / включите Android Wifi и вернитесь к шагу 2.
Когда он ответит на пинг, подключите его через usb и:
adb подключение 192.168.10.1:5555
Если он все еще не подключен, попробуйте переключить режим USB-соединения как MTP / PTP / Camera, пока устройство подключено через USB, и повторите эти шаги еще раз .
Если указанные выше пункты не работают, попробуйте запустить adb от имени администратора. Для Ubuntu —
Я решил эту проблему, отключив отладку по USB и снова включив ее
У меня возникла та же проблема из-за того, что я не мог подключиться через Wi-Fi, но использовал snap-версию < >. Я продолжал видеть сообщения типа adb server version (40) doesn’t match this client (39); killing. , когда я выполнял команды adb или scrcpy , но они все еще работали, пока я не попытался подключиться через Wi-Fi.
Я считаю, что это означает, что ему не удалось отправить серверное приложение на устройство.
Выполнение команд для настройки Wi-Fi с помощью встроенного в оснастку adb scrpy.adb решил это за меня.
Убедитесь, что вы не подключены к VPN. Я смог подключиться к adb, как только отключился от VPN. Для надежного подключения сделайте следующее:
- Отключите USB
- Перезагрузите Android-устройство
- Завершите работу Android Studio или любой другой IDE с помощью ADB.
- adb kill-server
- Подключите USB снова после перезагрузки
- adb devices Это автоматически запускает сервер. Вы должны увидеть устройство, подключенное через USB.
- adb shell ip addr show wlan0 , чтобы узнать IP-адрес ваших устройств
- adb tcpip 5555 Установите порт 5555, через который вы хотите подключиться
- adb connect 192.168.0.6:5555 Замените IP-адрес на адрес из шага 6.
- Отключите USB
Итак, моя ситуация заключалась в том, что я перезапустил его в режиме tcp, но все еще не смог подключиться, у меня была ошибка No route to host , поэтому я попытался пропинговать его, но не смог найти его, даже если он был в таблице arp. Итак, я заметил, что когда я подключаю его по USB, он успешно пингуется. так что мне пришлось сделать adb connect ip , прежде чем я смог отключить USB.
Подключитесь через USB и просто используйте эту команду
Источник
Platform-tools: r33.0.3
ADB: 1.0.41 (33.0.3-8952118)
Fastboot: 33.0.3-8952118
Make_f2fs (casefold): 1.15.0 (2022-05-20)
Mke2fs: 1.46.2 (28-Feb-2021)
Последнее обновление утилит в шапке: 23.08.2022
ADB (Android Debug Bridge — Отладочный мост Android) — инструмент, который устанавливается вместе с Android-SDK и позволяет управлять устройством на базе ОС Android.
Работает на всех Android-устройствах, где данный функционал не был намеренно заблокирован производителем.
Здесь и далее: PC — ПК, компьютер к которому подключено устройство.
ADB — консольное приложение для PC, с помощью которого производится отладка Android устройств, в том числе и эмуляторов.
Работает по принципу клиент-сервер. При первом запуске ADB с любой командой создается сервер в виде системной службы (демона), которая будет прослушивать все команды, посылаемые на порт 5037.
Официальная страница
ADB позволяет:
- Посмотреть какие устройства подключены и могут работать с ADB.
- Просматривать логи.
- Копировать файлы с/на аппарат.
- Устанавливать/Удалять приложения.
- Удалять (очищать) раздел data.
- Прошивать (перезаписывать) раздел data.
- Осуществлять различные скрипты управления.
- Управлять некоторыми сетевыми параметрами.
Поставляется ADB в составе инструментария разработчика Андроид (Android SDK), который, в свою очередь входит в состав Android Studio.
Если что-то неправильно, то в списке подключенных устройств (List of devices attached) будет пусто.
Скрытые команды ADB
adb -d Команда посылается только на устройство подключенное через USB.
Внимание: Выдаст ошибку, если подключено больше одного устройства.
adb -e Команда посылается на устройство в эмуляторе.
Внимание: Выдаст ошибку, если подключено больше одного эмулятора.
adb -s Команда посылается на устройство с указанным серийным номером:
adb -p Команда посылается на устройство с указанным именем:
Если ключ -p не указан, используется значение переменной ANDROID_PRODUCT_OUT.
adb devices Список всех подсоединенных устройств.
adb connect [: ] Подсоединиться к андроид хосту по протококу TCP/IP через порт 5555 (по умолчанию, если не задан).
adb disconnect [ [: ]] Отсоединиться от андроид подключенного через TCP/IP порт 5555 (по умолчанию, если не задан).
Если не задан ни один параметр, отключиться от всех активных соединений.
adb push Копировать файл/папку PC->девайс.
adb pull [ ] Копировать файл/папку девайс->PC.
adb sync [ ] Копировать PC->девайс только новые файлы.
Ключи:
-l Не копировать, только создать список.
adb shell Запуск упрощенного unix shell.
Примеры использования
adb emu Послать команду в консоль эмулятора
adb install [-l] [-r] [-s] Послать приложение на устройство и установить его.
Пример: adb install c:/adb/app/autostarts.apk Установить файл autostarts.apk лежащий в папке /adb/app/ на диске с:
Ключи:
-l Блокировка приложения
-r Переустановить приложение, с сохранением данных
-s Установить приложение на карту памяти
Установка split apk
adb uninstall [-k] Удаление приложения с устройства.
Ключи:
-k Не удалять сохраненные данные приложения и пользователя.
adb wait-for-device Ждать подключения устройства.
adb start-server Запустить службу/демон.
adb kill-server Остановить службу/демон.
adb get-state Получить статус:
offline Выключен.
bootloader В режиме начальной загрузки.
device В режиме работы.
adb get-serialno Получить серийный номер.
adb status-window Непрерывный опрос состояния.
adb remount Перемонтировать для записи. Требуется для работы скриптов, которые изменяют данные на.
adb reboot bootloader Перезагрузка в режим bootloader.
adb reboot recovery Перезагрузка в режим recovery.
adb root Перезапуск демона с правами root
adb usb Перезапуск демона, прослушивающего USB.
adb tcpip Перезапуск демона, прослушивающего порт TCP.
adb ppp [параметры] Запуск службы через USB.
Note: you should not automatically start a PPP connection. refers to the tty for PPP stream. Eg. dev:/dev/omap_csmi_tty1
Параметры:
defaultroute debug dump local notty usepeerdns
FastBoot — консольное приложение для PC. Используется для действий над разделами
fastboot devices Список присоединенных устройств в режиме fastboot.
fastboot flash Прошивает файл .img в раздел устройства.
fastboot erase Стереть раздел.
Разделы: boot, recovery, system, userdata, radio
Пример: fastboot erase userdata Стирание пользовательских данных.
fastboot update Прошивка из файла имя_файла.zip
fastboot flashall Прошивка boot + recovery + system.
fastboot getvar Показать переменные bootloader.
Пример: fastboot getvar version-bootloader Получить версию bootloader.
fastboot boot [ ] Скачать и загрузить kernel.
fastboot flash:raw boot [ ] Создать bootimage и прошить его.
fastboot devices Показать список подключенных устройств.
fastboot continue Продолжить с автозагрузкой.
fastboot reboot Перезагрузить аппарат.
f astboot reboot-bootloader Перезагрузить девайсв режим bootloader.
Перед командами fastboot можно использовать ключи:
-w стереть данные пользователя и кэш
-s Указать серийный номер устройства.
-p
Указать название устройства.
-c Переопределить kernel commandline.
-i Указать вручную USB vendor id.
-b Указать в ручную базовый адрес kernel.
-n
Указать размер страниц nand. по умолчанию 2048.
Команду logcat можно использовать с машины разработки
$ adb logcat
или из удаленного shell
# logcat Каждое сообщение лога в Android имеет тэг и приоритет
Тэг – это строка указывающая компонент системы, от которого принято сообщение (например: View для системы view)
Приоритет – имеет одно из нижеследующих значений (в порядке от меньшего к большему):
V — Verbose (Низший приоритет).
D — Debug
I — Info
W — Warning
E — Error
F — Fatal
S — Silent (Наивысший приоритет, при котором ничего не выводится).
Получить список тэгов, используемых в системе, вместе с их приоритетами можно запустив logcat. В первых двух столбцах каждого из выведенных сообщений будут указаны / .
Пример выводимого logcat сообщения:
I/ActivityManager( 585): Starting activity: Intent
Для уменьшения вывода лога до приемлемого уровня нужно использовать выражения фильтра. Выражения фильтра позволяют указать системе нужные комбинации и , остальные сообщения система не выводит.
Выражения фильтра имеют следующий формат : . где указывает нужный тэг, указывает минимальный уровень приоритета для выбранного тэга. Сообщения с выбранным тэгом и приоритетом на уровне или выше указанного записываются в лог. Можно использовать любое количество пар : в одном выражении фильтра. Для разделения пар : используется пробел.
Пример ниже выводит в лог все сообщения с тэгом «ActivityManager» с приоритетом «Info» или выше, и сообщения с тэгом «MyApp» и приоритетом «Debug» или выше:
adb logcat ActivityManager:I MyApp:D *:S
Последний элемент в выражении фильтра *:S устанавливает приоритет «silent» для всех остальных тэгов, тем самым обеспечивая вывод сообщений только для «View» и «MyApp». Использование *:S – это отличный способ для вывода в лог только явно указанных фильтров (т.е. в выражении фильтра указывается «белый список» сообщений, а *:S отправляет все остальное в «черный список»).
При помощи следующего выражения фильтра отображаются все сообщения с приоритетом «warning» или выше для всех тэгов:
adb logcat *:W
Если logcat запускается на машине разработчика (не через удаленный adb shell), можно также установить значение выражения фильтра по умолчанию задав переменную окружения ANDROID_LOG_TAGS:
export ANDROID_LOG_TAGS=»ActivityManager:I MyApp:D *:S»
Следует обратить внимание что задав переменную окружения ANDROID_LOG_TAGS она не будет работать в эмуляторе/устройстве, если вы будете использовать logcat в удаленном shell или используя adb shell logcat.
Вышеописанная команда export работает в ОС *nix и не работает в Windows.
Контроль формата вывода лога
Сообщения лога в дополнение к тэгу и приоритету содержат несколько полей метаданных. Можно изменять формат вывода сообщений показывая только конкретные поля метаданных. Для этого используется параметр -v и указывается один из ниже перечисленных форматов вывода.
brief Показывать приоритет/тэг и PID процесса (формат по умолчанию).
process Показывать только PID.
tag Показывать только приоритет/тэг.
thread Показывать только процесс:поток и приоритет/тэг.
raw Показать необработанное сообщение, без полей метаданных.
time Показывать дату, время вызова, приоритет/тэг и PID процесса.
long Показывать все поля метаданных и отдельно сообщения с пустыми строками.
При запуске logcat можно указать формат вывода используя параметр -v:
adb logcat [-v
Источник

If you have used an Android phone for some time, you will notice that there are certain features and capabilities that you cannot access or perform. These include sideloading apps, taking screenshots in applications that forbid that (e.g. Telegram has such a feature), installing custom ROMs, removing unnecessary Google or manufacturer apps, creating frequent backups, etc.
Fortunately, there is a way that you can bypass all that and do anything you wish to do with your phone using the Android Debug Bridge (ADB). This post will guide you on Installing ADB and Fastboot Android Drivers on Linux.
Table of Contents
What are ADB and Fastboot?
To understand ADB, let’s have a quick look at what happens on an Android phone under the hood.
Android mobile phones run a customised version of the Linux kernel to perform the core system services (It must be a surprise to know Linux has a massive market in the phone industry, right?). Even though Android is regarded as open-source, phone manufacturers add certain restrictions which prevent the average user from tweaking the software.
The Android Debug Bridge (ADB) is a command-line tool that you can install on your PC and execute commands directly on your Android phone. This tool enables you to have more privileged access over your phone. To use ADB, you will first need to enable USB debugging on your phone – We will discuss this below.
With ADB, you can efficiently perform tasks like accessing your phone UI from your laptop, taking screenshots from your PC, and more. A more exciting bit is you can use ADB to remove malware and other malicious apps from your phone.
Fastboot, on the other hand, is a command-line tool that allows you to modify the flash system on your Android phone from your computer. That is made possible because this utility is built-in with the Android SDK. It enables you to install custom ROMs, root your mobile phone, or perform a custom recovery.
Install ADB on Linux Systems
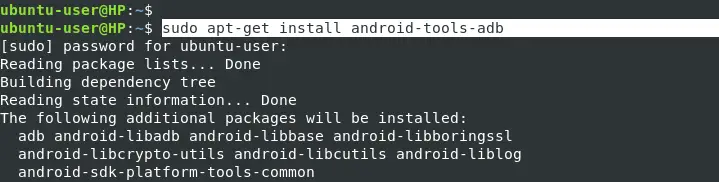
To install ADB tools on Linux systems is pretty straightforward. Execute any of the commands below depending on your Linux distro.
Debian/ Ubuntu-based distributions
Or
RHEL/ CentOS/ Fedora
To install ADB on any RHEL-based distribution, execute the command below.
To use ADB tools on your Android phone, we first need to enable USB debugging. Follow the steps below.
How to Enable USB Debugging
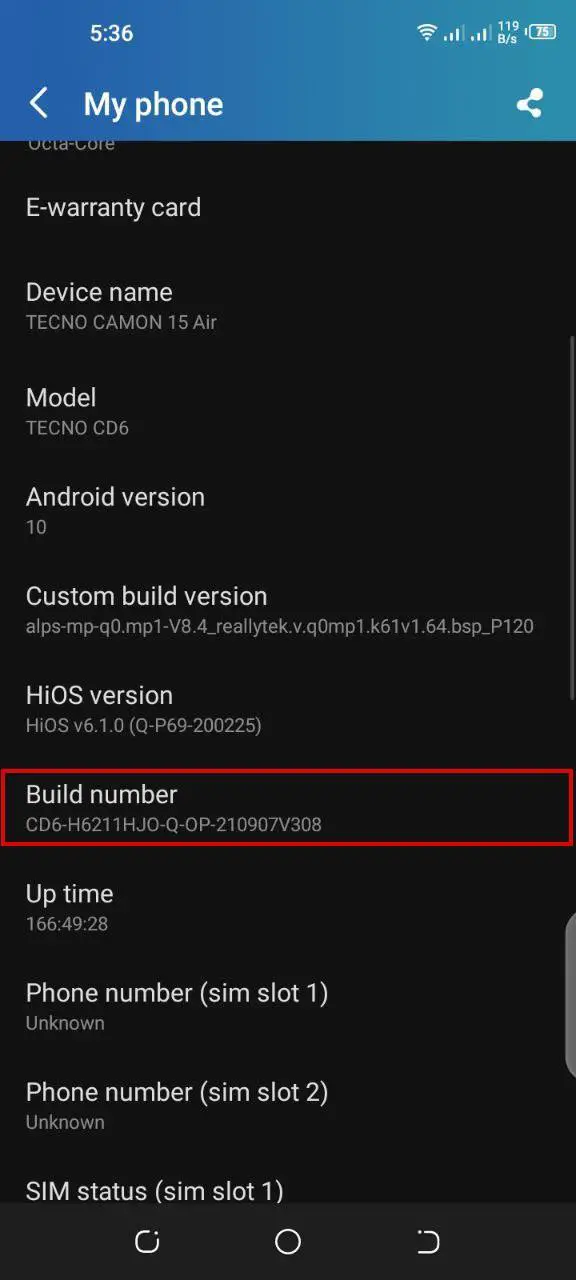
The procedure might differ from one phone to another. However, they all use simple logic. Find the build number on your Settings app and tap it continuously seven times until you see the notification “you are already a developer.”
For this post, we will use a Tecno phone. First, open the Settings application and click on “About Phone.” Scroll down until you see the “build number” option. Continuously tap this option seven times to enable USB debugging.
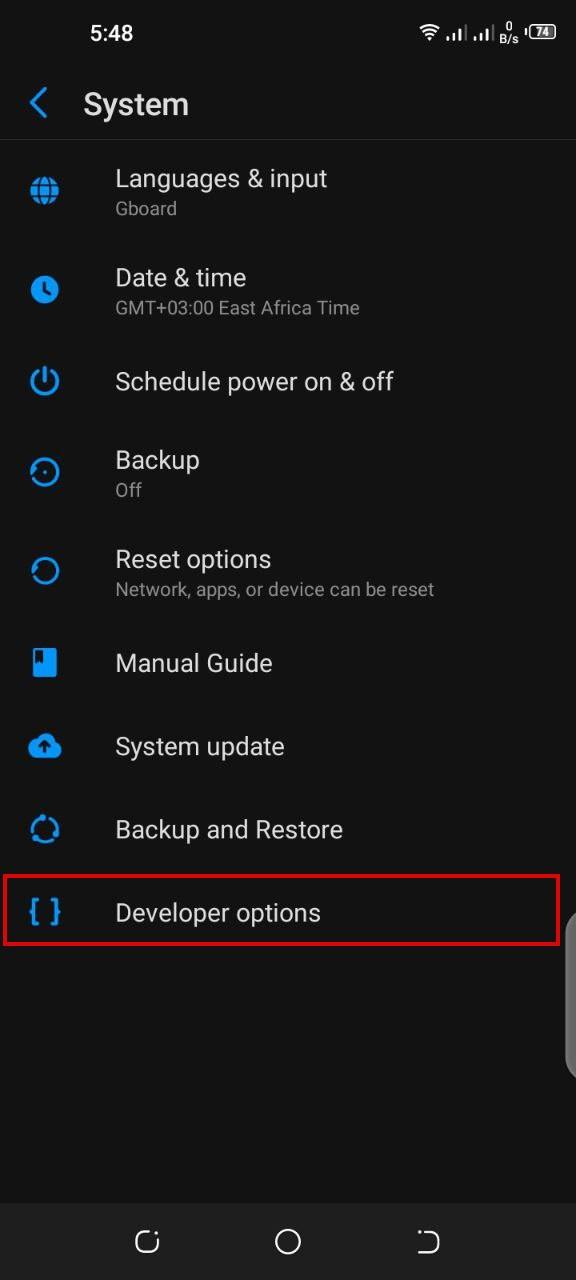
When done, navigate to the System option (still on the Settings app). Here, you should see a new option listed as “Developer Options.”
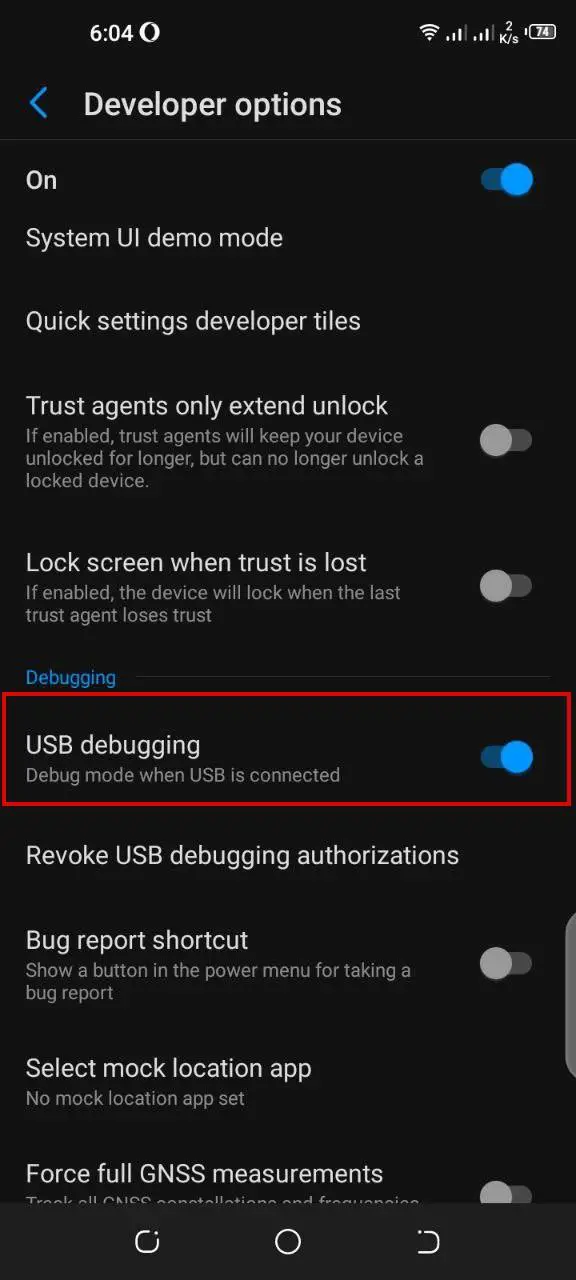
Open the Developer Options and scroll down till you see the USB Debugging option. Tap on it to enable USB debugging on your phone. See the image below.
Starting ADB Server on Linux
To start using USB debugging, we need to start the ADB server on our PC. Execute the command below.

Once done, connect your Android phone to your PC via the USB cable. If you are doing this for the first time, you will see a pop-up notification on your phone prompting you to whether to allow USB debugging. Select the option “Always allow from this computer.”
Optional: Connecting to USB Debugging Wirelessly.
You might need to use USB debugging, but you don’t want to use a USB cable to create a physical connection. In such a situation, you cannot connect to your phone wirelessly. Follow the steps below.
- Connect your phone to the same network your PC is connected to.
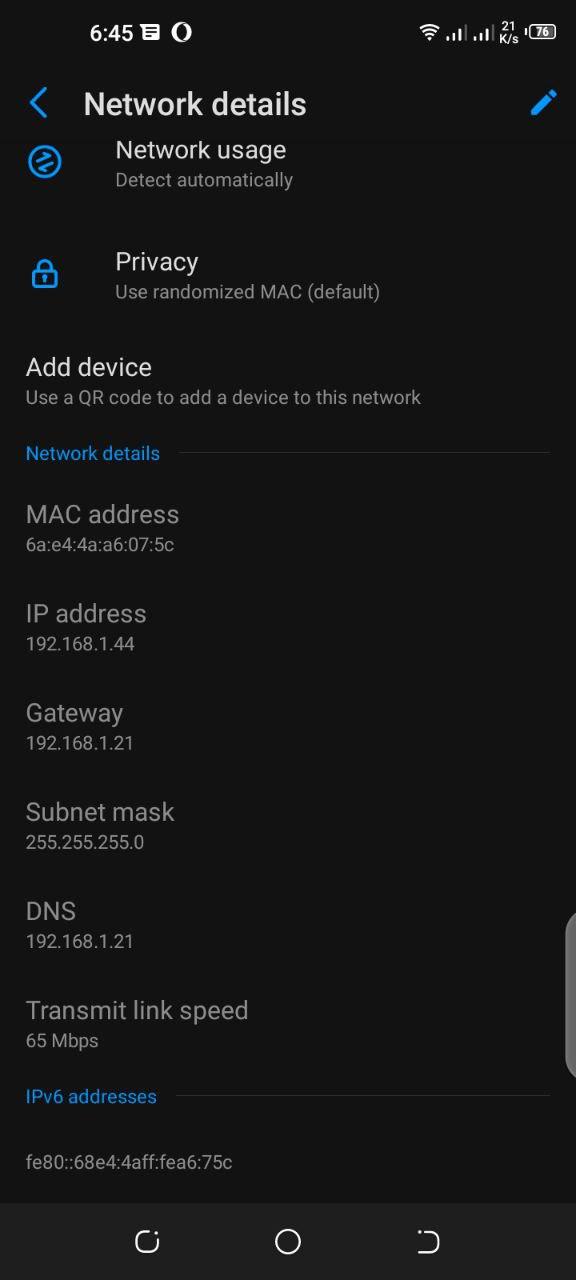
- Get the IP address assigned to your phone. You can do this from the Settings app on your phone or the router connection page. If you have a little background in computer security, you can also use a tool like Nmap. In our case, we easily accessed it from the Settings app.

- After retrieving the IP, execute the command on your PC.
e.g.
That will allow us to connect to our phone via port 5555. You can use any other port but not greater than 65535. We highly recommend using a port over 1000.
To connect to your phone device wirelessly, execute the command below on your PC.
e.g.

From this point, you can now proceed to execute commands on your system.
To keep things simple, use one ADB connection. For example, if you connect wirelessly, don’t connect again via the USB cable. If you do that, you will encounter the error, “adb: error: failed to get feature set: more than one device/emulator.”
Using ADB on Linux
If you have used Linux systems for a while, you know that most utilities will change the Terminal prompt when running them. That’s not the case with ADB. The Terminal prompt will stay the same (probably pointing to your current working directory). And that’ is where you will execute your ADB commands. However, there is still the adb shell option, but we will look at that at end of this post.
Let’s look at some activities that you can carry out with ADB.
Transferring Files with ADB
Before we dive deeper, there are a few things you need to understand. The files you see on your phone are all located in the /storage/sdcard0 directory. If you insert an external SD card, it will be registered as /storage/sdcard1 .
To copy a file from your computer to the Downloads folder on your phone, use the syntax below.
E.g.

If the transfer was successful, you should see an output like file pushed .
To copy a file from the phone to our PC, we will use the pull command. For example, inside the test_dir directory that we copied to our phone, there was a file called image.jpg. Let’s copy this file from our phone to our PC. We will use the syntax below.
E.g.

Installing and Uninstalling Applications
This is one of the most interesting features that fascinates me when using ADB. You have the power to remove applications that you cannot remove when using your normal phone UI.
To install an application, you first need to download that .apk file on your PC. Use the syntax below.

If the installation was successful, you will see the message Success on the Terminal.
To uninstall any application, we first need to list all installed applications. Execute the command below.
You will see a long list of all apps installed on your phone. The names might be quite complicated but you should still be able to spot your target app with ease.

To uninstall any app, use the syntax below.
E.g.

View Logs
To view the logs on your android phone, execute the command below.
The output might be a little complex for the average user. However, if you are a developer or a security analyst, these logs are quite useful.

Access the Phone Screen on the PC
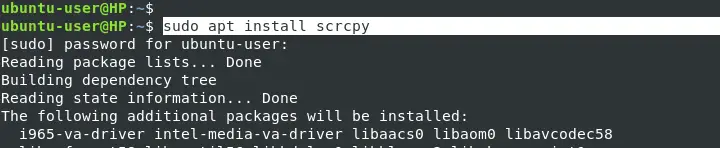
Another interesting feature you can use with ADB is accessing your phone’s screen on your PC. However, for this one, we need to install a package called scrcpy. If you are running any Debian/ Ubuntu-based distribution, execute the command below to install scrcpy .
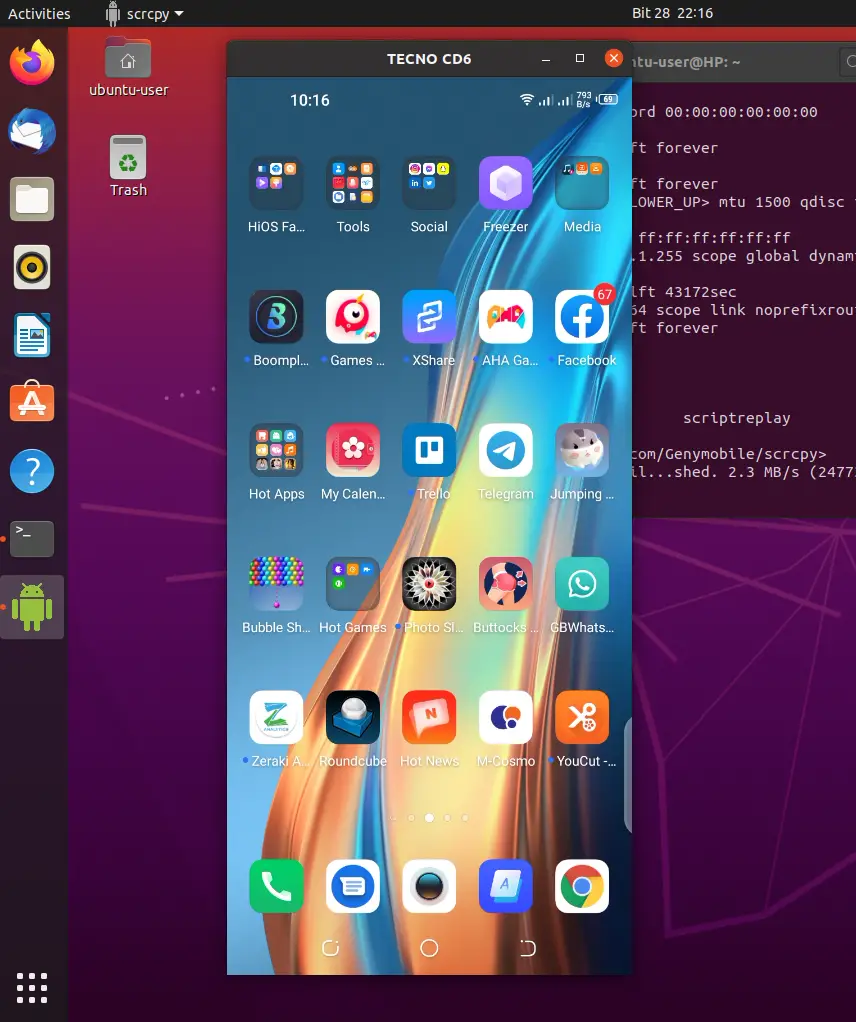
To access your phones’ screen on the PC, run the scrcpy command on the Terminal.
Using the ADB Shell
In the previous section, we have looked at various practical situations where you can use ADB. However, you will notice that we were executing all these commands in our working directory. That might not give you full access to the phone as you might want. And that’s where the adb shell command comes in. As the name states, these commands opens a direct shell to your phone.
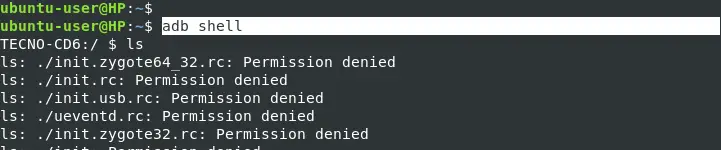
Here, you can run any Linux commands just like you would on the Terminal. What you can do with this simple shell is unimaginable.
Conclusion
Up to this point, we hope you now have a good understanding of the Android Debug Bridge (ADB) and how to install ADB tools on your Linux system. ADB gives you more privilege over your phone, allowing you to access more resources and features. Did you encounter any errors when installing or working with ADB? If so, please don’t hesitate to leave a comment below.
Источник
If you have used an Android phone for some time, you will notice that there are certain features and capabilities that you cannot access or perform. These include sideloading apps, taking screenshots in applications that forbid that (e.g. Telegram has such a feature), installing custom ROMs, removing unnecessary Google or manufacturer apps, creating frequent backups, etc.
Fortunately, there is a way that you can bypass all that and do anything you wish to do with your phone using the Android Debug Bridge (ADB). This post will guide you on Installing ADB and Fastboot Android Drivers on Linux.
Table of Contents
- What are ADB and Fastboot?
- Install ADB on Linux Systems
- Debian/ Ubuntu-based distributions
- RHEL/ CentOS/ Fedora
- How to Enable USB Debugging
- Starting ADB Server on Linux
- Optional: Connecting to USB Debugging Wirelessly.
- Using ADB on Linux
- Transferring Files with ADB
- Installing and Uninstalling Applications
- View Logs
- Access the Phone Screen on the PC
- Using the ADB Shell
- Conclusion
What are ADB and Fastboot?
To understand ADB, let’s have a quick look at what happens on an Android phone under the hood.
Android mobile phones run a customised version of the Linux kernel to perform the core system services (It must be a surprise to know Linux has a massive market in the phone industry, right?). Even though Android is regarded as open-source, phone manufacturers add certain restrictions which prevent the average user from tweaking the software.
The Android Debug Bridge (ADB) is a command-line tool that you can install on your PC and execute commands directly on your Android phone. This tool enables you to have more privileged access over your phone. To use ADB, you will first need to enable USB debugging on your phone – We will discuss this below.
With ADB, you can efficiently perform tasks like accessing your phone UI from your laptop, taking screenshots from your PC, and more. A more exciting bit is you can use ADB to remove malware and other malicious apps from your phone.
Fastboot, on the other hand, is a command-line tool that allows you to modify the flash system on your Android phone from your computer. That is made possible because this utility is built-in with the Android SDK. It enables you to install custom ROMs, root your mobile phone, or perform a custom recovery.
Install ADB on Linux Systems
To install ADB tools on Linux systems is pretty straightforward. Execute any of the commands below depending on your Linux distro.
Debian/ Ubuntu-based distributions
sudo apt-get install android-tools-adb
Or
sudo apt install adb
RHEL/ CentOS/ Fedora
To install ADB on any RHEL-based distribution, execute the command below.
sudo dnf install adb
To use ADB tools on your Android phone, we first need to enable USB debugging. Follow the steps below.
How to Enable USB Debugging
The procedure might differ from one phone to another. However, they all use simple logic. Find the build number on your Settings app and tap it continuously seven times until you see the notification “you are already a developer.”
For this post, we will use a Tecno phone. First, open the Settings application and click on “About Phone.” Scroll down until you see the “build number” option. Continuously tap this option seven times to enable USB debugging.
When done, navigate to the System option (still on the Settings app). Here, you should see a new option listed as “Developer Options.”
Open the Developer Options and scroll down till you see the USB Debugging option. Tap on it to enable USB debugging on your phone. See the image below.
Starting ADB Server on Linux
To start using USB debugging, we need to start the ADB server on our PC. Execute the command below.
adb start-server
Once done, connect your Android phone to your PC via the USB cable. If you are doing this for the first time, you will see a pop-up notification on your phone prompting you to whether to allow USB debugging. Select the option “Always allow from this computer.”
Optional: Connecting to USB Debugging Wirelessly.
You might need to use USB debugging, but you don’t want to use a USB cable to create a physical connection. In such a situation, you cannot connect to your phone wirelessly. Follow the steps below.
- Connect your phone to the same network your PC is connected to.
- Get the IP address assigned to your phone. You can do this from the Settings app on your phone or the router connection page. If you have a little background in computer security, you can also use a tool like Nmap. In our case, we easily accessed it from the Settings app.

- After retrieving the IP, execute the command on your PC.
adb tcpip [port_number]
e.g.
adb tcpip 5555
That will allow us to connect to our phone via port 5555. You can use any other port but not greater than 65535. We highly recommend using a port over 1000.
- To connect to your phone device wirelessly, execute the command below on your PC.
adb connect [phone_ip_address:port_number]
e.g.
adb connect 192.168.1.44:5555

From this point, you can now proceed to execute commands on your system.
Tip: If you encounter the error “error: insufficient permissions for device: user in plugdev group; are your udev rules wrong?” execute the commands below, then repeat the process.
adb kill-server
sudo adb start-server
sudo adb devices
To keep things simple, use one ADB connection. For example, if you connect wirelessly, don’t connect again via the USB cable. If you do that, you will encounter the error, “adb: error: failed to get feature set: more than one device/emulator.”
Using ADB on Linux
If you have used Linux systems for a while, you know that most utilities will change the Terminal prompt when running them. That’s not the case with ADB. The Terminal prompt will stay the same (probably pointing to your current working directory). And that’ is where you will execute your ADB commands. However, there is still the adb shell option, but we will look at that at end of this post.
Let’s look at some activities that you can carry out with ADB.
Transferring Files with ADB
Before we dive deeper, there are a few things you need to understand. The files you see on your phone are all located in the /storage/sdcard0 directory. If you insert an external SD card, it will be registered as /storage/sdcard1.
To copy a file from your computer to the Downloads folder on your phone, use the syntax below.
adb push [path_to_file] /storage/sdcard0/Downloads
E.g.
adb push test_dir /storage/sdcard0/Downloads
If the transfer was successful, you should see an output like file pushed.
To copy a file from the phone to our PC, we will use the pull command. For example, inside the test_dir directory that we copied to our phone, there was a file called image.jpg. Let’s copy this file from our phone to our PC. We will use the syntax below.
adb pull [path_to_file_on_the_phone]
E.g.
adb pull /storage/sdcard0/Downloads/test_dir/image.jpg
Installing and Uninstalling Applications
This is one of the most interesting features that fascinates me when using ADB. You have the power to remove applications that you cannot remove when using your normal phone UI.
To install an application, you first need to download that .apk file on your PC. Use the syntax below.
adb install [path_to_apk_file]
E.g.
adb install ProtonVPN_Android_App.apk
If the installation was successful, you will see the message Success on the Terminal.
To uninstall any application, we first need to list all installed applications. Execute the command below.
adb shell pm list packages
You will see a long list of all apps installed on your phone. The names might be quite complicated but you should still be able to spot your target app with ease.
To uninstall any app, use the syntax below.
adb uninstall --user 0 [application_name]
E.g.
adb uninstall --user 0 ch.protonvpn.android
View Logs
To view the logs on your android phone, execute the command below.
adb logcat
The output might be a little complex for the average user. However, if you are a developer or a security analyst, these logs are quite useful.
Access the Phone Screen on the PC
Another interesting feature you can use with ADB is accessing your phone’s screen on your PC. However, for this one, we need to install a package called scrcpy. If you are running any Debian/ Ubuntu-based distribution, execute the command below to install scrcpy.
sudo apt install scrcpy
To access your phones’ screen on the PC, run the scrcpy command on the Terminal.
scrcpy
Using the ADB Shell
In the previous section, we have looked at various practical situations where you can use ADB. However, you will notice that we were executing all these commands in our working directory. That might not give you full access to the phone as you might want. And that’s where the adb shell command comes in. As the name states, these commands opens a direct shell to your phone.
adb shell
Here, you can run any Linux commands just like you would on the Terminal. What you can do with this simple shell is unimaginable.
Conclusion
Up to this point, we hope you now have a good understanding of the Android Debug Bridge (ADB) and how to install ADB tools on your Linux system. ADB gives you more privilege over your phone, allowing you to access more resources and features. Did you encounter any errors when installing or working with ADB? If so, please don’t hesitate to leave a comment below.
Here are the steps to cast your Quest to your Mac. I’ve struggled with this for a week, but have finally got it working after no other methods / apps worked for me. This may help others as well. Also should add I’m running MacOS 10.14.2, not sure if that makes a difference.
Here’s a clip to show the latency I get on a 2.4Ghz connection (my router is upstairs at the other end of the house): https://streamable.com/s/7i2bb/ezkkyo
Installs:
Before getting started you need to sign up for a Dev account on the Oculus site. I assume most people have done this already but if not create an organisation here: https://dashboard.oculus.com/organizations/create.
Then enable Dev mode in the Oculus iOS app (you need your phone connected to Quest, then select «More Settings» / «Developer Mode»).
Then you need to install Command Line Developer Tools, Homebrew, Scrcpy, and adb:
1 — To install Command Line Developer Tools in Terminal type: xcode-select —install
2 — Then install Homebrew (https://brew.sh). In Terminal type:
ruby -e «$(curl -fsSL https://raw.githubusercontent.com/Homebrew/install/master/install)»
3 — Then install Scrcpy. In Terminal type: brew install scrcpy (Then wait… takes ages to install, maybe 10-15mins).
4 — Then install adb. In Terminal type: brew cask install android-platform-tools
For USB:
To start casting (over USB) plug your Quest into your Mac and in Terminal type: scrcpy
It’s probably good to do this first to make sure it’s all working.
There are other launch commands you can add to modify how the casting looks, see below.
For Wifi:
To cast over wifi, download this automated casting script app and follow the instructions:
https://mega.nz/#!Dn4lQQzR!B_WFhcnhgVinaSA3pXVvo_uzDztYKi4jnCQLKetWLsU
You will need to allow the app in your System Security settings. And make sure both devices are on the same wifi network.
This script will open in Terminal, and it is possible to customize it in a text editor. Simply run it whenever you want to cast your Quest to your Mac.
Manual Older Way:
If you prefer to manually run the terminal commands, here’s the old way to do it over wifi:
1 — Plug your Quest into your Mac with USB. Also make sure they are on the same wifi network.
2 — Get your Quest’s local IP address. In Terminal type: adb shell ip route. Your Quest’s local IP address will be the one at the end after «scope link src»
3 — In Terminal type: adb tcpip 5555
4 — Disconnect the Quest USB cable from your Mac
5 — In Terminal type: adb connect 192.168.x.x:5555 (i.e whatever your Quest IP address is, plus :5555)
6 — Then in Terminal to start casting wirelessly type: scrcpy
Disconnect:
I’m not sure if this is needed, but it might be good to disconnect from adb when you’re finished. Run these two commands in Terminal:
adb disconnect
adb kill-server
They might also come in handy if you’re having connection problems to start everything again.
Extras:
For added control on launch you can change the bitrate, crop the image, scale the image, record, and go full screen.
Scroll down the Github page for the launch commands to put in Terminal: https://github.com/genymobile/scrcpy
Here’s my launch command that crops it down to a 16:9 rectangle and lowers the bitrate a bit for smoother casting:
scrcpy -c1280:720:100:400 -b4M -m720
You can also toggle Fullscreen by pressing: Command-Control-F
Another bonus is you can drag APK’s, movies, photos etc onto the casting window and they will be sideloaded onto your Quest.
Edited IP address tip from u/jpaulgale. Thanks!
Edited to show clip of casting latency.
Edited to add Dev mode steps, thanks u/galopping_giraffe for the reminder!
Edited to add automated wifi casting script version by u/GromitATL
Содержание
- 0.1 17 comments
- 0.2 Принцип работы ADB Sideload
- 0.3 Необходимое для ADB S >драйвер Android и после установить его
Скачать программу — ADB RUN или ADB
Заряд Andro >Отладка по USB на Android
ZIP архив-обновление - 0.4 Инструкция использования ADB Sideload
- 0.5 Способ №1
- 0.6 Если у вас стандартное или CWM Recovery оно может называться
- 0.7 Если у вас TWRP Recovery
- 0.8 Способ №2
- 0.9 ADB Sideload что это? Принцип работы ADB Sideload
- 0.10 Необходимое для прошивки ADB Sideload
- 1 Подготовка Android к прошивке в ADB SIDELOAD
- 1.1 В стандартном или CWM Recovery необходимо выбрать:
- 1.2 Sideload в TWRP Recovery
- 2 Как пользоваться ADB Sideload? Установка прошивки с помощью ADB SIDELOAD
- 2.1 Способ №1. С помощью ADB
- 2.2 Способ №2. ADB Sideload с помощью ADB RUN
- 3 Ошибки ADB Sideload
Если при использовании ADB возникает ошибка error: device not found , не обязательно переключать/перезапускать телефон/эмулятор, достаточно перезапустить демон adb:
adb kill-server, после чего следует подождатьне менее 5 сек. После этого любая adb-команда снова запустит демона, и в большинстве случаев связь восстанавливается и все девайсы обнаруживаются.
Но, если даже несколько перезапусков не решили проблему, то есть ещё вариант решения проблемы: в эмуляторе/на телефоне в настройках отладки выключить и снова включить галочку «Разрешать отладку», это вызовет соответствующий перезапуск сервиса отладки, но только уже со стороны Андроида.
Отлично, спасибо 
не понял!что за демон adb?
Демон adb — процесс на копьютере, тот самый «сервер» adb (хотя он является лишь клиентом). Также на телефоне есть adbd — adb-хост, отвечающий на запросы с компьютера или другого клиента.
добрый день! помогите пожалуйста. При установки у меня всегда выходит ошибка device not found, и я не знаю что делать у меня телефон nokia xl

ADB sideload, как пользоваться. Команда adb sideload очень прекрасна и с помощью ее можно легко выполнить обновление прошивки или выполнить восстановление Android в случае если он не загружается!
Еще раз о том для чего нужна команда ADB SIDELOAD — данная команда необходима для того чтобы выполнять прошивку ZIP архивов из меню recovery или если отсутствует bootloader. У данной команды есть аналог fastboot -w update, но у многих Android девайсов утилита fastboot не работает, соответственно adb sideload является универсальным средством.
Принцип работы ADB Sideload
ZIP архив-обновление находится в папке с утилитой adb, смартфон или планшет переводится в режим recovery или bootloader. Запускается утилита adb и прописывается командаadb sideload .zip, после чего архив копируется в Android и затем прошивается.
Необходимое для ADB S >драйвер Android и после установить его
Скачать программу — ADB RUN или ADB
Заряд Andro >Отладка по USB на Android
ZIP архив-обновление
Инструкция использования ADB Sideload
В данной статье будет предложено два варианта как можно воспользоваться adb sideload, первый способ — демонстрация как все работает от начала до конца, второй способ — автоматизированный, без лишних действий и писанины руками.
Способ №1
1. Подключаем устройство Android к компьютеру
2. Файл ZIP архив-обновление переместить по пути C:/adb/progbin
3. Запускаем программу ADB RUN или переходим в меню Manual Command -> ADB

4. Далее проверим «видит» ли adb ваш Android для этого наберем команду:
И должны получить следующий ответ:
Если получим ответ (ошибка):
Если получим ответ (ошибка):
То есть ничего нет, после attached, то устройство не видно (переустанавливаем драйвера, меняем порт USB, меняем кабель USB)
5. Переводим устройство в режим Recovery или режим Bootloader
6. В зависимости от Recovery в некоторых случаях необходимо включать принудительно включать на устройстве режим передачи и установки Sideload:
Если у вас стандартное или CWM Recovery оно может называться
- install zip from sileload
- apply update from ADB
- ADB Sideload
и находится это меню может в главном разделе Recovery, раздел Advanced или Install ZIP.

Если у вас TWRP Recovery
Чтобы активировать sideload перейдите в Advanced -> ADB Sideload и потянуть нижний ползунок вправо:

Далее все остальные действия происходят на компьютере.
7. В ADB RUN пишем следующую команду:
Где XXXXXXXX — точное название прошиваемого ZIP обновления (учитывая ЗаГЛАвные или строЧНЫЕ, как написано, названия иначе получите ошибку)
После чего начнется перемещение обновления (прошивки) на Android и обновление.
- Если вы получили ошибку error: closed — не активировали sideload на Android
- Если вы получили ошибку error: device not found — не видит Android, меняйте ядро, recovery, перезапустить Android и снова перевести в режим.
Способ №2
1. Подключаем устройство Android к компьютеру
2. Запускаем программу ADB RUN и переходим в меню Reboot Device -> выбрать Reboot Recovery или Reboot Bootloader (если нет на устройстве Recovery)
3. Активируем sideload на устройстве

4. Вернуться в главное меню и перейти в меню Move -> Sideload

5. Выбрать вначале пункт Copy ZIP to Directory, в открывшееся окно переместить ZIP архив-обновление, после закрыть окно
6. Выбрать Istall ZIP после чего, выбрать прошиваемый файл, после чего начнется прошивка.
- Если вы получили ошибку error: closed — не активировали s >error: device not found — не видит Android, меняйте ядро, recovery, перезапустить Android и снова перевести в режим.
Подробно расскажем как пользоваться adb sideload — выполнить обновление прошивки или восстановление Android в случае если он не загружается!
Еще раз о том для что делает ADB SIDELOAD — данная команда необходима для того, чтобы выполнять прошивку ZIP архивов из меню recovery.
ADB Sideload что это? Принцип работы ADB Sideload
ADB Sideload — это специальный режим установки прошивки, с помощью утилиты ADB.
Принцип работы следующий: ZIP архив-обновление находится в папке с утилитой adb, смартфон или планшет переводится в режим recovery. Запускается утилита adb, и прописывается команда adb sideload filename.zip (вместо filename указать ваш ZIP), после чего архив копируется в Android и прошивается.
Необходимое для прошивки ADB Sideload
- Компьютер или ноутбук
- Скачать драйвер Android и после установить его
- Скачать фирменную программу сайта — ADB RUN или adb
- Заряд Android устройства более чем 40%
- Оригинальный, неповрежденный кабель USB
- Включить Отладка по USB на Android
- ZIP архив-обновление
Подготовка Android к прошивке в ADB SIDELOAD
Телефон или планшет Android необходимо перевести в режим Recovery переведя его руками или с помощью adb. После чего необходимо активировать на Android прошивку через adb sideload.
В стандартном или CWM Recovery необходимо выбрать:
- install zip from sileload
- apply update from ADB
- ADB S >
Иногда это опция находиться в меню Advanced.
Sideload в TWRP Recovery
Далее все остальные действия происходят на компьютере.
Как пользоваться ADB Sideload?
Установка прошивки с помощью ADB SIDELOAD
В этой статье будет предложено два варианта как можно воспользоваться adb sideload, первый способ — демонстрация как все работает от начала до конца в adb, второй способ — автоматизированный сайтом Android +1 с помощью ADB RUN, без лишних действий и писанины руками.
Способ №1. С помощью ADB
- Подключаем устройство Andro > adb sideload XXXXXXXX.zip
Где XXXXXXXX — точное название прошиваемого ZIP обновления (учитывая ЗаГЛАвные или строЧНЫЕ, как написано, названия иначе получите ошибку)После чего начнется перемещение обновления (прошивки) на Android и установка на смартфон или планшет.
Способ №2. ADB Sideload с помощью ADB RUN
- Подключаем устройство Android к компьютеру
- Запускаем программу ADB RUN и переходим в меню Reboot Device -> выбрать Reboot Recovery
- Активируем s />
- Выбрать вначале пункт Copy ZIP to Directory, в открывшееся окно переместить ZIP архив-обновление, после закрыть окно
- Выбрать Istall ZIP после чего, выбрать прошиваемый файл, после чего начнется прошивка.
Ошибки ADB Sideload
- Если вы получили ошибку error: closed — не активировали sideload на Android;
- Если вы получили ошибку error: device not found — не видит Android, меняйте ядро, recovery, перезапустить Android и снова перевести в режим.
Вот и все! Больше статей и инструкций читайте в разделе Статьи и Хаки Android. Оставайтесь вместе с сайтом Android +1, дальше будет еще интересней!
Мало того, что OBD2 ошибки работы двигателя или других электронных систем автомобиля не всегда на прямую указывают на неработающий элемент, но и в разных марках и моделях автомобилей одна и таже ошибка может возникать как следствие неисправности абсолютно разных элементов электронной системы.
Мы надеемся, с Вашей помощью, сформировать причино-следственную связь возникновения той или иной OBD2 ошибки у конкретного автомобиля (марка и модель). Как показал опыт если рассматривать определенную марка-модель автомобиля, то в подавляющем большинстве случаев причина ошибки одна и также.
Если ошибка указывает на неверные параметры (высокие или низкие значения) какого нибудь из датчиков или анализаторов, то вероятней всего этот элемент исправен, а проблему надо искать так сказать «выше по течению», в элементах работу которых анализирует датчик или зонд.
Если ошибка указывает на постоянно открытый или закрытый клапан, то тут надо подойти к решению вопроса с умом, а не менять бездумно этот элемент. Причин может быть несколько: клапан засорен, клапан заклинил, на клапан приходит неверный сигнал от других неисправных узлов.
Ошибки работы двигателя OBD2 и других систем автомобиля не всегда на прямую указывают на неработающий элемент. Сама по себе ошибка является косвенными данными о неисправности в системе, в некотором смысле подсказкой, и только в редких случаях прямым указанием на неисправный элемент, датчик или деталь. Ошибки (коды ошибок) полученные от прибора, сканера требуют правильной интерпретации информации, дабы не тратить время и деньги на замену работающих элементов автомобиля. Проблема зачастую кроется намного глубже чем кажется на первый взгляд. Это вызвано теми обстоятельствами, что информационные сообщения содержат, как было выше сказано, косвенную информацию о шарушении работы системы.
Вот пару общих примеров. Если ошибка указывает на неверные параметры (высокие или низкие значения) какого нибудь из датчиков или анализаторов, то вероятней всего этот элемент исправен, так как он анализирует (выдает некие параметры или значения), а проблему надо искать так сказать «выше по течению», в элементах работу которых анализирует датчик или зонд.
Если ошибка указывает на постоянно открытый или закрытый клапан, то тут надо подойти к решению вопроса с умом, а не менять бездумно этот элемент. Причин может быть несколько: клапан засорен, клапан заклинил, на клапан приходит неверный сигнал от других неисправных узлов.
Еще один момент который хотелось бы отметить — это специфика той или иной марки и модели. Поэтому узнав ошибку работы двигателя или дрогой системы Вашего автомобиля не спешите делать поспешных решений, а подойдите к вопросу комплексно.
I’m back! Having the same issue. May be related in some way with #22, but maybe not. It is running fine without livereload. Here’s the output with ionic cordova run android --livereload --verbose:
[native-run] 2019-06-03T19:35:05.407Z native-run:android:utils:adb:getDevices Invoking adb: '/home/lucio/Android/Sdk/platform-tools/adb' [ 'devices', '-l' ]
[native-run] 2019-06-03T19:35:05.413Z native-run:android:utils:adb:parseAdbDevices Parsing adb devices from output lines: [ 'List of devices attached',
[native-run]   '192.168.0.3:5555       device product:mido model:Redmi_Note_4 device:mido transport_id:1',
[native-run]   '',
[native-run]   '' ]
[native-run] 2019-06-03T19:35:05.414Z native-run:android:utils:adb:getDeviceProperties Invoking adb: '/home/lucio/Android/Sdk/platform-tools/adb' [ '-s', '192.168.0.3:5555', 'shell', 'getprop' ]
[native-run] 2019-06-03T19:35:05.484Z native-run:android:utils:adb:getDevices Found adb devices: [ { serial: '192.168.0.3:5555',
[native-run]     state: 'device',
[native-run]     type: 'hardware',
[native-run]     connection: 'tcpip',
[native-run]     properties:
[native-run]      { product: 'mido',
[native-run]        model: 'Redmi_Note_4',
[native-run]        device: 'mido',
[native-run]        transport_id: '1' },
[native-run]     manufacturer: 'Xiaomi',
[native-run]     model: 'Redmi Note 4',
[native-run]     product: 'mido',
[native-run]     sdkVersion: '24' } ]
[native-run] 2019-06-03T19:35:05.485Z native-run:android:utils:avd:getAVDINIs Discovered AVD ini files: [ '/home/lucio/.android/avd/Pixel_2_API_28.ini' ]
[native-run] Selected hardware device 192.168.0.3:5555
[native-run] 2019-06-03T19:35:05.604Z native-run:android:utils:adb:getDeviceProperty Invoking adb: '/home/lucio/Android/Sdk/platform-tools/adb' [ '-s',
[native-run]   '192.168.0.3:5555',
[native-run]   'shell',
[native-run]   'getprop',
[native-run]   'dev.bootcomplete' ]
[native-run] 2019-06-03T19:35:05.655Z native-run:android:utils:adb:waitForBoot Device 192.168.0.3:5555 is booted!
[native-run] 2019-06-03T19:35:05.655Z native-run:android:utils:adb:forwardPorts Invoking adb: '/home/lucio/Android/Sdk/platform-tools/adb' [ '-s', '192.168.0.3:5555', 'reverse', 'tcp:8100', 'tcp:8100' ]
[native-run] 2019-06-03T19:35:05.664Z native-run Caught fatal error: { Error: Command failed: /home/lucio/Android/Sdk/platform-tools/adb -s 192.168.0.3:5555 reverse tcp:8100 tcp:8100
[native-run] adb: error: more than one device/emulator
[native-run]
[native-run]     at ChildProcess.exithandler (child_process.js:297:12)
[native-run]     at ChildProcess.emit (events.js:197:13)
[native-run]     at maybeClose (internal/child_process.js:988:16)
[native-run]     at Socket.stream.socket.on (internal/child_process.js:404:11)
[native-run]     at Socket.emit (events.js:197:13)
[native-run]     at Pipe._handle.close (net.js:611:12)
[native-run]   killed: false,
[native-run]   code: 1,
[native-run]   signal: null,
[native-run]   cmd:
[native-run]    '/home/lucio/Android/Sdk/platform-tools/adb -s 192.168.0.3:5555 reverse tcp:8100 tcp:8100',
[native-run]   stdout: '',
[native-run]   stderr: 'adb: error: more than one device/emulatorn' }
[native-run] Error: Command failed: /home/lucio/Android/Sdk/platform-tools/adb -s 192.168.0.3:5555 reverse tcp:8100 tcp:8100
[native-run] adb: error: more than one device/emulator
[native-run]
[native-run]     at ChildProcess.exithandler (child_process.js:297:12)
[native-run]     at ChildProcess.emit (events.js:197:13)
[native-run]     at maybeClose (internal/child_process.js:988:16)
[native-run]     at Socket.stream.socket.on (internal/child_process.js:404:11)
[native-run]     at Socket.emit (events.js:197:13)
[native-run]     at Pipe._handle.close (net.js:611:12)
[ERROR] An error occurred while running subprocess native-run.

        native-run android --app platforms/android/app/build/outputs/apk/debug/app-debug... exited with exit code 1.

        Re-running this command with the --verbose flag may provide more information.
  ionic:utils-process onBeforeExit handler: 'process.exit' received +0ms
  ionic:utils-process onBeforeExit handler: running 5 functions +0ms
  ionic:lib:hooks Looking for ionic:serve:after npm script. +26s
  ionic:utils-process processExit: exiting (exit code: 1) +20ms
and here is the output with native-run android --app platforms/android/app/build/outputs/apk/debug/app-debug.apk --verbose:
lucio@pop-os:~/holonfix/mechanicionic$ native-run android --app platforms/android/app/build/outputs/apk/debug/app-debug.apk --verbose
  native-run:android:utils:sdk:resolveSDKRoot Looking for $ANDROID_HOME +0ms
  native-run:android:utils:sdk:resolveSDKRoot Using $ANDROID_HOME at /home/lucio/Android/Sdk +3ms
  native-run:android:utils:sdk:resolveEmulatorHome Looking for $ANDROID_EMULATOR_HOME +0ms
  native-run:android:utils:sdk:resolveEmulatorHome Using $HOME/.android/ at /home/lucio/.android +0ms
  native-run:android:utils:sdk:resolveAVDHome Looking for $ANDROID_AVD_HOME +0ms
  native-run:android:utils:sdk:resolveAVDHome Using $HOME/.android/avd/ at /home/lucio/.android/avd +0ms
  native-run:android:utils:sdk:getSDKPackage Parsing /home/lucio/Android/Sdk/platform-tools/package.xml +0ms
  native-run:android:utils:adb:getDevices Invoking adb: '/home/lucio/Android/Sdk/platform-tools/adb' [ 'devices', '-l' ] +0ms
  native-run:android:utils:adb:parseAdbDevices Parsing adb devices from output lines: [ 'List of devices attached',
  native-run:android:utils:adb:parseAdbDevices   '192.168.0.3:5555       device product:mido model:Redmi_Note_4 device:mido transport_id:1',
  native-run:android:utils:adb:parseAdbDevices   '',
  native-run:android:utils:adb:parseAdbDevices   '' ] +0ms
  native-run:android:utils:adb:getDeviceProperties Invoking adb: '/home/lucio/Android/Sdk/platform-tools/adb' [ '-s', '192.168.0.3:5555', 'shell', 'getprop' ] +0ms
  native-run:android:utils:adb:getDevices Found adb devices: [ { serial: '192.168.0.3:5555',
  native-run:android:utils:adb:getDevices     state: 'device',
  native-run:android:utils:adb:getDevices     type: 'hardware',
  native-run:android:utils:adb:getDevices     connection: 'tcpip',
  native-run:android:utils:adb:getDevices     properties:
  native-run:android:utils:adb:getDevices      { product: 'mido',
  native-run:android:utils:adb:getDevices        model: 'Redmi_Note_4',
  native-run:android:utils:adb:getDevices        device: 'mido',
  native-run:android:utils:adb:getDevices        transport_id: '1' },
  native-run:android:utils:adb:getDevices     manufacturer: 'Xiaomi',
  native-run:android:utils:adb:getDevices     model: 'Redmi Note 4',
  native-run:android:utils:adb:getDevices     product: 'mido',
  native-run:android:utils:adb:getDevices     sdkVersion: '24' } ] +85ms
  native-run:android:utils:avd:getAVDINIs Discovered AVD ini files: [ '/home/lucio/.android/avd/Pixel_2_API_28.ini' ] +0ms
Selected hardware device 192.168.0.3:5555
  native-run:android:utils:adb:getDeviceProperty Invoking adb: '/home/lucio/Android/Sdk/platform-tools/adb' [ '-s',
  native-run:android:utils:adb:getDeviceProperty   '192.168.0.3:5555',
  native-run:android:utils:adb:getDeviceProperty   'shell',
  native-run:android:utils:adb:getDeviceProperty   'getprop',
  native-run:android:utils:adb:getDeviceProperty   'dev.bootcomplete' ] +0ms
  native-run:android:utils:adb:waitForBoot Device 192.168.0.3:5555 is booted! +0ms
Installing platforms/android/app/build/outputs/apk/debug/app-debug.apk...
  native-run:android:utils:adb:installApk Invoking adb: '/home/lucio/Android/Sdk/platform-tools/adb' [ '-s',
  native-run:android:utils:adb:installApk   '192.168.0.3:5555',
  native-run:android:utils:adb:installApk   'install',
  native-run:android:utils:adb:installApk   '-r',
  native-run:android:utils:adb:installApk   '-t',
  native-run:android:utils:adb:installApk   'platforms/android/app/build/outputs/apk/debug/app-debug.apk' ] +0ms
Starting application activity com.holonic.mech/com.holonic.mech.MainActivity...
  native-run:android:utils:adb:startActivity Invoking adb: '/home/lucio/Android/Sdk/platform-tools/adb' [ '-s',
  native-run:android:utils:adb:startActivity   '192.168.0.3:5555',
  native-run:android:utils:adb:startActivity   'shell',
  native-run:android:utils:adb:startActivity   'am',
  native-run:android:utils:adb:startActivity   'start',
  native-run:android:utils:adb:startActivity   '-W',
  native-run:android:utils:adb:startActivity   '-n',
  native-run:android:utils:adb:startActivity   'com.holonic.mech/com.holonic.mech.MainActivity' ] +0ms
Run Successful
lucio@pop-os:~/holonfix/mechanicionic$
With the last one the app is installed in the phone, but it doesn’t connect to livereload, because even if the server address is passed, the app shows «no connection to localhost:8100».
Я подключил устройство Android по беспроводной сети через tcpip к порту 5555. Когда я запускаю команду «adb devices», я получаю следующий вывод
Список подключенных устройств
172.16.202.156: устройство 5555
Теперь я запускаю тестовый пример appium на том же устройстве, используя следующие возможности
«appPackage»: «com. ***».,
«uiautomator2ServerInstallTimeout»: «500000»,
«DeviceName»: «172.16.202.156: 5555»,
«AppActivity»: «********. Всплеск активности»,
«androidInstallTimeout»: «500000»,
«nativeInstrumentsLib»: «true»,
«newCommandTimeout»: «500»,
«adbExecTimeout»: «520000»,
«platformVersion»: «9»,
«automationName»: «UiAutomator2»,
«Имя браузера»: «»,
«waitForAppScript»: «$.delay (5000);»,
«platformName»: «Android»,
«autoAcceptAlerts»: «true»
Я получаю сообщение об ошибке при выполнении команды adb в журналах сервера appium.
[debug] [35m [MJSONWP] [39m Обнаружена внутренняя ошибка при выполнении команды: Ошибка: ошибка при получении версии платформы устройства. Исходная ошибка: ошибка при выполнении adbExec. Исходная ошибка: ‘Command’/Users/ mac1 / Library / Android / sdk / platform-tools / adb -P 5037 -s 172.16.202.156: 5555 shell getprop ro.build.version.release’завершен с кодом 1’; Stderr: ‘ошибка: неизвестная служба хоста’; Код: ‘1’ [debug] [35m [MJSONWP] [39m в ADB.getPlatformVersion (/Applications/Appium.app/Contents/Resources/app/node_modules/appium/node_modules/appium-adb/lib/tools/adb-commands.js:122:11 ) [отладка] [35m[MJSONWP] [39m Разрушает соединение с сокетом
Вот полные журналы сервера appium.
 [info] [35m[Appium][39m Welcome to Appium v1.17.1
[info] [35m[Appium][39m Non-default server args:
[info] [35m[Appium][39m   allowInsecure: {
[info] [35m[Appium][39m   }
[info] [35m[Appium][39m   denyInsecure: {
[info] [35m[Appium][39m   }
[info] [35m[Appium][39m Appium REST http interface listener started on 0.0.0.0:4723[info] [35m[HTTP][39m [37m-->[39m [37mGET[39m [37m/wd/hub/status[39m
[info] [35m[HTTP][39m [90m{}[39m
[debug] [35m[GENERIC][39m Calling AppiumDriver.getStatus() with args: []
[debug] [35m[GENERIC][39m Responding to client with driver.getStatus() result: {"build":{"version":"1.17.1"}}
[info] [35m[HTTP][39m [37m<-- GET /wd/hub/status [39m[32m200[39m [90m9 ms - 68[39m
[info] [35m[HTTP][39m [90m[39m
[info] [35m[HTTP][39m [37m-->[39m [37mGET[39m [37m/wd/hub/status[39m
[info] [35m[HTTP][39m [90m{}[39m
[debug] [35m[GENERIC][39m Calling AppiumDriver.getStatus() with args: []
[debug] [35m[GENERIC][39m Responding to client with driver.getStatus() result: {"build":{"version":"1.17.1"}}
[info] [35m[HTTP][39m [37m<-- GET /wd/hub/status [39m[32m200[39m [90m2 ms - 68[39m
[info] [35m[HTTP][39m [90m[39m[info] [35m[HTTP][39m [37m-->[39m [37mPOST[39m [37m/wd/hub/session[39m
[info] [35m[HTTP][39m [90m{"capabilities":{"desiredCapabilities":{"appPackage":"com.********.******","uiautomator2ServerInstallTimeout":"500000","deviceName":"172.16.202.156:5555","appActivity":"crc646c9a2553fa37f659.SplashActivity","androidInstallTimeout":"500000","nativeInstrumentsLib":"true","newCommandTimeout":"500","adbExecTimeout":"520000","platformVersion":"9","automationName":"UiAutomator2","browserName":"","waitForAppScript":"$.delay(5000);","platformName":"Android","autoAcceptAlerts":"true"},"requiredCapabilities":{}},"desiredCapabilities":{"appPackage":"com.********.******","uiautomator2ServerInstallTimeout":"500000","deviceName":"172.16.202.156:5555","appActivity":"crc646c9a2553fa37f659.SplashActivity","androidInstallTimeout":"500000","nativeInstrumentsLib":"true","newCommandTimeout":"500","adbExecTimeout":"520000","platformVersion":"9","automationName":"UiAutomator2","browserName":"","waitForAppScript":"$.delay(5000);","platformName":"Android","autoAcceptAlerts":"true"},"requiredCapabilities":{}}[39m
[debug] [35m[W3C][39m Calling AppiumDriver.createSession() with args: [{"appPackage":"com.********.******","uiautomator2ServerInstallTimeout":"500000","deviceName":"172.16.202.156:5555","appActivity":"crc646c9a2553fa37f659.SplashActivity","androidInstallTimeout":"500000","nativeInstrumentsLib":"true","newCommandTimeout":"500","adbExecTimeout":"520000","platformVersion":"9","automationName":"UiAutomator2","browserName":"","waitForAppScript":"$.delay(5000);","platformName":"Android","autoAcceptAlerts":"true"},{},{"desiredCapabilities":{"appPackage":"com.********.******","uiautomator2ServerInstallTimeout":"500000","deviceName":"172.16.202.156:5555","appActivity":"crc646c9a2553fa37f659.SplashActivity","androidInstallTimeout":"500000","nativeInstrumentsLib":"true","newCommandTimeout":"500","adbExecTimeout":"520000","platformVersion":"9","automationName":"UiAutomator2","browserName":"","waitForAppScript":"$.delay(5000);","platformName":"Android","autoAcceptAlerts":"true"},"requiredCapabilities":{}}]
[debug] [35m[BaseDriver][39m Event 'newSessionRequested' logged at 1614153815161 (08:03:35 GMT 0000 (Coordinated Universal Time))
[info] [35m[Appium][39m Appium v1.17.1 creating new AndroidUiautomator2Driver (v1.44.2) session
[debug] [35m[BaseDriver][39m Creating session with MJSONWP desired capabilities: {
[debug] [35m[BaseDriver][39m   "appPackage": "com.********.******",
[debug] [35m[BaseDriver][39m   "uiautomator2ServerInstallTimeout": "500000",
[debug] [35m[BaseDriver][39m   "deviceName": "172.16.202.156:5555",
[debug] [35m[BaseDriver][39m   "appActivity": "crc646c9a2553fa37f659.SplashActivity",
[debug] [35m[BaseDriver][39m   "androidInstallTimeout": "500000",
[debug] [35m[BaseDriver][39m   "nativeInstrumentsLib": "true",
[debug] [35m[BaseDriver][39m   "newCommandTimeout": "500",
[debug] [35m[BaseDriver][39m   "adbExecTimeout": "520000",
[debug] [35m[BaseDriver][39m   "platformVersion": "9",
[debug] [35m[BaseDriver][39m   "automationName": "UiAutomator2",
[debug] [35m[BaseDriver][39m   "browserName": "",
[debug] [35m[BaseDriver][39m   "waitForAppScript": "$.delay(5000);",
[debug] [35m[BaseDriver][39m   "platformName": "Android",
[debug] [35m[BaseDriver][39m   "autoAcceptAlerts": "true"
[debug] [35m[BaseDriver][39m }
[warn] [35m[BaseDriver][39m Capability 'newCommandTimeout' changed from string ('500') to integer (500). This may cause unexpected behavior
[warn] [35m[BaseDriver][39m Capability 'uiautomator2ServerInstallTimeout' changed from string ('500000') to integer (500000). This may cause unexpected behavior
[warn] [35m[BaseDriver][39m Capability 'androidInstallTimeout' changed from string ('500000') to integer (500000). This may cause unexpected behavior
[warn] [35m[BaseDriver][39m Capability 'adbExecTimeout' changed from string ('520000') to integer (520000). This may cause unexpected behavior
[warn] [35m[BaseDriver][39m The following capabilities were provided, but are not recognized by Appium:
[warn] [35m[BaseDriver][39m   nativeInstrumentsLib
[warn] [35m[BaseDriver][39m   waitForAppScript
[warn] [35m[BaseDriver][39m   autoAcceptAlerts
[info] [35m[BaseDriver][39m Session created with session id: 8fea8be0-33b8-4fca-8d01-39121a8731ae
[info] [35m[UiAutomator2][39m Starting 'com.********.******' directly on the device[info] [35m[ADB][39m Found 2 'build-tools' folders under '/Users/mac1/Library/Android/sdk' (newest first):
[info] [35m[ADB][39m     /Users/mac1/Library/Android/sdk/build-tools/30.0.0
[info] [35m[ADB][39m     /Users/mac1/Library/Android/sdk/build-tools/28.0.3
[info] [35m[ADB][39m Using 'adb' from '/Users/mac1/Library/Android/sdk/platform-tools/adb'
[info] [35m[AndroidDriver][39m Retrieving device list
[debug] [35m[ADB][39m Trying to find a connected android device
[debug] [35m[ADB][39m Getting connected devices...
[debug] [35m[ADB][39m Connected devices: [{"udid":"172.16.202.156:5555","state":"device"}]
[info] [35m[AndroidDriver][39m Looking for a device with Android '9.0.0'
[debug] [35m[ADB][39m Setting device id to 172.16.202.156:5555
[info] [35m[ADB][39m Getting device platform version
[debug] [35m[ADB][39m Running '/Users/mac1/Library/Android/sdk/platform-tools/adb -P 5037 -s 172.16.202.156:5555 shell getprop ro.build.version.release'
[debug] [35m[UiAutomator2][39m Deleting UiAutomator2 session
[debug] [35m[BaseDriver][39m Event 'newSessionStarted' logged at 1614153815988 (08:03:35 GMT 0000 (Coordinated Universal Time))
[debug] [35m[MJSONWP][39m Encountered internal error running command: Error: Error getting device platform version. Original error: Error executing adbExec. Original error: 'Command '/Users/mac1/Library/Android/sdk/platform-tools/adb -P 5037 -s 172.16.202.156:5555 shell getprop ro.build.version.release' exited with code 1'; Stderr: 'error: unknown host service'; Code: '1'
[debug] [35m[MJSONWP][39m     at ADB.getPlatformVersion (/Applications/Appium.app/Contents/Resources/app/node_modules/appium/node_modules/appium-adb/lib/tools/adb-commands.js:122:11)
[debug] [35m[MJSONWP][39m Destroying socket connection
[info] [35m[HTTP][39m [37m<-- POST /wd/hub/session [39m[31m500[39m [90m893 ms - 436[39m
[info] [35m[HTTP][39m [90m[39m[info] [35m[HTTP][39m [37m-->[39m [37mPOST[39m [37m/wd/hub/session[39m
[info] [35m[HTTP][39m [90m{"desiredCapabilities":{"appPackage":"com.********.******","uiautomator2ServerInstallTimeout":"500000","deviceName":"172.16.202.156:5555","appActivity":"crc646c9a2553fa37f659.SplashActivity","androidInstallTimeout":"500000","nativeInstrumentsLib":"true","newCommandTimeout":"500","adbExecTimeout":"520000","platformVersion":"9","automationName":"UiAutomator2","browserName":"","waitForAppScript":"$.delay(5000);","platformName":"Android","autoAcceptAlerts":"true"},"requiredCapabilities":{}}[39m
[debug] [35m[MJSONWP][39m Calling AppiumDriver.createSession() with args: [{"appPackage":"com.********.******","uiautomator2ServerInstallTimeout":"500000","deviceName":"172.16.202.156:5555","appActivity":"crc646c9a2553fa37f659.SplashActivity","androidInstallTimeout":"500000","nativeInstrumentsLib":"true","newCommandTimeout":"500","adbExecTimeout":"520000","platformVersion":"9","automationName":"UiAutomator2","browserName":"","waitForAppScript":"$.delay(5000);","platformName":"Android","autoAcceptAlerts":"true"},{},null]
[debug] [35m[BaseDriver][39m Event 'newSessionRequested' logged at 1614153816119 (08:03:36 GMT 0000 (Coordinated Universal Time))
[info] [35m[Appium][39m Appium v1.17.1 creating new AndroidUiautomator2Driver (v1.44.2) session
[debug] [35m[BaseDriver][39m Creating session with MJSONWP desired capabilities: {
[debug] [35m[BaseDriver][39m   "appPackage": "com.********.******",
[debug] [35m[BaseDriver][39m   "uiautomator2ServerInstallTimeout": "500000",
[debug] [35m[BaseDriver][39m   "deviceName": "172.16.202.156:5555",
[debug] [35m[BaseDriver][39m   "appActivity": "crc646c9a2553fa37f659.SplashActivity",
[debug] [35m[BaseDriver][39m   "androidInstallTimeout": "500000",
[debug] [35m[BaseDriver][39m   "nativeInstrumentsLib": "true",
[debug] [35m[BaseDriver][39m   "newCommandTimeout": "500",
[debug] [35m[BaseDriver][39m   "adbExecTimeout": "520000",
[debug] [35m[BaseDriver][39m   "platformVersion": "9",
[debug] [35m[BaseDriver][39m   "automationName": "UiAutomator2",
[debug] [35m[BaseDriver][39m   "browserName": "",
[debug] [35m[BaseDriver][39m   "waitForAppScript": "$.delay(5000);",
[debug] [35m[BaseDriver][39m   "platformName": "Android",
[debug] [35m[BaseDriver][39m   "autoAcceptAlerts": "true"
[debug] [35m[BaseDriver][39m }
[warn] [35m[BaseDriver][39m Capability 'newCommandTimeout' changed from string ('500') to integer (500). This may cause unexpected behavior
[warn] [35m[BaseDriver][39m Capability 'uiautomator2ServerInstallTimeout' changed from string ('500000') to integer (500000). This may cause unexpected behavior
[warn] [35m[BaseDriver][39m Capability 'androidInstallTimeout' changed from string ('500000') to integer (500000). This may cause unexpected behavior
[warn] [35m[BaseDriver][39m Capability 'adbExecTimeout' changed from string ('520000') to integer (520000). This may cause unexpected behavior
[warn] [35m[BaseDriver][39m The following capabilities were provided, but are not recognized by Appium:
[warn] [35m[BaseDriver][39m   nativeInstrumentsLib
[warn] [35m[BaseDriver][39m   waitForAppScript
[warn] [35m[BaseDriver][39m   autoAcceptAlerts
[info] [35m[BaseDriver][39m Session created with session id: e854d697-1ed0-481c-b353-0f31eca49d97
[info] [35m[UiAutomator2][39m Starting 'com.********.******' directly on the device
[info] [35m[ADB][39m Using 'adb' from '/Users/mac1/Library/Android/sdk/platform-tools/adb'
[info] [35m[AndroidDriver][39m Retrieving device list
[debug] [35m[ADB][39m Trying to find a connected android device
[debug] [35m[ADB][39m Getting connected devices...
[debug] [35m[ADB][39m Connected devices: [{"udid":"172.16.202.156:5555","state":"device"}]
[info] [35m[AndroidDriver][39m Looking for a device with Android '9.0.0'
[debug] [35m[ADB][39m Setting device id to 172.16.202.156:5555
[info] [35m[ADB][39m Getting device platform version
[debug] [35m[ADB][39m Running '/Users/mac1/Library/Android/sdk/platform-tools/adb -P 5037 -s 172.16.202.156:5555 shell getprop ro.build.version.release'
[debug] [35m[UiAutomator2][39m Deleting UiAutomator2 session
[debug] [35m[BaseDriver][39m Event 'newSessionStarted' logged at 1614153816179 (08:03:36 GMT 0000 (Coordinated Universal Time))
[debug] [35m[MJSONWP][39m Encountered internal error running command: Error: Error getting device platform version. Original error: Error executing adbExec. Original error: 'Command '/Users/mac1/Library/Android/sdk/platform-tools/adb -P 5037 -s 172.16.202.156:5555 shell getprop ro.build.version.release' exited with code 1'; Stderr: 'error: unknown host service'; Code: '1'
[debug] [35m[MJSONWP][39m     at ADB.getPlatformVersion (/Applications/Appium.app/Contents/Resources/app/node_modules/appium/node_modules/appium-adb/lib/tools/adb-commands.js:122:11)
[debug] [35m[MJSONWP][39m Destroying socket connection
[info] [35m[HTTP][39m [37m<-- POST /wd/hub/session [39m[31m500[39m [90m63 ms - 436[39m
[info] [35m[HTTP][39m [90m[39m
[info] [35m[HTTP][39m [37m-->[39m [37mPOST[39m [37m/wd/hub/session[39m
[info] [35m[HTTP][39m [90m{"capabilities":{"desiredCapabilities":{"appPackage":"com.*******.***","uiautomator2ServerInstallTimeout":"500000","deviceName":"172.16.202.156:5555","appActivity":"crc646c9a2553fa37f659.SplashActivity","androidInstallTimeout":"500000","nativeInstrumentsLib":"true","newCommandTimeout":"500","adbExecTimeout":"520000","platformVersion":"9","automationName":"UiAutomator2","browserName":"","waitForAppScript":"$.delay(5000);","platformName":"Android","autoAcceptAlerts":"true"},"requiredCapabilities":{}}}[39m
[debug] [35m[W3C][39m Calling AppiumDriver.createSession() with args: [null,null,{"desiredCapabilities":{"appPackage":"com.********.******","uiautomator2ServerInstallTimeout":"500000","deviceName":"172.16.202.156:5555","appActivity":"crc646c9a2553fa37f659.SplashActivity","androidInstallTimeout":"500000","nativeInstrumentsLib":"true","newCommandTimeout":"500","adbExecTimeout":"520000","platformVersion":"9","automationName":"UiAutomator2","browserName":"","waitForAppScript":"$.delay(5000);","platformName":"Android","autoAcceptAlerts":"true"},"requiredCapabilities":{}}]
[debug] [35m[BaseDriver][39m Event 'newSessionRequested' logged at 1614153816188 (08:03:36 GMT 0000 (Coordinated Universal Time))
[debug] [35m[BaseDriver][39m Event 'newSessionStarted' logged at 1614153816189 (08:03:36 GMT 0000 (Coordinated Universal Time))
[debug] [35m[W3C][39m Encountered internal error running command: Error: Either JSONWP or W3C capabilities should be provided
[debug] [35m[W3C][39m     at parseCapsForInnerDriver (/Applications/Appium.app/Contents/Resources/app/node_modules/appium/lib/utils.js:58:14)
[debug] [35m[W3C][39m     at AppiumDriver.createSession (/Applications/Appium.app/Contents/Resources/app/node_modules/appium/lib/appium.js:296:26)
[debug] [35m[W3C][39m     at commandExecutor (/Applications/Appium.app/Contents/Resources/app/node_modules/appium/node_modules/appium-base-driver/lib/basedriver/driver.js:330:9)
[debug] [35m[W3C][39m     at AppiumDriver.executeCommand (/Applications/Appium.app/Contents/Resources/app/node_modules/appium/node_modules/appium-base-driver/lib/basedriver/driver.js:344:15)
[debug] [35m[W3C][39m     at AppiumDriver.executeCommand (/Applications/Appium.app/Contents/Resources/app/node_modules/appium/lib/appium.js:520:26)
[debug] [35m[W3C][39m     at asyncHandler (/Applications/Appium.app/Contents/Resources/app/node_modules/appium/node_modules/appium-base-driver/lib/protocol/protocol.js:309:34)
[debug] [35m[W3C][39m     at /Applications/Appium.app/Contents/Resources/app/node_modules/appium/node_modules/appium-base-driver/lib/protocol/protocol.js:447:15
[debug] [35m[W3C][39m     at Layer.handle [as handle_request] (/Applications/Appium.app/Contents/Resources/app/node_modules/appium/node_modules/express/lib/router/layer.js:95:5)
[debug] [35m[W3C][39m     at next (/Applications/Appium.app/Contents/Resources/app/node_modules/appium/node_modules/express/lib/router/route.js:137:13)
[debug] [35m[W3C][39m     at Route.dispatch (/Applications/Appium.app/Contents/Resources/app/node_modules/appium/node_modules/express/lib/router/route.js:112:3)
[debug] [35m[W3C][39m     at Layer.handle [as handle_request] (/Applications/Appium.app/Contents/Resources/app/node_modules/appium/node_modules/express/lib/router/layer.js:95:5)
[debug] [35m[W3C][39m     at /Applications/Appium.app/Contents/Resources/app/node_modules/appium/node_modules/express/lib/router/index.js:281:22
[debug] [35m[W3C][39m     at Function.process_params (/Applications/Appium.app/Contents/Resources/app/node_modules/appium/node_modules/express/lib/router/index.js:335:12)
[debug] [35m[W3C][39m     at next (/Applications/Appium.app/Contents/Resources/app/node_modules/appium/node_modules/express/lib/router/index.js:275:10)
[debug] [35m[W3C][39m     at logger (/Applications/Appium.app/Contents/Resources/app/node_modules/appium/node_modules/morgan/index.js:144:5)
[debug] [35m[W3C][39m     at Layer.handle [as handle_request] (/Applications/Appium.app/Contents/Resources/app/node_modules/appium/node_modules/express/lib/router/layer.js:95:5)
[debug] [35m[W3C][39m     at trim_prefix (/Applications/Appium.app/Contents/Resources/app/node_modules/appium/node_modules/express/lib/router/index.js:317:13)
[debug] [35m[W3C][39m     at /Applications/Appium.app/Contents/Resources/app/node_modules/appium/node_modules/express/lib/router/index.js:284:7
[debug] [35m[W3C][39m     at Function.process_params (/Applications/Appium.app/Contents/Resources/app/node_modules/appium/node_modules/express/lib/router/index.js:335:12)
[debug] [35m[W3C][39m     at next (/Applications/Appium.app/Contents/Resources/app/node_modules/appium/node_modules/express/lib/router/index.js:275:10)
[debug] [35m[W3C][39m     at /Applications/Appium.app/Contents/Resources/app/node_modules/appium/node_modules/body-parser/lib/read.js:130:5
[debug] [35m[W3C][39m     at invokeCallback (/Applications/Appium.app/Contents/Resources/app/node_modules/appium/node_modules/raw-body/index.js:224:16)
[debug] [35m[W3C][39m     at done (/Applications/Appium.app/Contents/Resources/app/node_modules/appium/node_modules/raw-body/index.js:213:7)
[debug] [35m[W3C][39m     at IncomingMessage.onEnd (/Applications/Appium.app/Contents/Resources/app/node_modules/appium/node_modules/raw-body/index.js:273:7)
[debug] [35m[W3C][39m     at IncomingMessage.emit (events.js:208:15)
[debug] [35m[W3C][39m     at endReadableNT (_stream_readable.js:1168:12)
[debug] [35m[W3C][39m     at processTicksAndRejections (internal/process/task_queues.js:77:11)
[debug] [35m[W3C][39m Destroying socket connection
[info] [35m[HTTP][39m [37m<-- POST /wd/hub/session [39m[31m500[39m [90m55 ms - 667[39m
[info] [35m[HTTP][39m [90m[39m
Вероятно, это известная проблема: https://github.com/appium/appium/issues/12736 (в чем они обвиняют adb вместо того, чтобы признать это). Вы можете запустить adb shell getprop ro.build.version.release ?
Примечание:
1. Для поиска других кодов неисправностей воспользуйтесь поисковой строкой. Введите свой код неисправности в поле поиска и отправьте поиск.
2. Информация, содержащаяся на этом сайте, представлена исключительно в информационных целях. Мы не несем ответственности за любые действия, предпринятые вами в отношении вашего автомобиля. Если у вас есть какие-либо сомнения относительно ремонта вашего автомобиля, обратитесь к своему техническому специалисту.
Поиск всех кодов ошибок на одном сайте. Расшифровка Кодов ошибок obd2 по маркам автомобилей.
Знайдено кодов ошибок: 1
Код ошибки:
Значение ошибки
Похожие причины кодов
Коды ошибок по маркам автомобилей
Примечание:
1. Для поиска других кодов неисправностей воспользуйтесь поисковой строкой. Введите свой код неисправности в поле поиска и отправьте поиск.
2. Информация, содержащаяся на этом сайте, представлена исключительно в информационных целях. Мы не несем ответственности за любые действия, предпринятые вами в отношении вашего автомобиля. Если у вас есть какие-либо сомнения относительно ремонта вашего автомобиля, обратитесь к своему техническому специалисту.
Copyright © 2021. Коды ошибок OBD-II с расшифровкой на русском языке — возможные причины, описание и варианты по устранению ошибок.